
If you’ve ever wanted to make a paper mache mask for any reason, you’ve come to the right place; we’re going to show you exactly how to do it in easy-to-follow steps. For holidays, Halloween, crafting with kids, or just for fun, paper mache masks are versatile and a great way to get away from the screen and get crafting.
What You’ll Need:
- Plenty of newspaper
- White flour or wood glue
- Masking tape
- Scissors
- Mixing bowls
- Water
- Strong ribbon or twine
- Wire sculpting mesh
- Sandpaper
- Sealant
- Acrylic paints in a mix of colors
- Measuring cups or other containers for glue, paint, etc.
- Paintbrushes
- A tape measure
- Pencils, paper, and a marker pen
- A ruler
- Primer
- Paper mache clay
- Tools for sculpting with
- A drill or an awl
Step 1: Mapping Out The Face
For this step, you need to measure the face of whoever is going to wear the mask. Use your measuring tape to measure from the top of the forehead to the chin, and then take a piece of paper and draw a straight line down the center, with small markers at the top and bottom to reflect the top and bottom of the person’s face.
Next, measure from the top of the forehead to the subject’s eyes, and draw a horizontal line across the paper at the right height. You will now have a “plus” symbol on your piece of paper. Mark the horizontal line as “eyes.”
Measure to the bottom of the nose and mark this on the piece of paper, and then measure between the subject’s eyes and out to their ears. Mark each measurement on your paper plan; you’re going to use this to sketch out your mask.
Step 2: Draw The Mask
Using your markers as guides, draw yourself the mask you would like to create. You can get as creative as you like, though if it’s your first try, stay reasonably simple. Use the markers you have drawn as guides to make sure that the eye holes end up in the right positions.
Cut out the paper and hold it up to your face or your subject’s face to see how it looks. It won’t conform to your face shape, but it should give you an idea of whether you like the design and how it will fit. You can make any changes by just re-drawing the mask on another sheet of paper.
Step 3: Transferring To Mesh
Next, you’re going to be using the mesh to create the shape of your mask. You might have seen child-friendly versions of this which use a balloon for this step, but you’ll get much better and far more detailed results with wire mesh.
Smaller holes make the mesh easier to cover smoothly and accurately, but you can use larger hole mesh if that’s what you have. It will still work well.
Set your paper pattern on top of the mesh, parallel to the grain. You might want to use some pegs to hold it in place so it can’t slip. Take your marker pen and trace around the edge.
Don’t feel you have to press the pen against the outline. Drawing a little generously will give you more mesh to bend and shape, and remember that you can trim it down if you need to.
Step 4: Cutting The Mesh
Take some craft scissors for cutting out the mesh. Be careful not to cut yourself on any sharp edges. Cut around the outline you have drawn, but leave the eye holes as they are for now; you can cut those out later.
Step 5: Shaping The Mesh
Use your hands to start adding shape to the mask. You can gently fold and curve parts to give it a 3D effect. This is particularly effective if you are creating horns or tentacles.
Hold the mesh to your face and gently press it into place, shaping it to the contours of your skin (or your subject’s skin). Press along the curves of your eyes, nose, cheeks, and forehead to get a smooth, close fit.
Do this several times, smoothing out any parts you aren’t happy with and shaping it until it fits your face well and looks the way you want it to. If you need to trim off any excess mesh, you can now do so.
Step 6: Cutting Out The Eyes
Now the mask is the right shape, cut the eye holes carefully using your craft scissors. Mind that you bend any sharp bits of the mesh over away from your face so you don’t hurt your eyes.
Step 7: Create A Paste And Tearing Paper Strips
Using glue or flour, mix yourself a good paste for the paper mache. You can add water to make the glue wetter if it’s too thick, but remember that a wet mix will take longer to dry. If you’re making a flour paste yourself, use a reputable recipe or one you have tried before.
Next, take your newspaper and begin tearing it into long strips. You don’t need to be neat; just tear yourself lots and lots of strips of varying thicknesses. Newspaper tears easily in one direction, so find which it is and use that to your advantage.
You can tear several sheets at once to speed up the process. Once you have a good stack, you’re ready to move on to the next step. You can always tear more later if you need to.
Step 8: Add Paper Strips To The Front Of The Mask
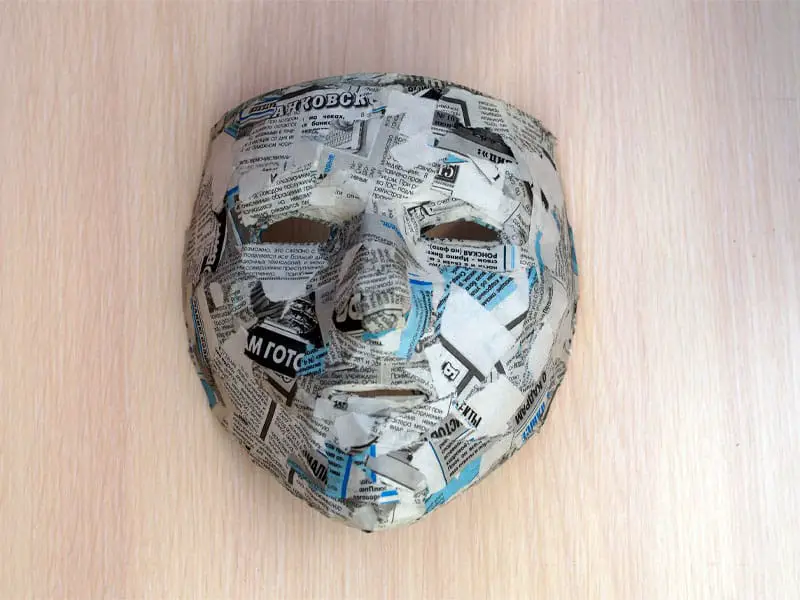
Take a newspaper strip, add some glue or paste to it, and stick it to your mask. Carry on doing this with the other strips until you have completely covered the whole face of the mask, leaving no gaps. Try to paste the strips down smoothly, pressing out bumps or creases to create a nice finish overall. Don’t rush this part.
Curve the strips around to fit the mask, tearing them off so that they end at the edges of the mesh and don’t stick out. It doesn’t matter if strips overlap, but avoid getting any lumps. If your glue is too thick, water it down a little.
Allow the first layer to dry slightly, and then repeat with a second layer, again making sure you cover all the gaps. This will be harder to see with the second layer, so work methodically and take your time.
Once you have stuck a full two layers over the whole front of the mask, set it down and allow it to dry enough that the strips will stay in place if you touch them. This may take an hour or two.
You May Also Like: How to Make a Masquerade Mask
Step 9: Add Paper Strips To The Back Of The Mask
Flip the mask over and repeat the same process on the back of the mask, so that you again have two smooth layers of paper strips, completely covering the mesh, but not sticking out past the edges of your mask. You can trim any parts which do stick out.
Allow these layers to partially dry before moving on.
If you want a more durable mask, you can keep adding to the layers on the front and back, but two layers on each should be sufficient.
Step 10: Add Paper To All Exposed Edges
Take some more paper strips and some more glue, and start covering the exposed edges of the mask. The new strips should glue to the mostly dry strips on either side fairly easily, so tuck them around and stick them firmly into place.
You may want to tear some strips very narrow for tight corners so that you get a nice, smooth edge with no crinkles or creases. This will make the mask look a lot better once it’s finished. If an edge looks tricky, experiment with how to fold and tuck the strip of paper before you try gluing it in place.
Now, leave the mask to dry thoroughly; this may take a while, but be patient as you don’t want to be working with damp newspaper for the next part.
Step 11: Start Adding Detail
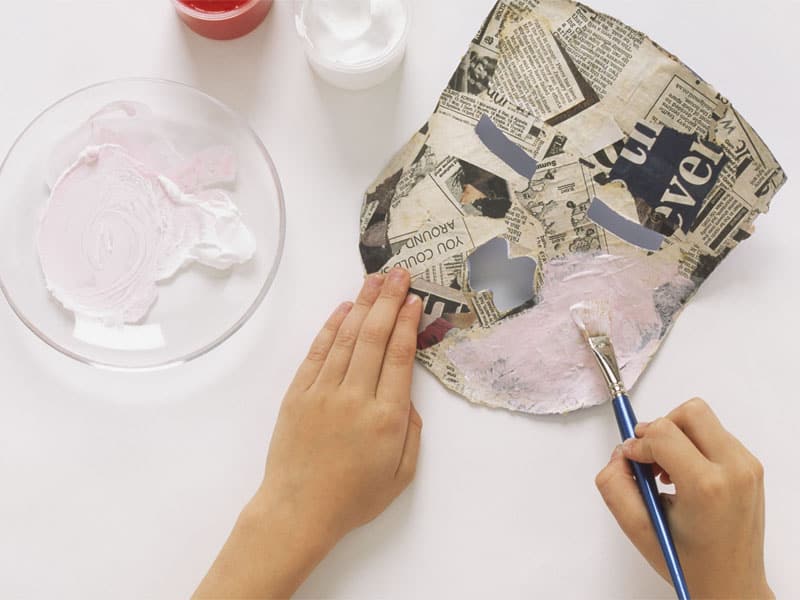
Once the mask is completely dry, grab your paper mache clay and get busy! Start by molding some clay in your fingers to the approximate shape you want, and then begin applying it to the mask.
You can add a little bit of water to the mask if you find the clay isn’t sticking or shaping well; just dab your fingers in some and rub it along the paper. You can use this trick to make the edges of the clay smooth as well.
Sculpt interesting shapes or patterns on the mask, add horns, warts, eyebrows, wrinkles, contours, or anything else. Do remember not to make very big or delicate shapes that are likely to get knocked off or bumped on things, or you might ruin your mask.
If you want, you can use sculpting tools or a knife to create details or textures in the clay. Try things out gently and smooth over them if you aren’t happy, but remember that once you are pleased with an effect, it needs to be clear enough that it will still stand out after you’ve painted the mask. Feather-light touches won’t do here!
If you want an ultra-smooth mask, you can cover the whole surface of the mask with clay, hiding all the newspaper. However, remember that this will add to its weight. The clay will not be as light as the paper mache, so don’t add so much that the mask becomes uncomfortable to wear.
If you have to leave the project at any point, remember to put your clay in an airtight container so it doesn’t dry out and get spoiled! Don’t leave something like a horn halfway through sculpting or you might find it’s dried before you get back.
Step 12: Sanding The Clay
Once the clay is dry, get some sandpaper and begin gently sanding down any rough edges. You should wear a dust mask for this so you don’t breathe in any of the dust. Move slowly, taking the time to create a really good, smooth surface.
Where the clay joins the newspaper, carefully sand the edges of both to create a nice join. This will make it harder for anyone to tell that the two surfaces are different, providing a great overall look. Once it’s painted, you probably won’t be able to see the join at all.
Use a few different grades of sandpaper for this step to get a really even finish. Work gently and slowly to avoid damaging the mask, and don’t press too hard. Remember to brush away all the dust with a soft paintbrush or wipe the mask with a slightly damp cloth and allow it to dry before moving on.
Step 13: Using A Primer
To make the mask even smoother, it’s time to apply a coat of primer to it. There are lots of different options available on the market; you might want to experiment with different ones or stick with a brand you like.
Apply a smooth coat of your primer. You can add water if you want to make it thinner and add more coats. Try to apply it evenly, brushing away any drips or pooled areas before you leave the mask to dry. Remember that these will show up if they are allowed to sit.
Once the first coat is fully dry, add another coat. You can add as many coats as you want to the mask; the more you add, the stronger and smoother it will be. However, bear in mind that you will need to leave enough drying time between each coat, which will make the project take longer overall. Primers can take a couple of hours to dry.
Step 14: Painting
Once the primer coats are totally dry, you can get painting! Acrylics are probably the best option for this, but if you can only get watercolors, mixing some wood glue in them will make them more durable and give you a better finish.
Decide what colors you’re going to use before you start painting; you don’t want to muck the mask up after all that work. Test your colors out on scrap paper or dry clay before you apply them to the mask, especially if you’re mixing them yourself, to make sure you’re satisfied with the shade.
You may wish to prime the mask with a light or dark primer first, depending on the overall look you want to achieve. This will ensure that you get an even color across the whole mask, rather than darker areas for the newspaper and lighter ones for the clay. However, this is not a necessary step.
If you want to create a shaded look, paint the whole area in a single base color. Next, add a little white or black to the same base color in your palette and use that to either slightly lighten or slightly darken the particular area which you want to shade. This is very effective for adding shadows or highlights, especially on horns or other protrusions.
Remember to clean your brushes thoroughly and use fine brushes for fine details on the mask. A large brush is great for quickly applying blocks of color evenly, however.
Read Related Topic: How to Make a Chevron Bracelet
Step 15: Sealing Your Mask
Don’t skip this step! It might not feel necessary, but adding a coat of sealant will help to protect your paintwork and prevent it from chipping, and is particularly important if you plan to wear the mask outside.
You can use different finishes to create a glossy or matte effect on the mask, but this is definitely worth putting the time and effort into. It will make your mask last a lot longer than it might otherwise do.
You can use a couple of coats of sealant, letting them dry in between each coat, for the best effect.
Step 16: Add The Fastener
Now it’s time for a fastener to make sure your mask fits snugly to your face. Make sure that whatever you use to tie it is strong enough to hold; you really don’t want your mask falling off and potentially breaking.
You can use a drill, a sturdy hole punch, or an awl to create holes in the sides of the mask. Make them as small as you can while still fitting your thread through, and don’t make them too close to the edges or you may find the paper mache tears after some use.
Knot the ribbon or twine firmly in place, one length on either side. Give both sides a light tug to check they are holding, and then put the mask on and tie it behind your head Voila, you have a beautiful, professional, detailed mask, just perfect for any costume party!
If you’re really worried about the fasteners, use a spot of glue to secure them in place.
Wrapping Up
Hopefully, you found the tutorial useful and clear. It’s great to spend some time crafting and creating, and the wonderful thing about masks is that there’s no limit to the designs you can try or the fun you can have. Get paper mache-ing and keep expanding your costume wardrobe!
Comments
0 comments