


Model Magic is Crayola’s soft, spongy air-dry modeling compound. It is non-toxic, sticks to itself, and dries lightweight with a slightly springy feel, so it works for everything from finger puppets to statement earrings. The one downside is the price compared with other modeling clays.
Below are 37 Model Magic ideas with materials, ages, drying times and short steps, plus a cheaper homemade alternative if you run out.
Model Magic Basics
- Drying: Crayola says pieces are dry to the touch in about 24 hours and fully dry in about 72 hours. Thick pieces take longer.
- Color: Buy white and color it with washable markers (knead them in) instead of buying every color. Mixing two colors makes new ones.
- Painting: Once fully dry, you can paint with acrylic, tempera or washable paint.
- Sealing: Crayola recommends acrylic varnish on dry pieces. Test a small piece first, and note that sealing does not make it waterproof. Mod Podge is a popular sealer, but only after the piece is fully dry.
- Water: Dry Model Magic softens in water. Don’t use it for vases that hold water or for anything that holds food.
- Where to buy: Hobby Lobby and craft stores sell it, as do Crayola and online shops.
- Small parts: Googly eyes, beads and clay bits are choking hazards for children under 3. Supervise young kids closely, and store leftover clay in an airtight bag.
37 Easy Crayola Model Magic Projects
1. Finger Puppets
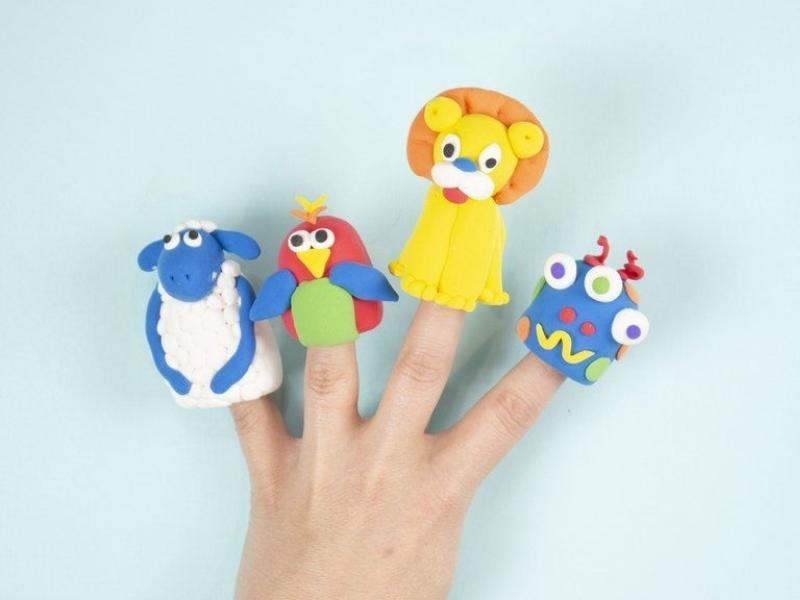
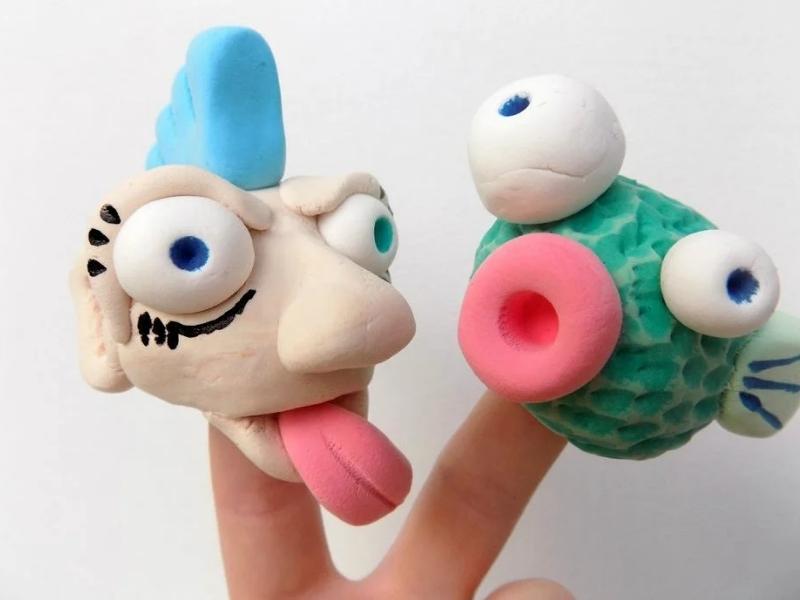
Ages 5+ | Easy | 30 minutes plus drying
Buy white Model Magic and color it with markers instead of buying a big color pack. Pinching, pulling and snipping with scissors shapes the details.
- Knead a marble-size piece of white clay with a marker to color it, then wrap leftovers airtight.
- Shape a body that fits over a finger, leaving the base hollow.
- Add ears, arms and faces from small colored pieces.
- Dry for 24-72 hours.
Model Magic Finger Puppets from Instructables. Also see instructables.com.
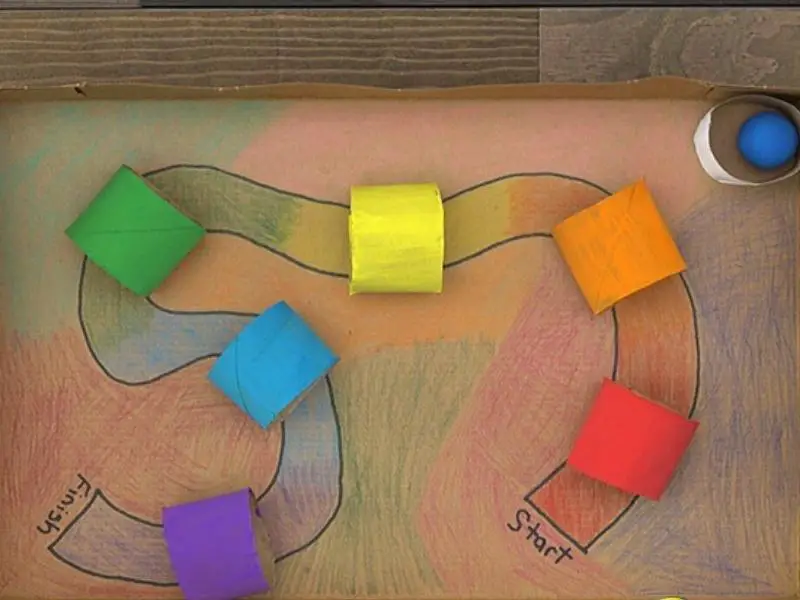
2. Marble Maze
Ages 6+ | Medium | 1 hour plus drying
Kids balance a clay marble through a maze. You need empty paper towel rolls, washable paint, colored pencils, paintbrushes, markers, glue and scissors.
- Paint and decorate the cardboard base and tube walls.
- Glue tube segments to form a maze.
- Roll a Model Magic ball for the marble and let it dry.
- Tilt the maze to roll the marble through.
Model Magic Marble Maze from Crayola
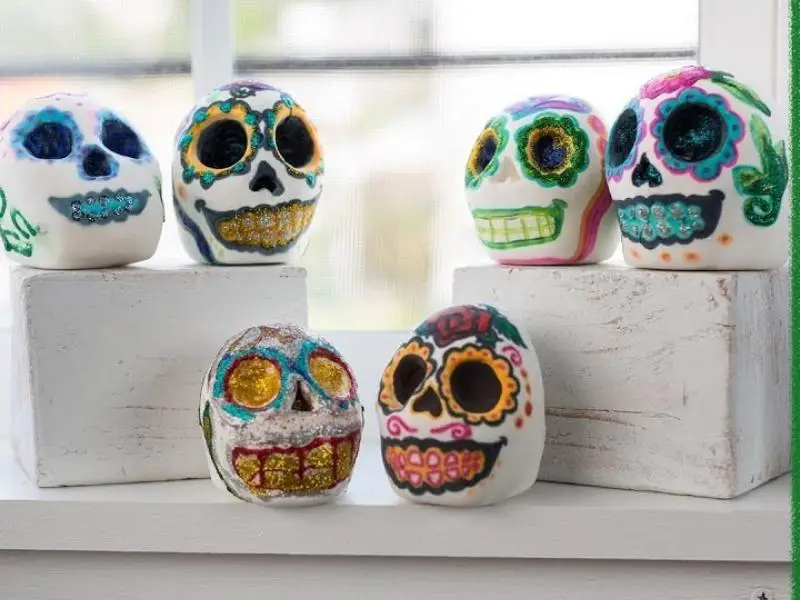
3. Sugar Skulls
Ages 7+ | Medium | 45 minutes plus drying
Sugar skulls are traditional decorations in Mexico’s Dia de los Muertos. Sculpt them from Model Magic and decorate with glitter glue.
- Shape a rounded skull and press in eye sockets.
- Add patterns with a toothpick or pencil.
- Dry fully.
- Decorate with glitter glue and markers.
Sugar Skulls from Crayola
4. Texture Stamps
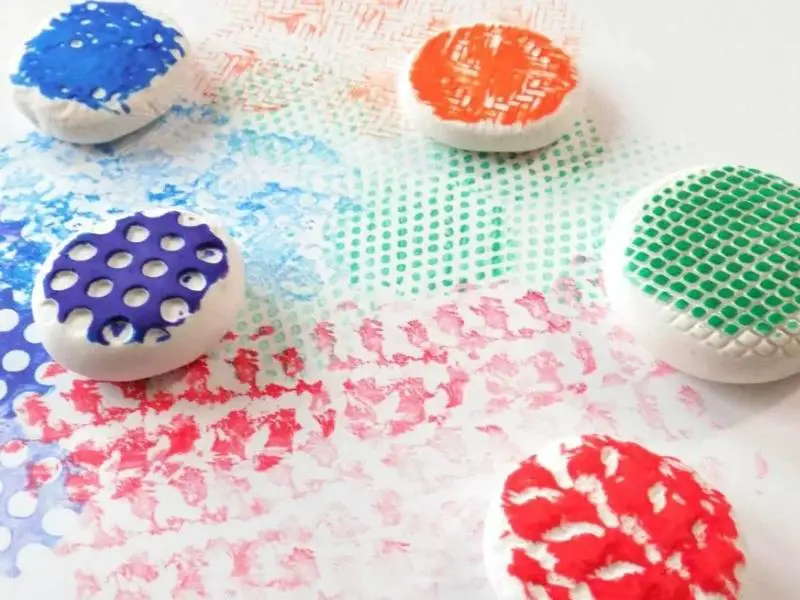
Ages 4+ | Easy | 20 minutes plus drying
Press clay onto textured objects (leaves, buttons, bottle caps) to make stamps for paper.
- Flatten a piece of clay into a small disc.
- Press a textured object into it and lift off.
- Dry for 24-72 hours.
- Dab with washable paint and stamp.
Texture Stamps Craft from Instructables
5. Necklaces and Beads
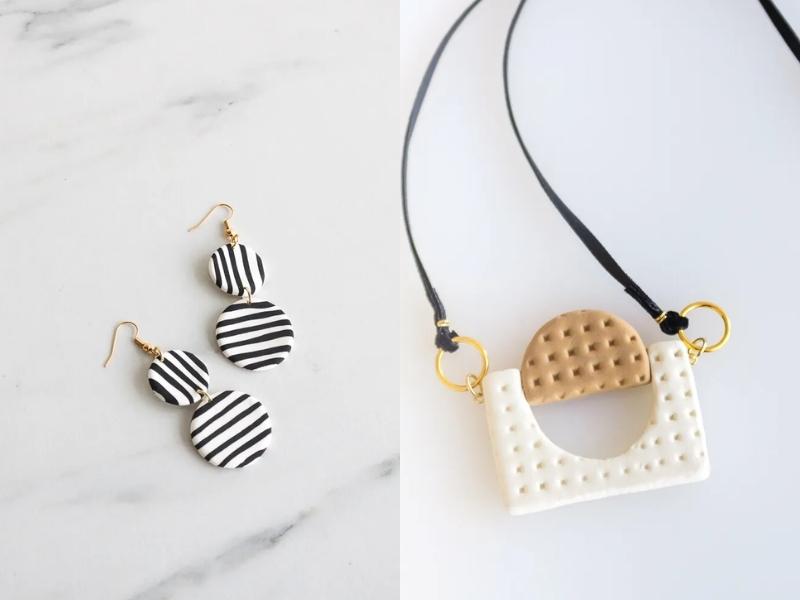

Ages 5+ | Easy | 30 minutes plus drying
Roll two colors together for a marbled look, or cut chunky shapes with cookie cutters and play dough tools. Because the clay is light, big pieces are comfortable to wear. Beads and small shapes are choking hazards under age 3.
- Roll out the clay about 1/4 inch thick on a smooth surface.
- Cut shapes with cookie cutters.
- Poke a hole with a straw or skewer.
- Dry, then thread onto string or cord.
Model Magic Necklaces and Earrings from Think.Make.Share. Find out more from mamagooliving.com.
6. Earrings
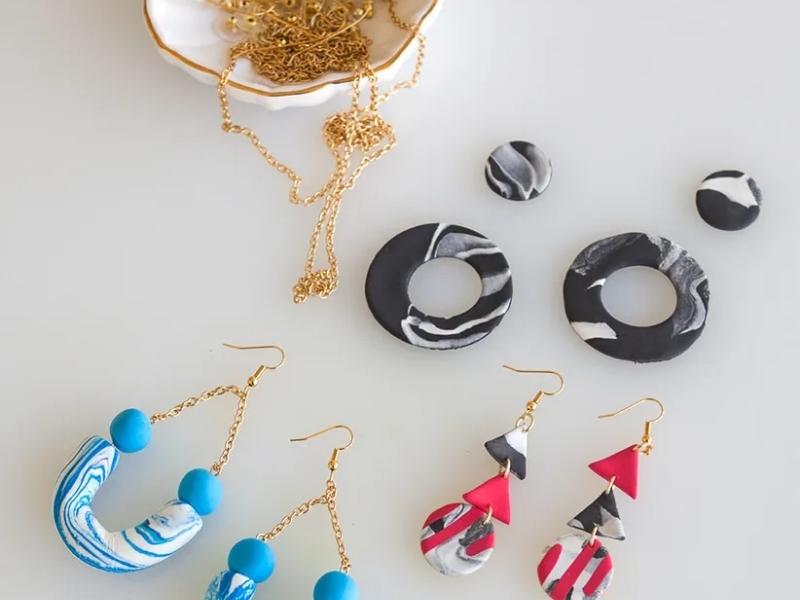
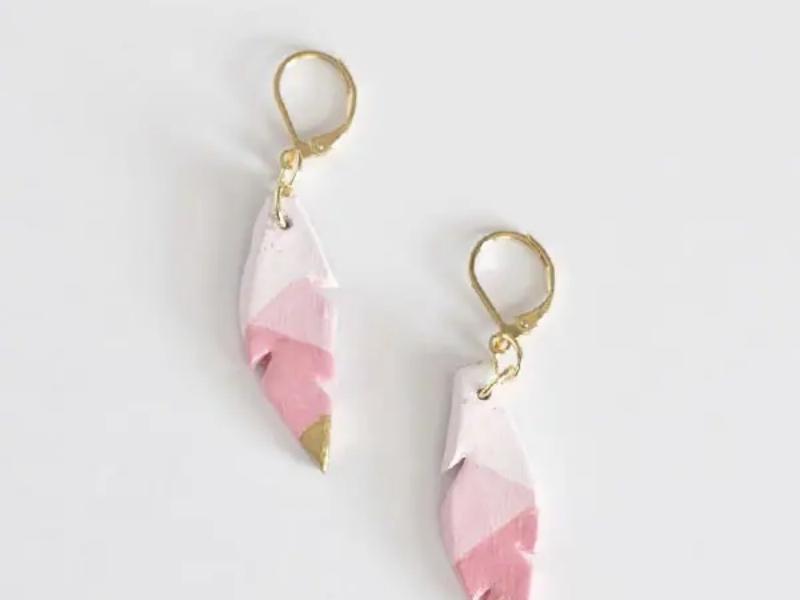
Ages 10+ | Medium | 45 minutes plus drying
The lightweight clay makes large earrings that don’t drag on the ear. Swirl two shades of one color for an ombre look, then paint once dry. Use nickel-free hooks if ears are sensitive.
- Cut or shape the pieces and poke a hole near the top.
- Dry fully before painting.
- Paint and let dry.
- Attach earring hooks with jump rings.
Get the knowledge from thinkmakeshareblog.com. For feather earrings, visit Little Red Window.
7. Cookie and Holiday Ornaments
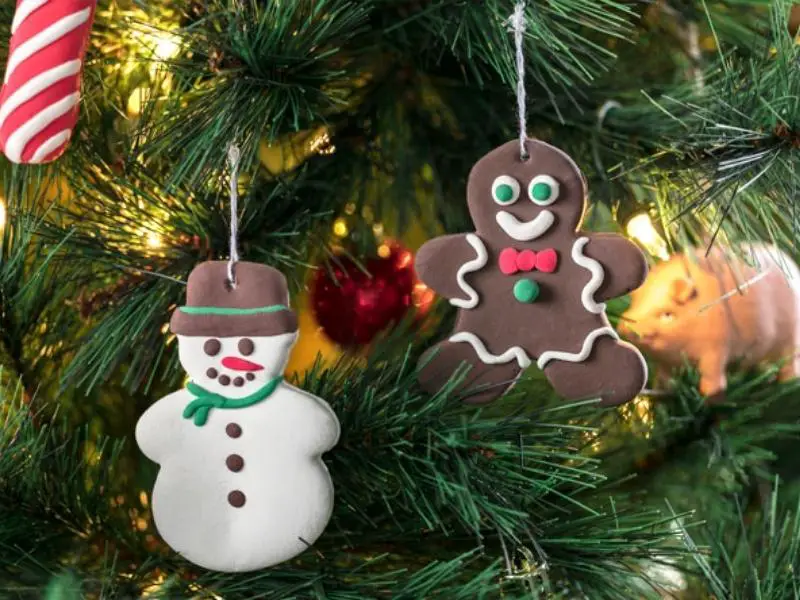
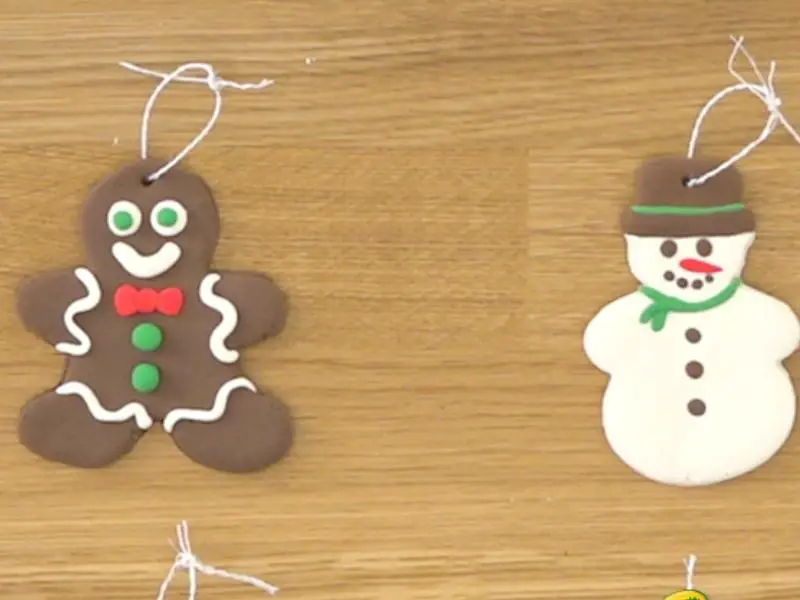
Ages 5+ | Easy | 30 minutes plus 24+ hours drying
Cut shapes with cookie cutters to make cookie-style or holiday ornaments that can be kept for years.
- Flatten the clay and cut shapes with cookie cutters.
- Punch a hole with a straw.
- Dry at least 24 hours.
- Decorate with markers, paint or more clay, then loop string through the hole.
Cookie Ornaments from Crayola. Find out how at crayola.com.
8. Ant Stick Puppets
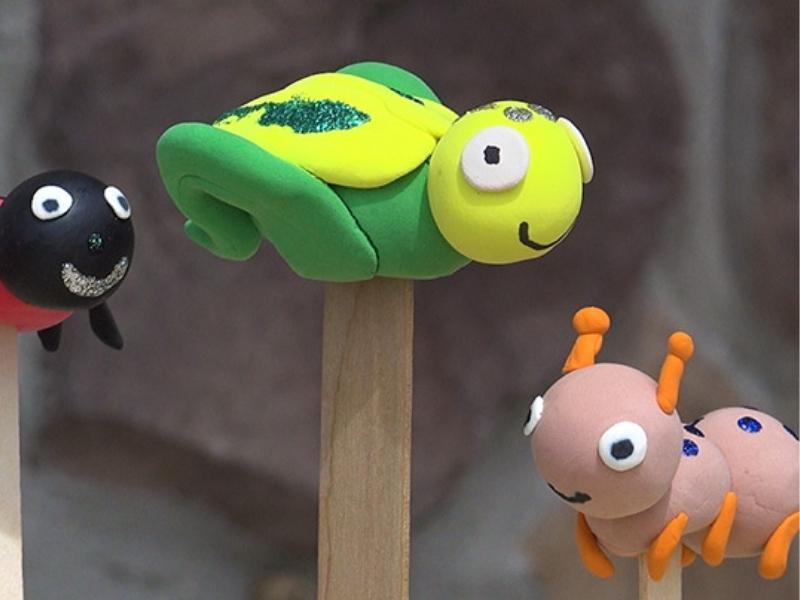
Ages 4+ | Easy | 20 minutes plus 24 hours drying
Three clay balls on a craft stick make an ant for a puppet show.
- Roll three balls of clay in graduated sizes.
- Press them onto a craft stick.
- Add legs, antennae and eyes from clay or markers.
- Dry for 24 hours.
Ant Stick Puppets from Crayola
9. Father’s Day Toolbox
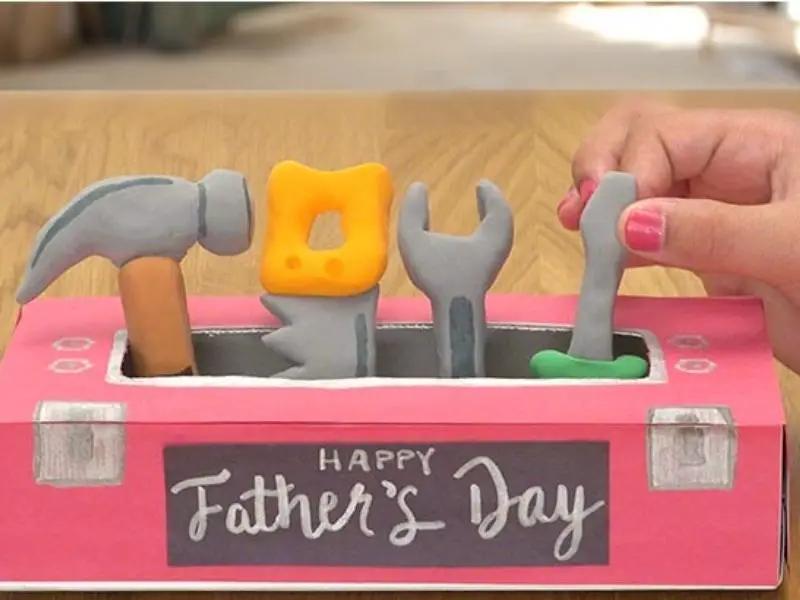
Ages 6+ | Medium | 1 hour
A small toolbox made from an empty tissue box, with clay tools inside. You also need construction paper, glue, markers, a pencil and scissors.
- Cover the box with construction paper.
- Mold tools such as a hammer or wrench from clay and let dry.
- Decorate the box with markers.
- Fill with the tools.
Father’s Day Toolbox from Crayola
10. Butter Slime
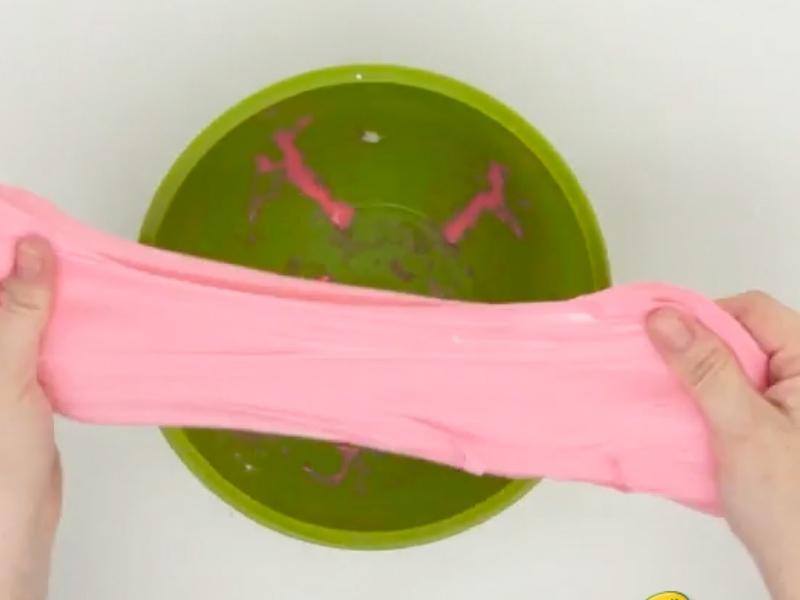
Ages 8+ | Medium | 30 minutes
Crayola’s butter slime mixes Model Magic into a glue slime. You need glue, baking soda, lotion, water and contact lens solution as the activator. Adults should supervise, and slime isn’t for children who still mouth things. Wash hands afterward.
- Mix glue, a pinch of baking soda and lotion in a bowl.
- Stir in contact lens solution a little at a time until the slime pulls away from the bowl.
- In another bowl, stir Model Magic with a little water until it softens.
- Knead the two mixtures together.
Model Magic Butter Slime from Crayola
11. Flower Pencil Toppers
Ages 5+ | Easy | 30 minutes plus drying
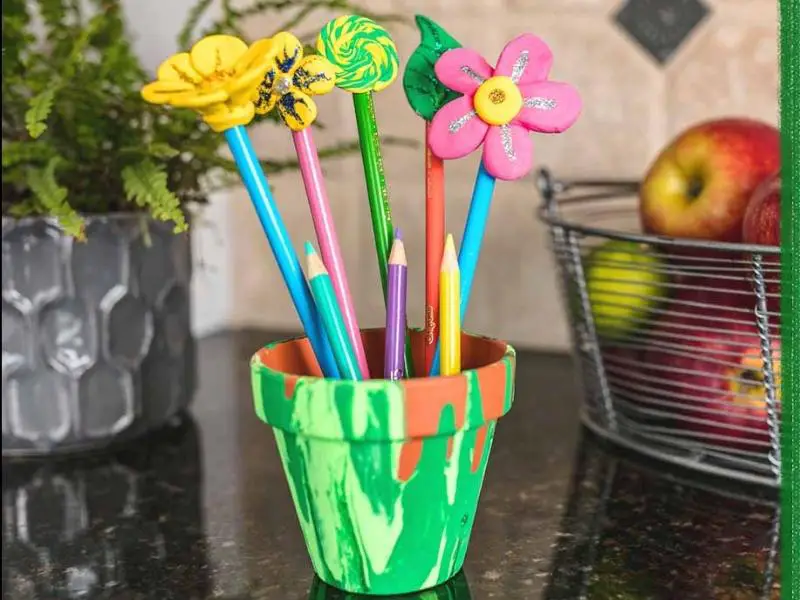
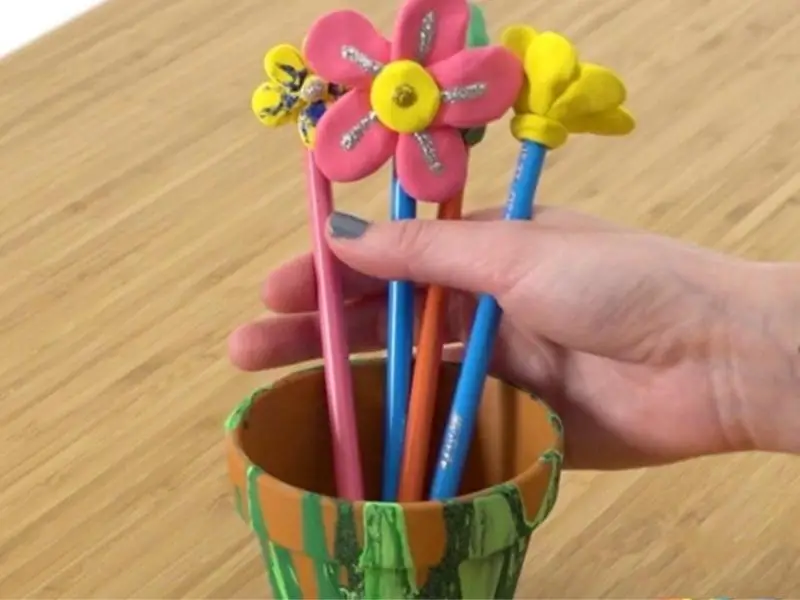
Press a ball of clay onto the end of a pencil and build a flower from petals. A small clay pot can hold the “bouquet”.
- Roll a small ball of clay and press it onto the pencil end.
- Add petals in a bright color and a center dot.
- Dry for 24 hours before using.
- Optional: make a pot to hold the pencils.
Flower Pencil Toppers Craft from Crayola. Find out more at crayola.com
12. Bookmarks
Ages 5+ | Easy | 20 minutes plus overnight drying
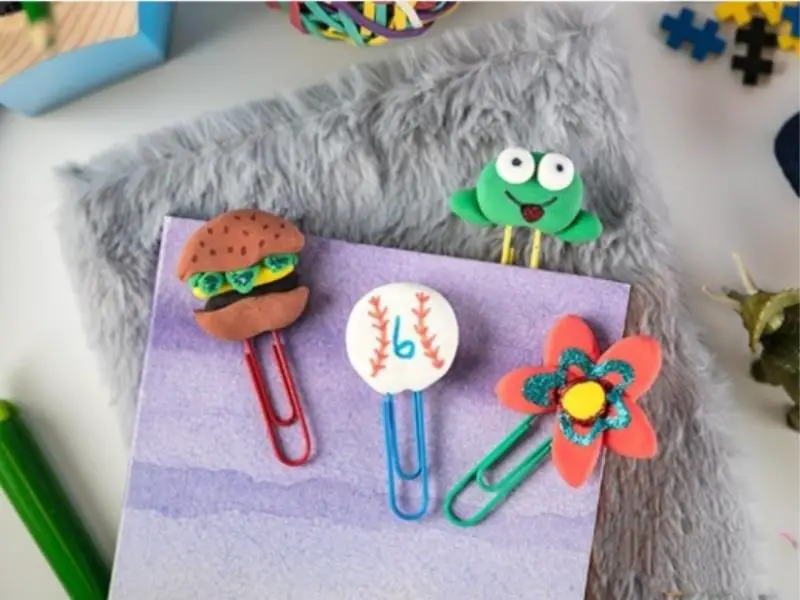
Make a bookmark in any shape, then stick a large paper clip into the bottom. Add glitter glue and markers once dry.
- Shape an animal or food on a flat base.
- Push a large paper clip into the back.
- Let harden overnight or longer.
- Decorate with markers or glitter glue.
Model Magic Bookmarks from Crayola. Get the instructions at crayola.com
13. Jar Lids
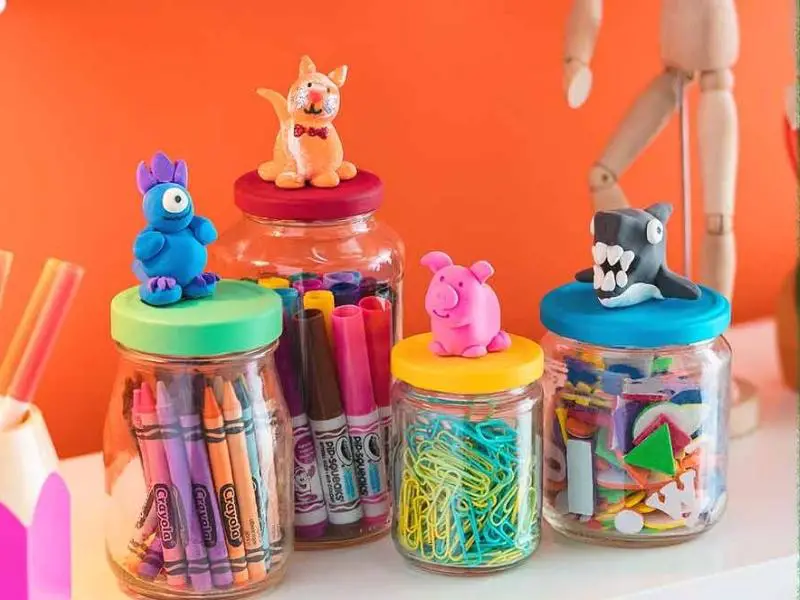
Ages 7+ | Medium | 45 minutes plus drying
Upcycle jars by topping lids with clay sculptures. You need acrylic paint, paintbrushes, glue, disposable cups, craft sticks and jars with lids. Fine for dry storage like buttons or beads, not for food.
- Mold a shape on top of a lid and let dry.
- Paint it.
- Glue it in place and let the glue set.
Model Magic Jar Lids from Crayola
14. Rock Animals
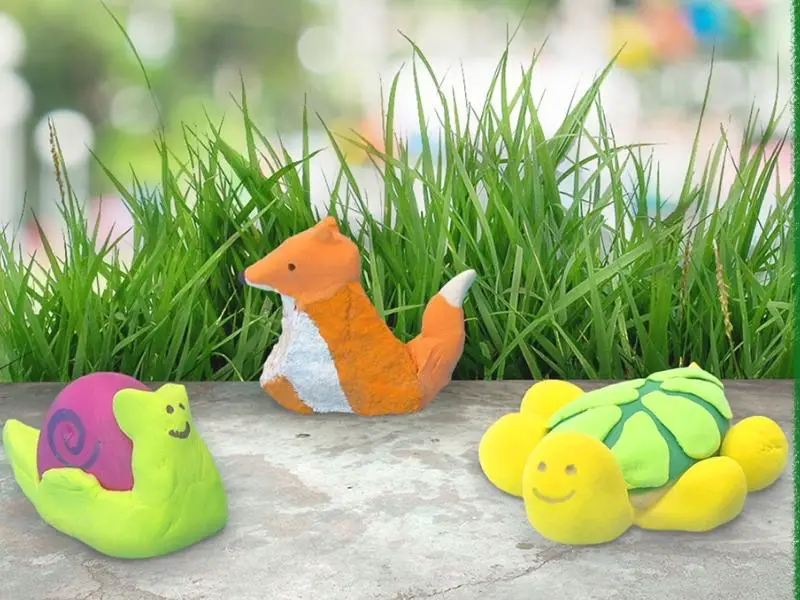
Ages 4+ | Easy | 30 minutes plus drying
Snails and turtles are the suggested animals, but any creature works on a smooth rock from the yard.
- Wash and dry a rock.
- Mold a head, legs or shell details from clay and press onto the rock.
- Dry for 24+ hours, then paint.
Model Magic Rock Animals from Crayola
15. Handprints
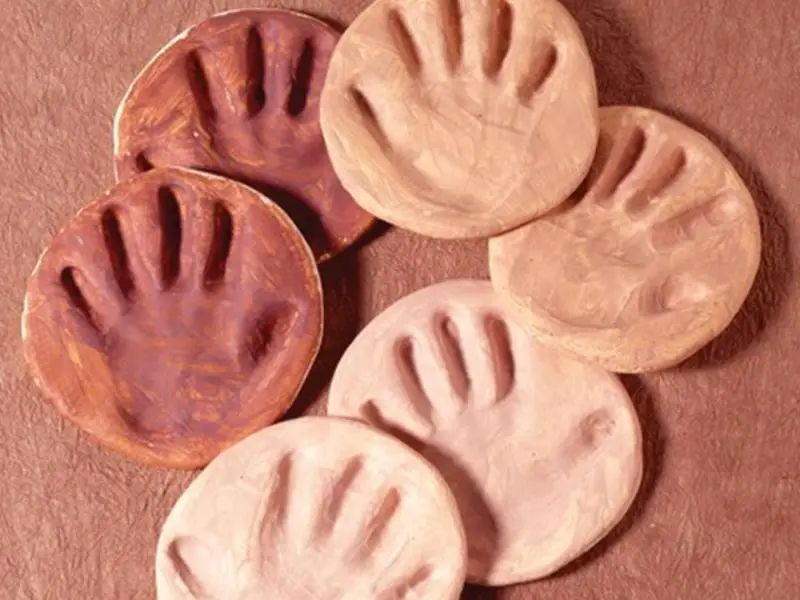
Ages 2+ with an adult | Easy | 15 minutes plus drying
Keep a record of small hands. An adult should handle and press hands.
- Roll a thick slab of clay.
- Press a hand gently into it.
- Add a hole at the top if hanging.
- Dry for 72 hours.
Handprints Model Magic Craft from Crayola
16. Piggy Bank
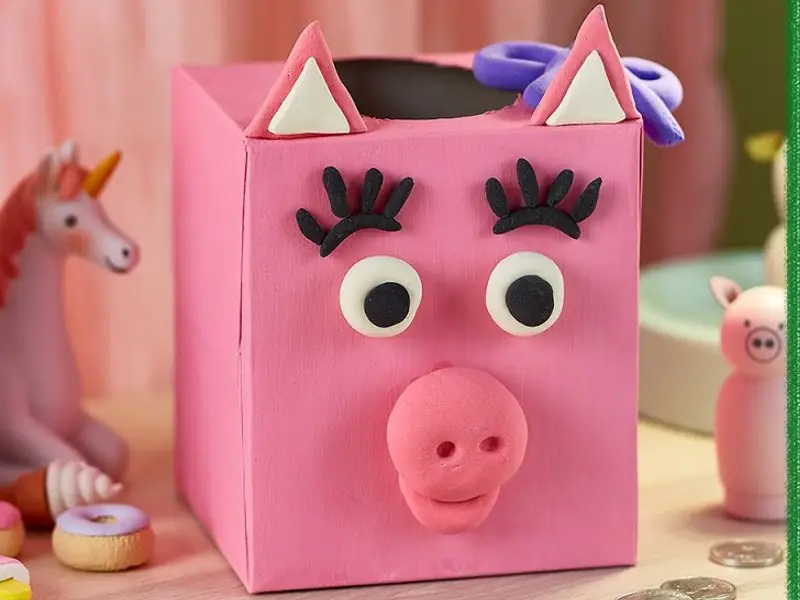
Ages 7+ | Medium | 1 hour plus drying
Turn an empty tissue box into a piggy bank. Mix red and white paint to make piggy pink. Let the clay harden before you glue it on.
- Shape snout, ears, feet and a tail from clay and dry them.
- Paint the box pink and the pieces to match.
- Glue the pieces on.
- Cut a coin slot in the top (adult job).
Model Magic Piggy Bank from Crayola
17. Fish Tank
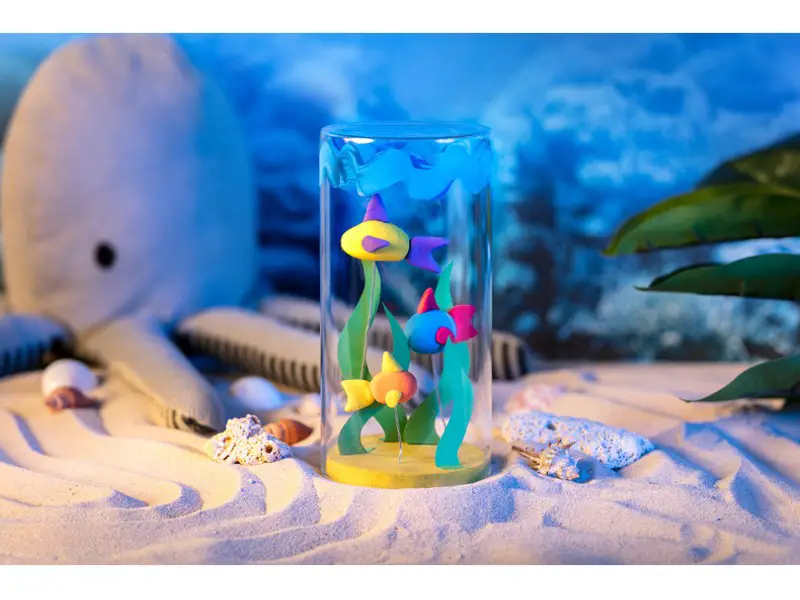
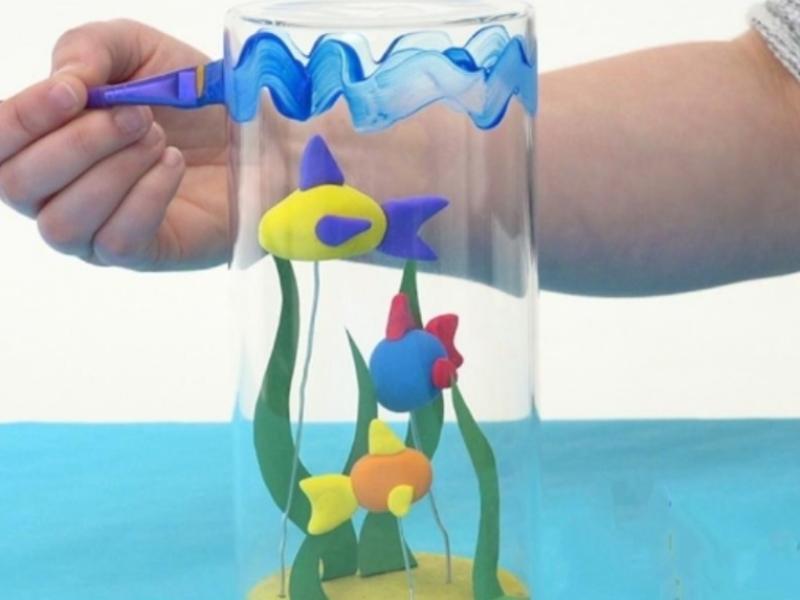
Ages 6+ | Medium | 1 hour plus drying
Build a tiny aquarium in a jar or clear cup. You need construction paper, washable paint, a jar with a lid, paper clips and blunt-tip scissors.
- Mold fish from clay and dry them.
- Paint a blue waterline on the jar and glue paper seaweed inside.
- Attach the fish to paper clips or glue them in.
- Close the lid.
Magic Clay Fish Tank from Crayola. Get the list of tools and the how-to at crayola.com
18. Frankenstein Pumpkin
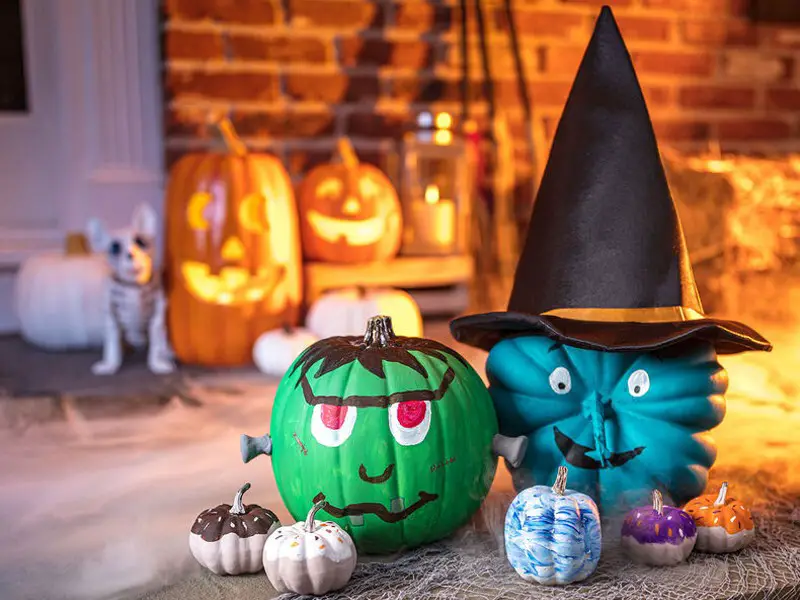
Ages 5+ | Easy | 30 minutes
A no-carve pumpkin: use green clay for a Frankenstein face and a real or craft pumpkin.
- Cover a pumpkin face area with green clay.
- Add bolts, a flat head and stitches from other colors.
- Press firmly to stick.
Model Magic Frankenstein Pumpkin from Crayola
19. Dragonfly
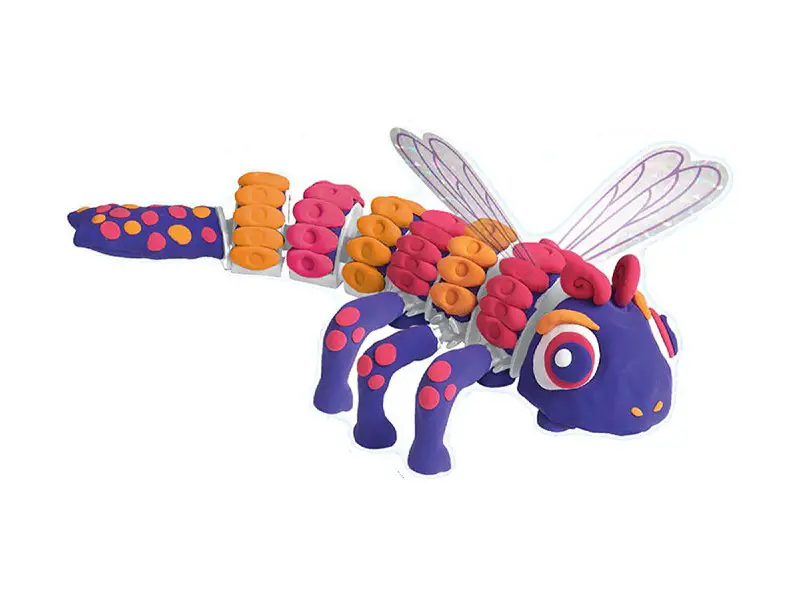
Ages 5+ | Easy | 30 minutes plus drying
Mold a dragonfly body and attach wings from another craft material.
- Roll a long thin body.
- Add a head and eyes.
- Attach wings and let dry.
Model Magic Dragonfly from Crayola
20. Frogs with Wiggly Tongues
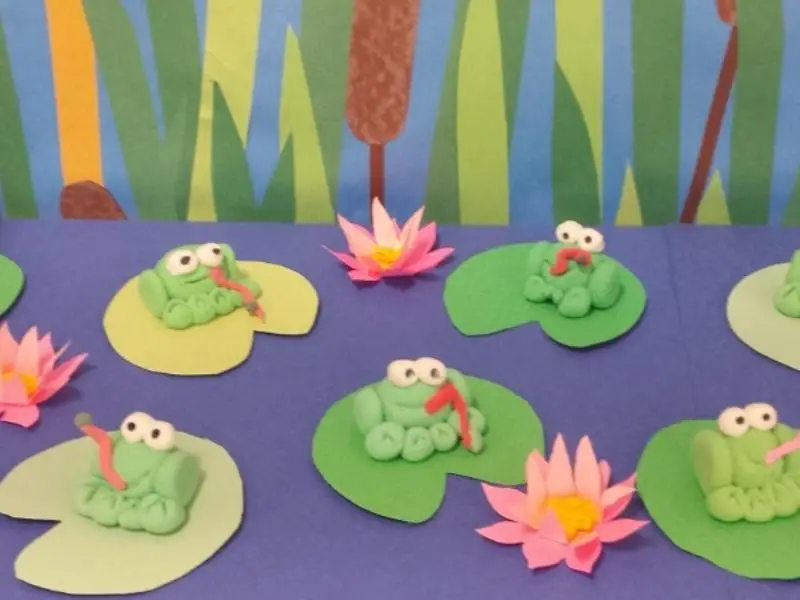
Ages 4+ | Easy | 30 minutes plus drying
Little frogs with a wiggling tongue. For extra challenge, add a lily pad for the frog to sit on.
- Shape a rounded body from green clay and pinch out two back legs.
- Add two eye bumps and a mouth line with a toothpick or pencil tip.
- Roll a thin pink tongue and tuck it under the mouth.
- Make a flat green lily pad, set the frog on it and dry for 24-72 hours.
See the pictures at jamestownart.blogspot.com
21. Among Us Characters
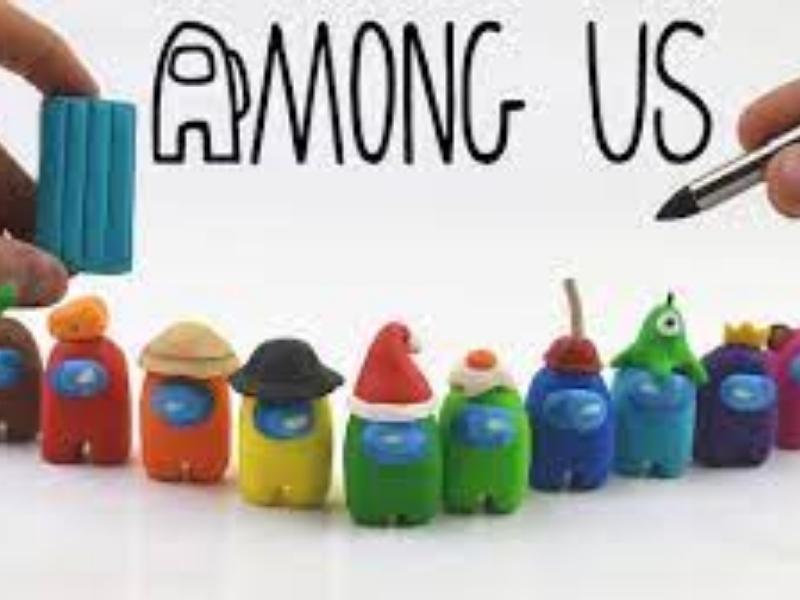
Ages 6+ | Easy | 30 minutes plus drying
A video guide shows how to shape the characters and mix colors from the ones you have, which also teaches kids color mixing.
- Roll a bean-shaped body from your base color.
- Flatten a small oval of light blue or gray for the visor.
- Add a backpack shape on one side.
- Press pieces together firmly and let dry.
Check out the instruction video at youtube.com
22. Solar System Mobile
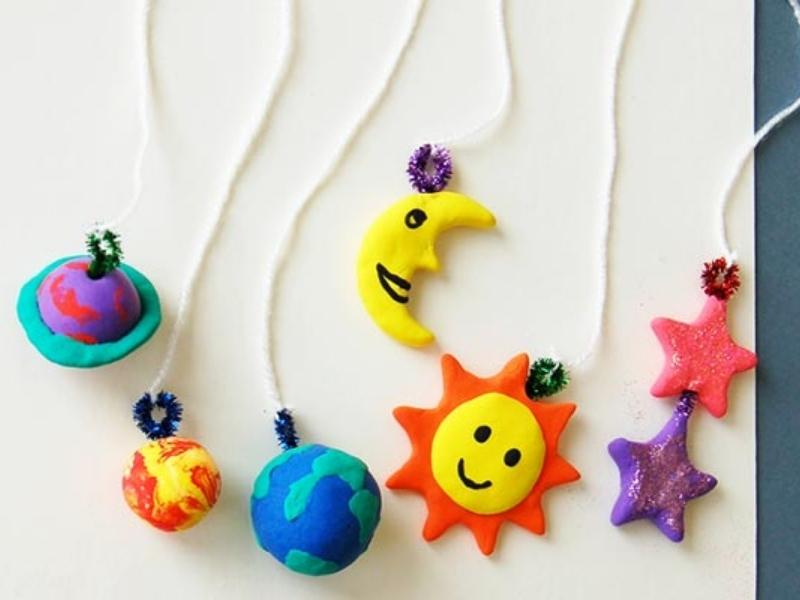
Ages 6+ | Medium | 1 hour plus drying
Model Magic is light enough to hang from thin string, where regular air-dry clay or plasticine can be too heavy. It also works as a science fair model.
- Roll nine balls of different sizes: one for the sun and eight for the planets.
- Dry for 24-72 hours, then paint.
- Tie string around each ball or push a loop in before drying.
- Hang the planets at different lengths from a hoop or stick.
Find out more at firstpalette.com
23. Little Mice
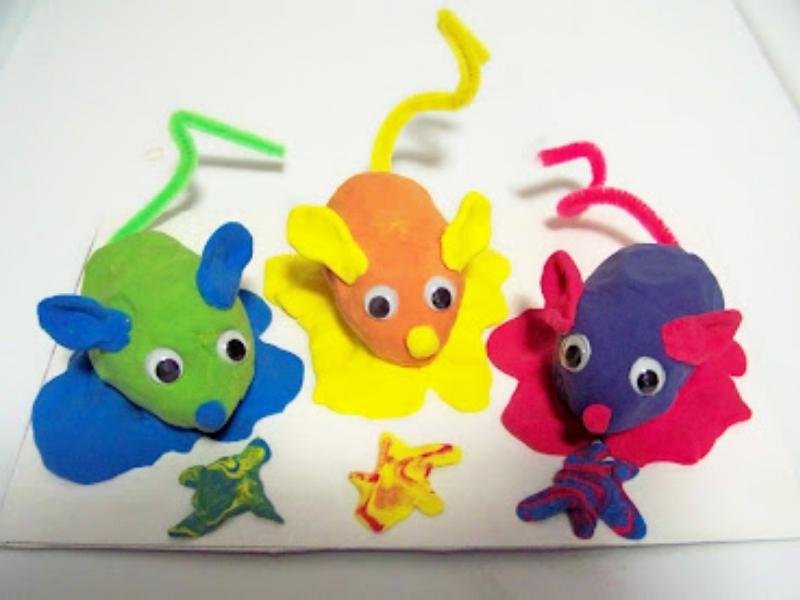
Ages 4+ | Easy | 30 minutes plus drying
Wrapping clay around an aluminum foil ball saves modeling material and is easier for small hands.
- Crumple a foil ball into an egg shape.
- Cover it with a thin layer of clay.
- Add ears, a nose, whiskers and a string tail.
- Dry fully.
Read more at theartannex.com
24. Cupcakes
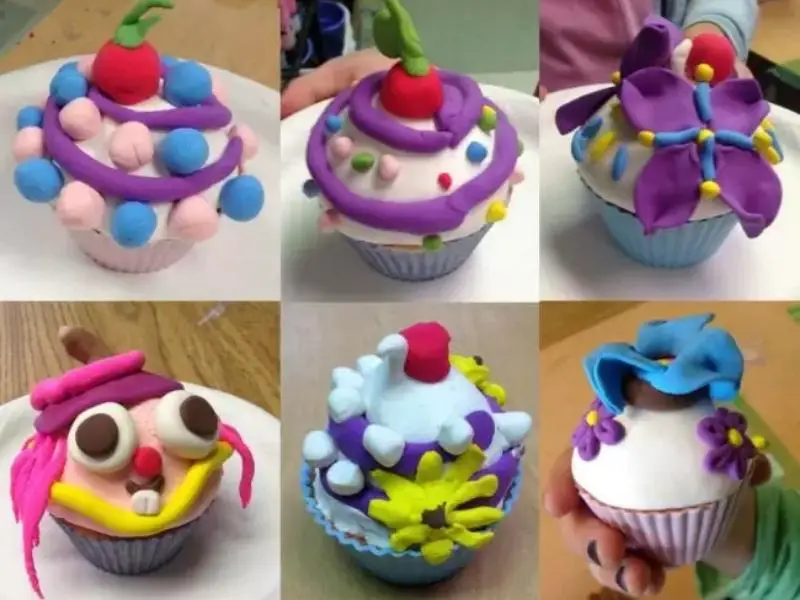
Ages 4+ | Easy | 30 minutes plus drying
Play food for a toy kitchen. For a hollow cupcake, shape the clay over a form like an air-dry clay bowl, which saves clay. These are not edible.
- Press a cup shape and add ridges for the paper liner.
- Roll a swirl of “frosting” in another color.
- Top with tiny clay sprinkles (a choking hazard for children under 3).
- Dry fully.
Get more information at artprojectsforkids.org
25. Greeting Card Embellishments
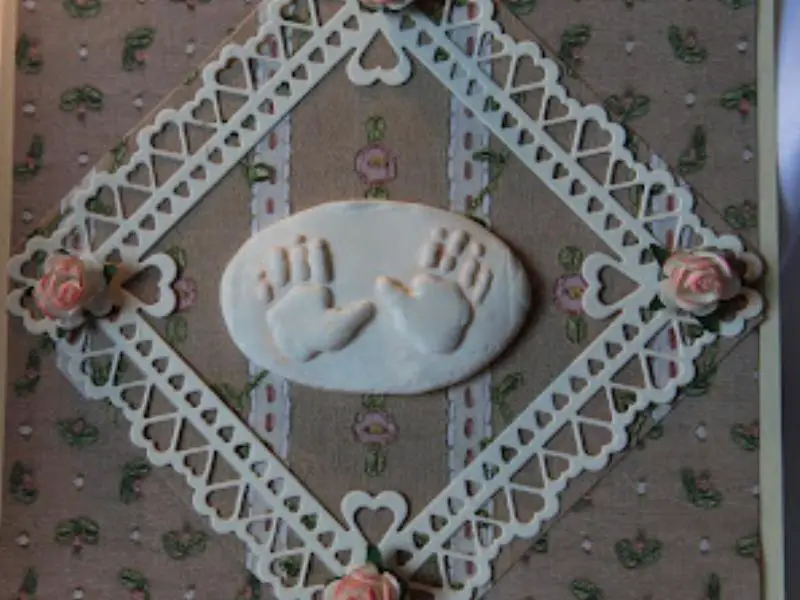
Ages 8+ | Medium | 30 minutes plus drying
Press clay into clean chocolate or fondant molds to make flat shapes such as baby feet or snowflakes, and glue them to cards. The light weight keeps them from toppling the card.
- Press a small ball of clay into the mold.
- Pop it out and dry for 24-72 hours.
- Paint if you like.
- Glue to a card with craft glue.
Check it out at todayscreations.blogspot.com
26. Decorated Bottle Vase
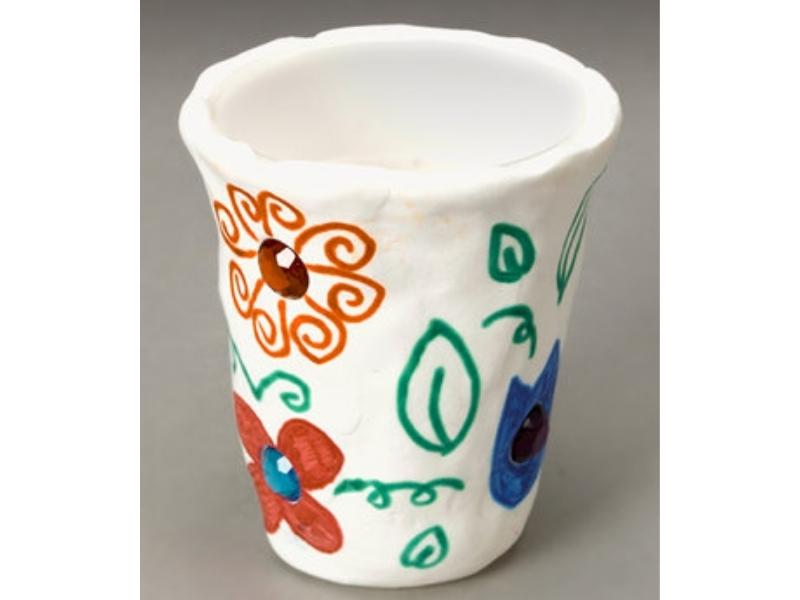
Ages 7+ | Easy | 45 minutes plus drying
Wrap clay around an empty plastic bottle and decorate with markers or glitter glue. Do not add water or fresh flowers, because the clay goes soft when wet. Use dried or paper flowers.
- Roll the clay into a flat slab.
- Wrap it around a clean, dry plastic bottle and smooth the seam.
- Dry for 72 hours.
- Decorate with markers or glitter glue.
Find out more at crayola.com
27. Shoe Box Diorama
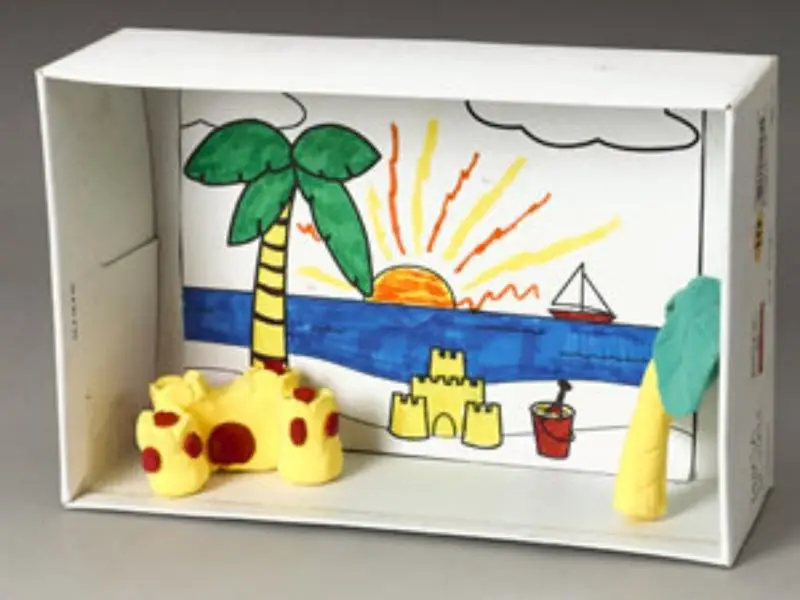
Ages 6+ | Medium | 1 hour
Turn a shoe box into an underwater, jungle or historical scene, with clay animals and plants for 3D detail.
- Paint or line the inside of the box for the background.
- Sculpt animals, trees or rocks from clay and dry them.
- Glue them into the box at different depths.
See this and other clay projects at crayola.com
28. Trinket Bowls

Ages 8+ | Medium | Under 1 hour plus drying
Knead the clay until soft, roll it out and stamp patterns. These are for rings and trinkets only, not food.
- Knead and roll the clay to an even 1/4 inch.
- Press in stamps or textures.
- Drape over a small upside-down bowl lined with plastic wrap.
- Dry for 72 hours, then lift off.
You can find the full instructions on Gathering Beauty.
29. Easter Bunny Mason Jar
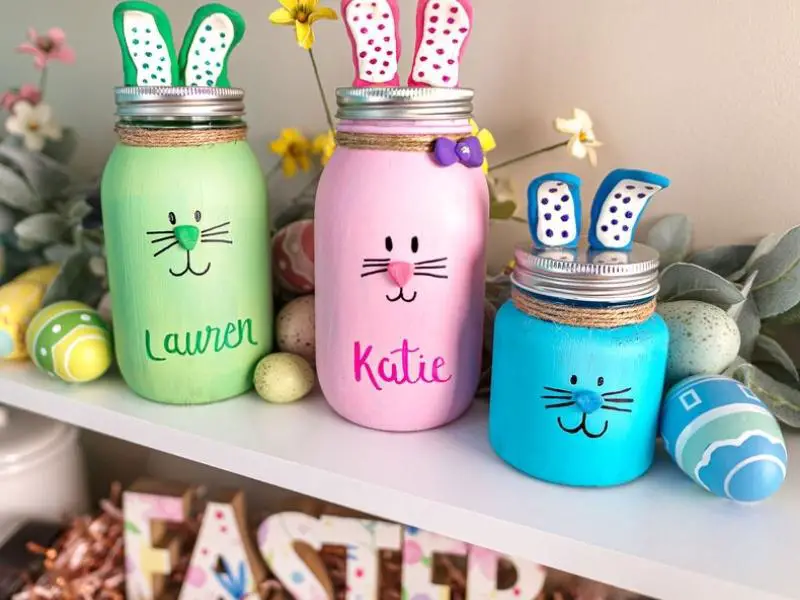
Ages 6+ | Easy | 30 minutes plus drying
Roll two bunny-ear shapes from white clay, marble them with a little acrylic paint, and glue them to a mason jar. Add glitter or a name tag.
- Roll two long ear shapes and pinch the tops.
- Knead in a small amount of acrylic paint for a marbled look.
- Dry, then glue to the jar lid or rim with craft glue.
A tutorial for this Easter mason jar craft is available on Crayola.
30. Essential Oil Diffuser Necklace
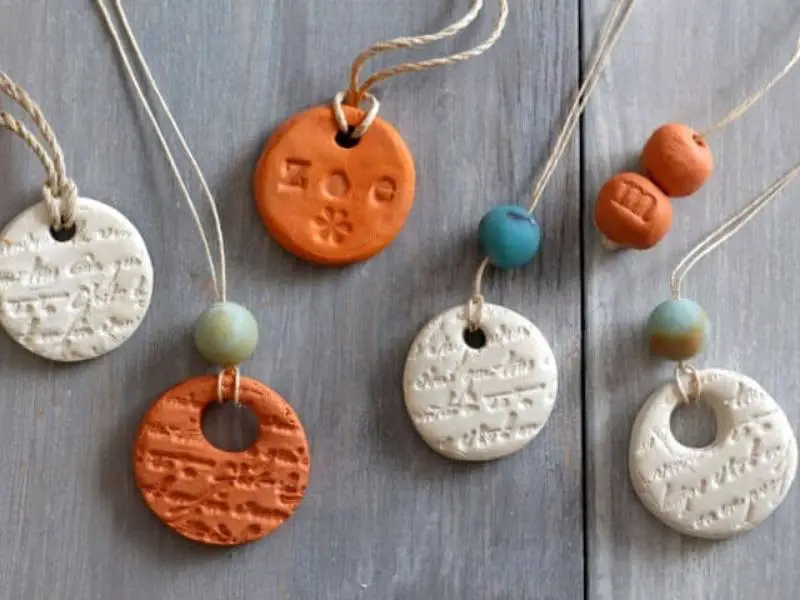
Teens and adults | Easy | 30 minutes plus drying
Dried clay absorbs a few drops of essential oil. Essential oils can irritate skin and are not recommended for young children, so this is a project for teens and adults.
- Cut a shape with a small cookie cutter.
- Poke a hole with a straw and dry fully.
- Sand the edges lightly.
- Add a few drops of oil and thread on cord.
For more, check Mommypotamus.
31. Pendant Lights
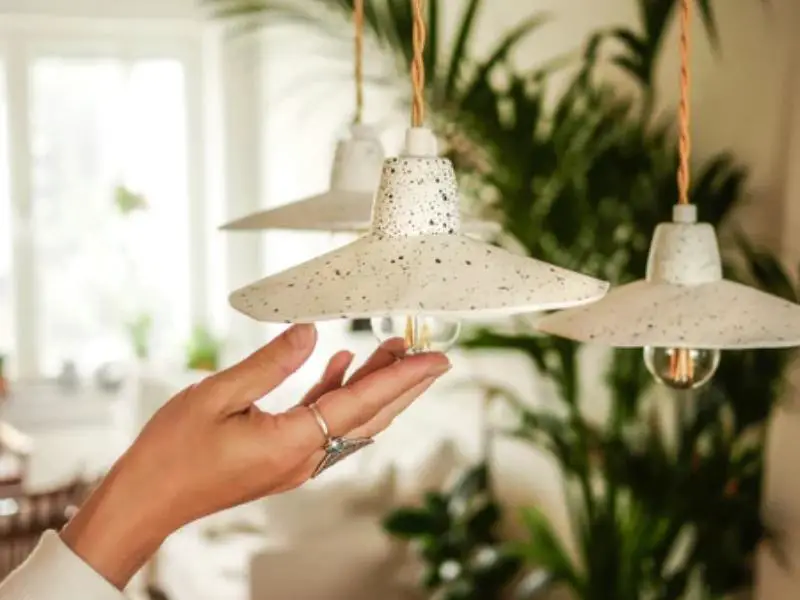
Adults only | Hard | Several hours
These clay lampshades involve electric wiring, so this is not a kids’ project. Use an LED bulb and keep clay away from heat. I could not confirm the tutorial’s wiring or heat guidance, so follow a qualified lighting kit.
- Make a shade form and cover it with stamped clay.
- Dry fully.
- Fit it over a pendant light kit using an LED bulb.
A step-by-step guide is on Createaholic.
32. Mother’s Day Flower Plaque
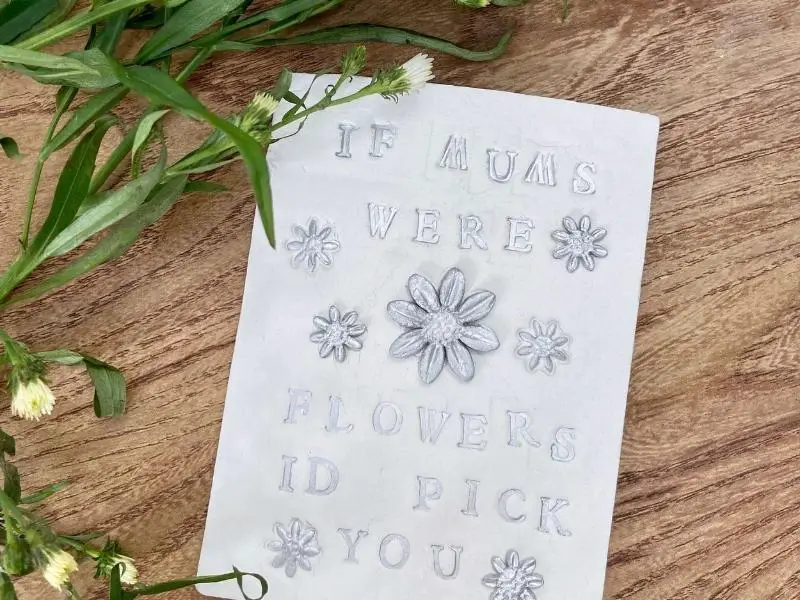
Ages 6+ | Easy | 45 minutes plus drying
Roll the clay, cut flowers with cookie cutters or a stick, and stamp a message. Paint with acrylics once dry.
- Roll out the clay.
- Cut or shape flowers and press on.
- Stamp a message.
- Dry, then paint.
Check the complete tutorial on Isoscella.
33. Holiday Gift Tags
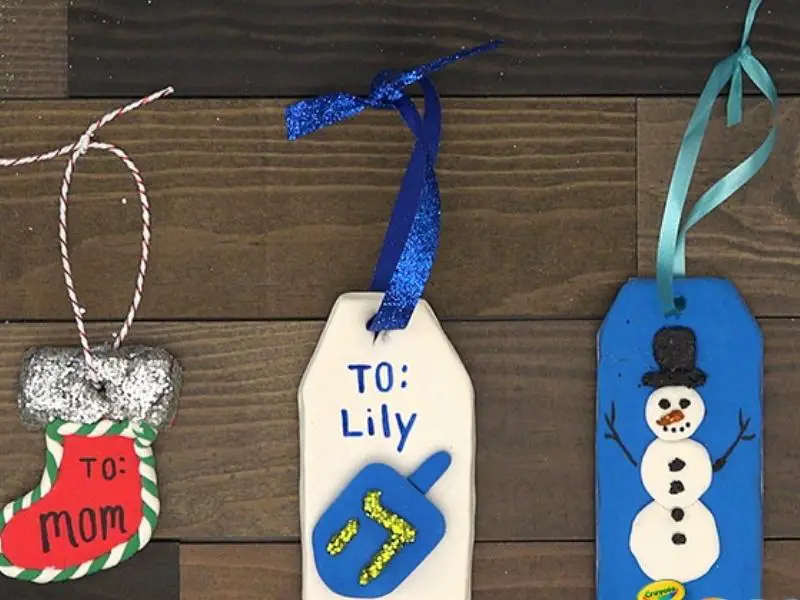
Ages 5+ | Easy | 20 minutes plus drying
Cut festive flat shapes, add a hole and loop string through. Animated-character shapes are popular with kids.
- Flatten the clay and cut shapes.
- Poke a hole near the top.
- Dry, then decorate.
- Thread string through.
For more, check out Crayola.
34. Marbled Ring Keeper
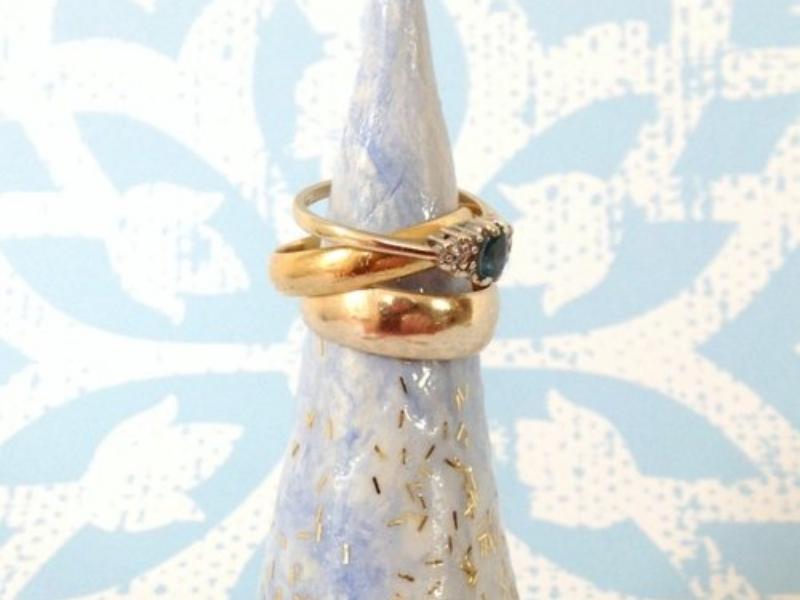
Ages 8+ | Easy | 30 minutes plus drying
Roll a few colors together for a marbled cone to hold rings. A scrap of card makes a good mold. Add glitter to the tip.
- Roll two or three colors together.
- Form a cone around scrap card and press to a base.
- Dry fully, then add glitter with glue.
For more decorating ideas, check out Sum of their Stories.
35. Connect Four Game
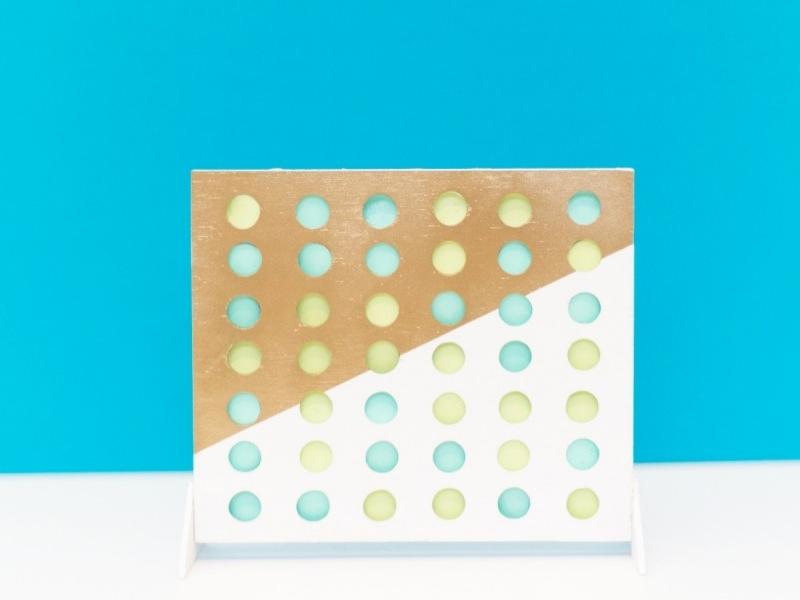
Ages 10+ with an adult | Medium | Several hours
A durable Connect Four from wood and clay game pieces. An adult should do the drilling.
- Drill a grid of holes in a wood board (adult job).
- Roll clay balls, or cut flat discs with cookie cutters, in two colors.
- Dry, then play.
Here is an implementation on Lovely Indeed.
36. Halloween Bowling
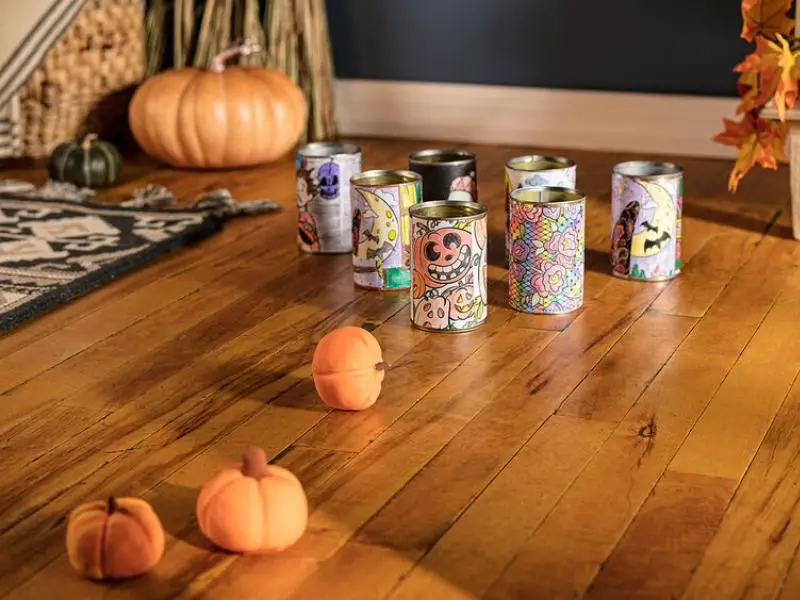
Ages 4+ | Easy | Under 1 hour
Paint tin cans (check for smooth edges) and roll clay “pumpkin” balls at them.
- Paint clean cans orange, purple and green.
- Roll clay balls and texture them with a brush handle.
- Dry, then stack the cans and bowl.
For design ideas, visit Crayola.
37. Whale Phone Holder
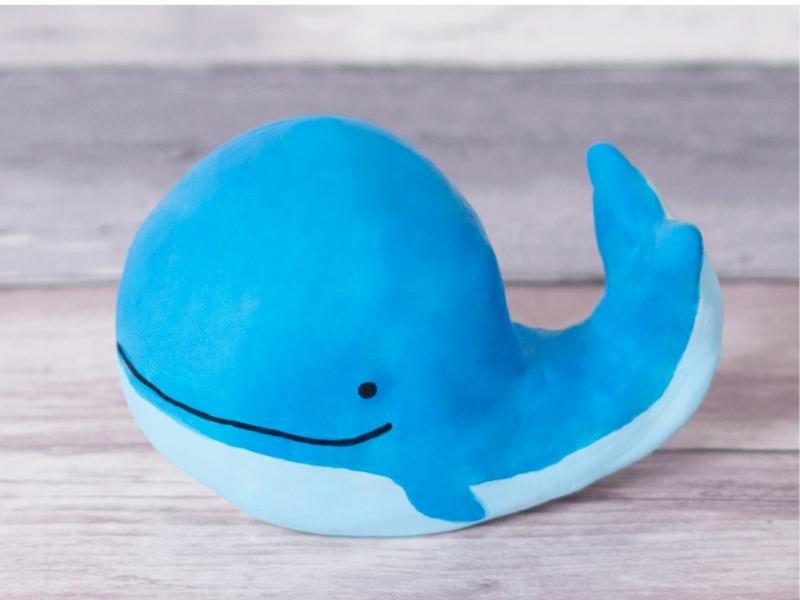
Ages 4+ | Easy | 30 minutes plus overnight drying
A simple whale, shaped by hand. Use it to prop a phone or hold small trinkets.
- Roll the clay until soft.
- Mold a whale body with a tail curved up and a dip for the phone.
- Dry overnight or longer, then paint with metallic paint.
An implementation is available on Doodle & Stitch.
Homemade Alternative to Model Magic
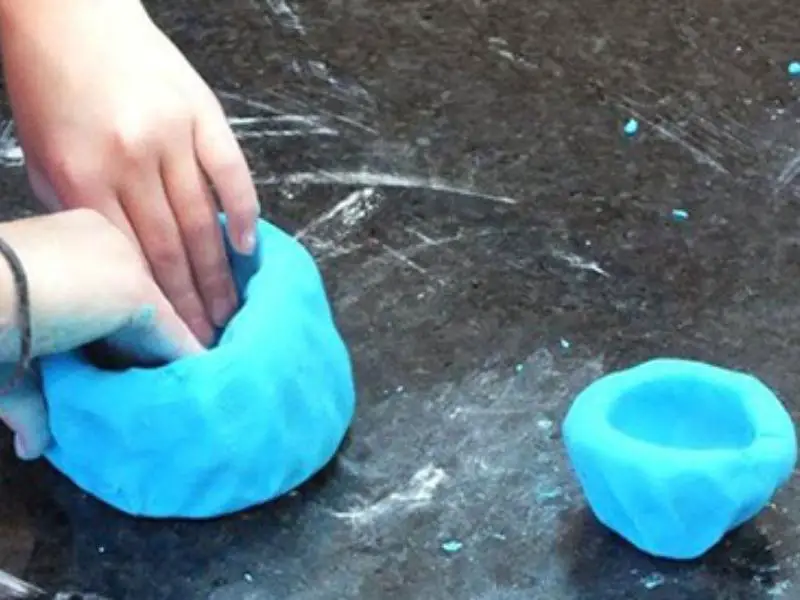
A common homemade substitute is baking soda clay: 1 cup baking soda, 1/2 cup cornstarch and 3/4 cup water. It is not the same as Model Magic, but it is cheap and smooth. An adult should do the cooking.
- Stir the ingredients in a pot over medium heat.
- Keep stirring until it thickens to a dough like mashed potatoes.
- Cool on a damp cloth, then knead until smooth.
- Add food coloring if you like, and store airtight.
Model Magic Clay Recipe from Kidcreate Studio
Get Creative with Crayola Model Magic
Model Magic is light and soft, which makes it good for jewelry, mobiles and cards, where heavier air-dry clay can be too stiff or heavy. Use these ideas as a starting point and swap in your own designs.
Comments
0 comments