If you’re looking to celebrate the coming of fall with some amazing and beautiful origami crafts, we’re going to cover some today. Fall has some of the most beautiful colors, arrays of oranges, reds, yellows, ambers, and golds ““ just perfect for making stunning origami.Let’s explore some of the most beautiful fall origami crafts.
Origami Maple Leaves
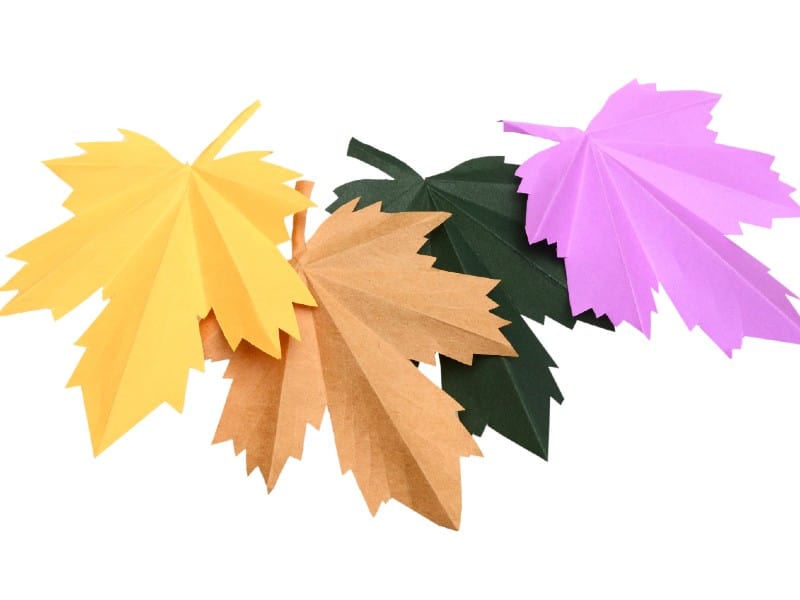
Who doesn’t associate fall with the stunning bursts of color that come from maple leaves? This origami should be done using different colors for each leaf to represent the gorgeous hues and crisp colors.
Materials
For the maple leaves, you’ll need:
- Origami paper in several different fall colors
Step 1
Fold your square of origami paper in half diagonally, forming a neat triangle. Open the triangle back into a square and smooth it out.
Step 2
Turn the paper the other way, and repeat the diagonal fold, gently creasing along the line. Unfold it to a square again. You should now have a creased cross running over the center of your paper.
Step 3
Turn the origami paper over so that the pale side faces up. Now create a straight fold so that your square becomes a rectangle. Crease the fold and then unfold the paper again.
Step 4
Turn your paper 90 degrees and again do a straight fold to create a rectangle. Crease it and undo the fold.
Step 5
Turn the paper again, bringing a point to the bottom. Slip your thumbs under the two edge points, and keep your fingers on top. Begin to gently fold the edges in to form a bud-like shape, with the four points of your square gathered at the top of the “bud.”You should now have a smaller square with all the quarters aligned. Press these new creases into the paper.
 Step 6
Place your square down and rotate it so that a point faces you, and you have a crease running up the center. Next, take the topmost layer on the bottom right edge and carefully fold it to the center crease. Press down firmly to form another crease.
Step 7
Do the same on the other side, folding the top layer into the center. Make sure both sides come to a nice point at the bottom of your square and crease them well.
Step 8
Flatten out the folds you have just created so that you have a flat square again. Next, lift the top colored layer so you can see the white inside the square, and put your thumb at the center of the crease that has lifted up on the left. Push it into the center of the white and press it down.Do the same on the other side. You should now have a small triangle sticking up. Gently crease this.
Step 9
Flatten the triangle out along the top of the square, and then fold it back over into the body of the square.
Step 10
Turn the square over and rotate it so that the lowest point faces you. Next, fold the right-hand corner to the center, and do the same with the left-hand side. This should form a shape like a kite. Carefully crease the folds, and then unfold them so you have a square once more.
Step 11
Slip your fingers into the top layer at the bottom of the square, lifting it up as you did in step five. Again, fold the lifted edges in, forming a kite shape with a point up in the air. Crease the edges and then fold the point down so that you have an elongated diamond.
Step 12
Fold the same point back over the lower half of the elongated diamond, turning it back into a kite.
 Step 13
Rotate the kite so that the right-hand small point faces you. Slip your thumb under the top edge of the paper and fold it most of the way to the center, creating a narrow crease on the short bottom edge of the kite.Rotate the kite and do the same on the other short side. You should now have a kite with an arrowhead shape in the middle.
Step 14
Turn the kite over and fold the short edges into the center, creating an elongated diamond.
Step 15
Hold the diamond in your fingers with the folds you have just made at the top, and then slip your fingers into the edge. At the bottom point, get your thumb beneath the right-hand flap of paper and then pull it out of the diamond sideways.Gently pull the flap up and crease it, tucking it into the edge of the diamond so that it sticks up along the upper edge of the diamond.Next, fold the left-hand side of the diamond (opposite side) over to the right-hand side, and again take the bottom point on the right and fold it out and up, creasing along its centerfold. It should stick just beyond the first point you folded out, so your diamond now has two protrusions.
Step 16
Fold the final left edge of the diamond over so that you have a triangle, and again pull the lower flap out. Fold it up and out, creating the third spike.
Step 17
Fold the lower half of the triangle back over itself, and invert the crease in it to form a final spike. This should leave you with a leaf-like shape with five spikes spaced out evenly. Tweak them and crease them so that they are flat and you are happy with the shape.
Step 18
Fold a small strip of origami paper to create a stem and glue this into the bottom part of the leaf. You now have a complete origami maple leaf ““ time to create a few more in all sorts of colors!
Conclusion
You can make origami maple leaves any size by increasing or decreasing the size of the paper, and they will look great scattered on a windowsill, or suspended on different lengths of fishing wire.
Comments
0 comments