It’s no secret that kids love dragons ““ big dragons, little dragons, fierce dragons, and cute dragons. If you want to encourage your child to get into a good arts and crafts session with you, you can have all kinds of fun doing dragon crafts together.It doesn’t matter what colors or even what shapes your child chooses when it comes to this kind of craft ““ a dragon can look like anything!
Dragon Sock Puppet
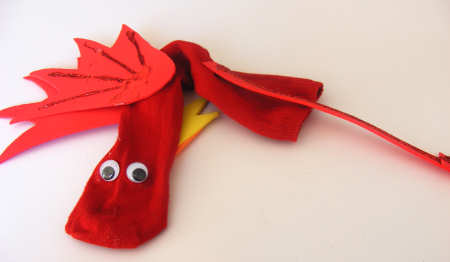 Source: https://www.activityvillage.co.uk/sock-puppet-dragon-craftSock puppets are fantastic fun for any kid, and the more designs and characters you can create, the better! One of the best things about this craft is that a dragon can be any color or pattern, so if you’ve got an odd sock that isn’t quite working for a hippo or elephant, you might still be able to turn it into a fantastic dragon for your little one to play with!
Materials
This craft needs:
- 1 colorful sock
- Googly eyes
- Felt to match or complement your sock color
- Red fabric (an old red sock is suitable)
- Red, orange, and yellow felt (or tissue paper)
- 1 scrap of black felt
- Pipe cleaner
- Foam
- Glue gun
- Scissors
- Black pen
- Sequins (optional)
Step 1: Draw The Wings
Use your black pen to draw two wings onto your foam. You can just draw one and cut around it to form a template for the other if that’s easier. Remember to reverse it before you draw around it for the other wing, so that you get mirror images that can be stuck on either side of the sock puppet.Once you are happy with the wings, cut around them.
Step 2: Glue The Components
Help your child to glue the googly eyes to the top of the sock puppet, and then cut two black circles from your black felt and glue them to the end of the sock puppet’s nose as nostrils. If you don’t have any black felt, you can just use your black pen for this.Add any other details, such as felt (or drawn) eyebrows. Next, cut two little pieces of your pipe cleaner and use these to make horns for your dragon, just above its eyes.
Step 3: Add The Wings
Use your glue gun to attach the foam wings to the sock puppet’s body. You should overlap the bottom of the wing with several centimeters of the sock to make sure you have a good join and that the wings won’t pull the sock puppet out of shape.Trim any bits of the wing that you aren’t happy with, and your dragon is getting close to finished!
Step 4: Add The Mouth
Cut out an oval of red fabric for the inside of the sock puppet’s mouth. Glue this in place inside the sock puppet’s mouth. If your sock puppet is already red, choose orange or a contrasting color instead.
Step 5: Add The Flames
Help your child to cut out some curving flames from the red, orange, and yellow felts. Make some longer, and others short and curly. If you don’t have felt, you can use tissue paper for this job, but it will not last as well.Glue this to the inside of the dragon’s mouth at the bottom and the top. Now, when your child operates the puppet, it will shift the flames and make it look as though the dragon is breathing fire.
Step 6: Decorate The Dragon (Optional)
Help your child glue some sparkly sequins to your sock puppet’s body to represent the dragon’s scales. These will make the puppet dance and flash in the light. You can choose sequins to match the puppet, or a whole host of other colors to make it look rainbow.
Step 7: Add A Tail And Spikes (Optional)
Cut a curving tail out of felt and then glue this to the back of the sock puppet. Your child can decorate this with a few more sequins, or leave it plain.Next, cut some curved triangles out of the same color felt, and glue these in a straight line running down the sock puppet’s “back.” These will form a ridge that will make the dragon feel finished.
Paper Chain Dragon
 Source: https://www.pinkstripeysocks.com/2019/01/chinese-new-year-paper-chain-dragons.htmlPaperchain dragons are a wonderfully simple craft to do with a little one, and they can be used as decorations for parties or just for every day. You can create a paper chain very quickly and easily, and it is a nice, tidy craft.
Materials
For a paper chain dragon, you’re going to need:
- Colored paper (several colors will make the dragon look more interesting, but you can just use one)
- White paper
- Pencil
- Black pen
- Scissors
- Glue stick
- Colored pens
- Colored yarn (optional)
- Colored tissue (optional)
Step 1: Cut Strips Of Paper
Cut out some short strips of paper for the chain. Help your child to turn the first one into a loop and glue it, and then show them how to glue the next strip through the first to make a chain.You can make a long or short dragon; just cut more or fewer strips of paper, and stop whenever you feel ready. You can always use excess strips up later in a different paper chain.
Step 2: Draw A Dragon Face
On your white paper, get your child to draw a dragon’s face, and then four legs and a tail (just the end of the tail is fine; they may want to draw a spiky triangle of some description).Get them to color the different parts in. You might want to help them draw on some scales to color, or just let them do it themselves.When they have finished, outline the dragon’s body parts in black marker so they will show up nicely.If your child doesn’t want to draw the dragon, you can find some of the body parts online and simply print them out to use instead. Your child might want to color these, or you can leave them plain.
Step 3: Glue The Dragon Together
Cut around each of the components, leaving an extra flap so that you will be able to easily glue them to the paper chain. Start by gluing the head into place at the front of the chain, and then the tail at the back. Finally, add the four legs.
Step 4: Add Fire (Optional)
Cut or tear some strips of orange and red tissue, and glue them to the underside of your dragon’s head so that it’s breathing fire.
Step 5: Hang Your Dragon Up (Optional)
You can just drape the paper chain dragon over a surface, or suspend it from two points on the ceiling, but you might get a better result by attaching some colored yarn to several different points on the paper chain, and suspending your dragon from these so that its body curves in multiple places.
Egg Carton Dragon
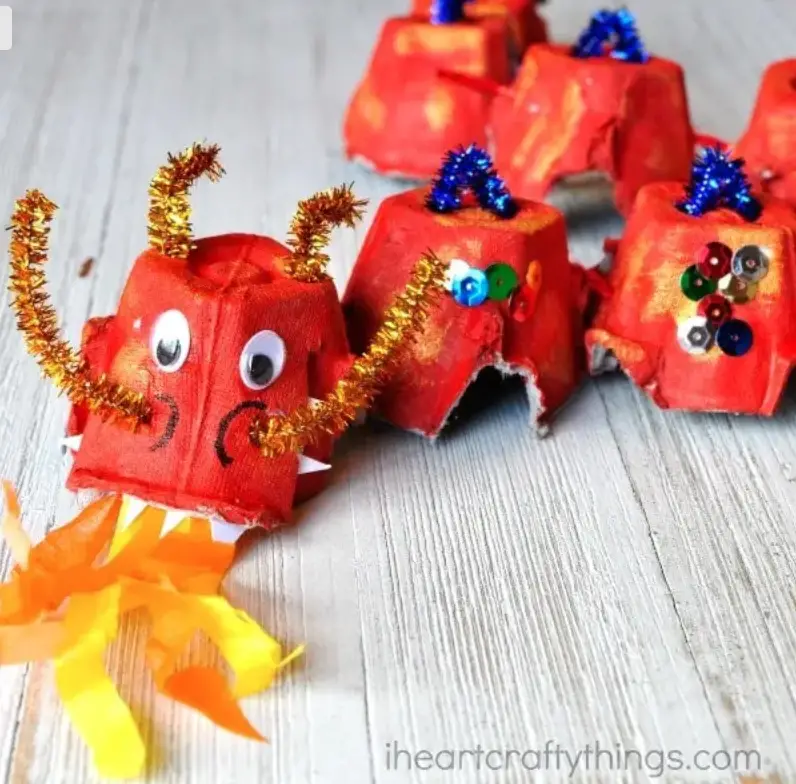 Source: https://iheartcraftythings.com/egg-carton-dragon-craft.htmlYour child can have enormous fun with an egg carton, some paint, and some pipe cleaners, and will make an amazing dragon decorate their bedroom with. This can be a great party activity too; make some egg carton dragons in advance and invite your guests to decorate them (or, with older guests, let them make the egg carton bodies as well).
Materials
For an egg carton dragon, you will need:
- Acrylic paint in whatever color(s) your child wants their dragon to be
- Paintbrush
- 1 old egg carton
- Glue gun
- Orange and red tissue paper
- White paper
- White glue
- Scissors
- Colored card
- Googly eyes
- Black pen
- Sequins (optional)
Step 1: Cut Up The Egg Carton
First, you need to help your child cut the egg carton down into individual cups of cardboard. Each cup is going to be a segment of the dragon’s body, so you can use as many or as few as you like. Try to make them neat to get a nice finish overall, but don’t worry too much.Once you’ve got enough of the egg carton cut up, your child should paint them ““ any color or colors that they choose. They may want to use glittery or pearlescent paint. Leave these segments to dry.
Step 2: Glue It Together
Help your child to arrange the cartons as they like. They might decide to make the dragon’s body snake around in a curve or do a straight line. When they have settled on an arrangement, use the glue gun to join the different sections up into one long train.Cut off a bit of the last section of the egg carton to form a pointed tail and finish off the body. If your child wants to do a more elaborate tail, help them cut one from a colored card and then stick this on top of the egg carton.
Step 3: Add The Face
Help your child to glue the googly eyes to the front cup, and then draw two little circular nostrils onto the dragon’s face. You could also cut out some circles of black paper or use two mini black pom poms for the nose. Glue some torn strips of red and orange tissue to the underside of the carton to form flames, and add some small white triangles for the dragon’s teeth.Finally, cut some pipe cleaners into short lengths and help your little one to give the dragon horns. They can also add spikes along the dragon’s body, using either piece of pipe cleaner or a colored card.
Step 4: Add Wings And Legs
Next, you want to draw some wings and dragon-like legs onto your colored card. Cut these out and let your child decorate them, and then glue them to the dragon’s body. It may be best to keep the wings fairly small so they don’t get bent too easily.
Step 5: Decorate The Dragon
Next, it’s time to have fun decorating the dragon! Your child can draw or paint scales on its body, and then glue sequins on it to make it sparkly. You could also add little white claws to the dragon’s legs, or some dots of glitter glue.Your child might want to add some fringes to the dragon’s face to make it more 3D; this should be easy to do with either colored paper or more short lengths of pipe cleaner.
Conclusion
You can have endless fun with dragon crafts, making these amazing mythical beasts out of anything that takes your fancy. You can also make a dragon’s hoard for them to guard by using a large-size hole punch and some gold card to cut circular coins ““ or add a chocolate coin hoard if you’re decorating for a party. A few boiled sweets will make perfect “gems,” and mini chocolate eggs could form a perfect clutch of baby dragons waiting to hatch.Whatever you do, your child will love the bright colors and creativity that accompanies dragon crafts, and you can have endless fun with them.

Comments
0 comments