
Elephants are amazingly fun to craft with ““ those big ears and wonderful curving trunks present the perfect opportunity for you to get inventive and for your child to play with large, satisfying shapes.They are also highly recognizable and frequently populate children’s books, meaning that elephant crafts are likely to be firm favorites in any household with kids of all ages. So, let’s look at some amazing art ideas!
Moving Trunk Elephant Craft
This craft is very easy to do, even with a small child, but has the added interest that the elephant’s trunk can swing round and round! Make sure you’re using a reasonably tough card for this so that your little one isn’t likely to tear it when they enthusiastically move the trunk back and forth.If you want to make this craft more complicated, you can use the same trick with the paper fastener to make the ears wiggle, but we’ve stuck with a simpler version for these instructions.
Materials
This craft needs:
- 1 paper plate (or circle of card)
- Gray acrylic paint (or another color if your child doesn’t want a gray elephant)
- Paintbrush
- Glue gun
- Googly eyes
- Pencil
- Paper fasteners
- Scissors
- Pink card
- Gray card
- White card
- White glue
Step 1: Draw Your Elephant
If you need to cut a circle of cards, draw around a side plate or something similar to get a good circle, and then cut neatly around the edge. If you’re using a paper plate, get your child to paint it the same color as the card they intend to use for the ears and trunk, and then set it aside to dry.Next, help your child to draw lovely big ears, which can either be simple semi-circles or have a slight dink near the middle to create a more shaped effect.Finally, draw a big curvy trunk, and cut everything out, or let your child cut it out if they are old enough to handle scissors.
Step 2: Glue The Components
Start by gluing the elephant’s ears to the back of your circle of card. Your child can then cut a smaller version of the ears from the pink cards and glue these inside the bigger gray ears.Help your child position and glue the googly eyes on the elephant’s face (or draw eyes on with a pen if you haven’t got any googly eyes).
Step 3: Add The Trunk
Next, we’re going to add the trunk, but not by gluing it. Get your child to decide where the trunk should be positioned, and then carefully pierce through both layers of the card using your paper fastener. You can use a pin first if it makes it easier to get the fastener through.Fold the paper fastener around at the back, and check that the trunk turns smoothly and is secure.
Step 4: Add Further Details
Now, cut a little semicircle out of the pink card for the mouth and glue this beneath the trunk. Add any other details your child wants to include, such as eyelashes or wrinkles, and your elephant craft is complete!
3D Elephant
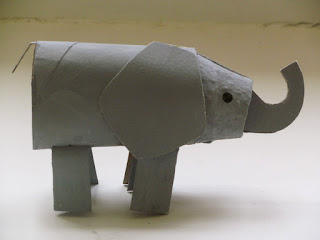 Source: https://patchworkparent.blogspot.com/2013/05/easy-elephant_25.html?m=0If your child really loves elephants, you can help them make their own elephant mascot, using materials from your recycling bin. These are so cute! Feel free to change the gray for any other color your child likes, or make a rainbow elephant.
Materials
For an elephant mascot, you’re going to need:
- 1 empty toilet tube
- Gray cardboard
- 1 old egg carton
- Mini googly eyes
- Scissors
- Glue gun
- Gray paint
- Paintbrush
- Black marker
- Gray felt
- Gray yarn
- White paper (optional)
- Colored pens (optional)
- Colored yarn (optional, different color to the elephant)
- Green tissue (optional)
Step 1: Paint The Components
Start out by helping your child to paint the toilet tube and one cup of an egg carton gray (or another color if they would rather have a bright elephant). Try to paint the inside of the toilet tube a bit, but don’t worry about the inside of the egg carton.
Step 2: Cut Out The Other Parts
While the paint is drying, take your gray card and draw four rectangles on for your elephant’s legs. Next, draw a curving trunk.If you don’t have any gray felt, you can also draw the ears on the card, leaving a little tab you can crease over when you glue them on so that they’ll stand out. However, if you do have fabric, you can create floppy ears that will rest against the elephant’s head; do whichever you prefer.Cut out all the pieces and check if your paint is dry.If your child wants to decorate any of these parts by adding a pink pen to the ears or white to the elephant’s toes, it’s easier to do this before they are stuck on, so give them the opportunity now.
Step 3: Glue The Elephant Together
Glue the egg carton cup to the toilet tube end and that creates the head. You may need to trim the carton a bit to get a neat edge that slots into the toilet tube, with the bottom section angled down so you get a good shape for the elephant’s head.Next, glue the four legs to the underside of the elephant’s body and adjust them so that it stands up.Glue the curving trunk to the front of the elephant’s nose, and cut a short length of gray yarn. Tie a knot in one end and then another knot about two-thirds of the way down. Below the second knot, fray the ends a little and then glue the first knot to the back of the toilet tube to make the elephant’s tail.Finally, glue the ears to the sides of the elephant’s head, and stick the googly eyes on (or draw eyes if you don’t have googly eyes).
Step 4: Add A Rug (Optional)
If your child wants to give the elephant a rug on its back, you can do this very easily. Simply cut a rectangle of white paper, and let them decorate it with colored pens. Next, glue some little tufts of yarn along the edge of the rug to create tassels.Glue this to the elephant’s back.
Step 5: Give The Elephant Food (Optional)
Maybe the elephant is hungry? It can be fun to stick a tuft of green tissue at the end of its trunk to indicate it is plucking some leaves from a tree to munch on. Alternatively, cut out an apple from a red card, or give the elephant a carrot. These little details can make a craft look great.
Elephant Handprints
 Source: http://thewonderfullifeoftheparkers.blogspot.com/2013/07/rainy-day-activities-for-kids.htmlThis craft is particularly nice to do as a whole family, especially if you have several kids of different ages. It’s wonderfully simple and will create a beautiful memento for everyone ““ it’s a keeper, for sure.
Materials
For elephant handprints, you will need:
- Gray acrylic paint
- Green acrylic paint
- White acrylic paint
- Black acrylic paint
- Paintbrush
- Large sheet of high-quality paper
Step 1: Gather The Family
Get everyone together to do this craft, with a nice clear space and a flat surface to work on. Check that nobody is wearing good clothes as acrylic paints don’t wash out and it’s very easy for accidents to happen, especially with little ones.
Step 2: Print Everyone’s Hands
One at a time, get each member of the family to print their hands on the paper, trying to get the fingers approximately level. Every handprint is going to form a separate elephant, so this will make it easier to add some grass, but it doesn’t need to be perfect.If your little ones need some help, use the paintbrush to paint their palms so that their prints come out properly.
Step 3: Fill In The Details
You can add to the detail of the elephants by mixing some darker and lighter grays and touching up the shadows on the elephants’ legs and bodies, but make sure you don’t lose the original handprints; they are what will make the craft special. Once you’ve finished building up the elephants, let the paint dry before continuing.Add a thin black line to each elephant to indicate where its ear is, and then use the thumb of the print as the elephant’s trunk. Put a round black eye near the top of it, and add a little flick of white paint to represent a tusk.Add some grass down at the bottom of the picture, and any other details you like ““ but try not to add too much; this craft is made charming by being rustic and simple.Make sure you add a date to the front or back of the picture, so you know when you created your little elephant family and how old your children were.
Elephant Finger Puppet
For anyone whose kids love finger puppets, an elephant finger puppet is quick and easy, and very recognizable ““ even if it’s a bit wonky! If you’ve got plenty of time, you could sew this craft, but you can also use a glue gun to speed it along a little bit.
Materials
For an elephant finger puppet, you will need:
- Gray felt
- Pink felt
- Googly eyes
- A glue gun
- Scissors
- Gray yarn
- A thin marker pen
- Gold thread (optional)
- Colorful beads (optional)
Step 1: Cut Out The Finger Puppet
Cut yourself a piece of gray felt, with one end rounded and the other end flat. This should be big enough to slot over a child’s finger. Measure generously, as you will lose some of the material when you join it to the other piece.Use this as a template to create the other piece so that the two sides are identical. Ask your child to try wrapping the pieces around their finger to involve them and check that the puppet will fit.
Step 2: Glue It Together
Use the glue gun to join the two pieces together, and then trim off any rough edges so that you have a nice, tidy puppet. Check the fit again.
Step 3: Cut Out The Other Parts
Use your marker to draw an elephant ear (you can then cut around this for the other one), a trunk, and four cute legs on the gray felt.Next, draw a little semicircle on the pink fabric for the mouth, and two slightly bigger semi-circles for the insides of the ears.Now, help your child to glue the pink insides to the ears, and stick these on either side of the puppet. Glue the mouth in place, and then add the trunk and the googly eyes.They can draw some lines and details on the trunk if they like, or leave it plain. You can also add tusks with two tiny triangles of white felt or with some scrap white paper.
Step 4: Add The Tail
Take a short piece of yarn and tease out the end of it to create a fluffy end to the elephant’s tail.Glue the non-fluffy end to the back of the finger puppet, and help your child put the puppet on their finger.
Step 5: Add A Crown (Optional)
To make your elephant look a little more exciting, give it a crown by cutting a small length of gold thread and gluing this to the top of the elephant’s head, above the ears. You can then glue some little beads or even dots of glitter glue along the line of the crown, turning your elephant into a prince or princess.Alternatively, give your elephant an apple to hold in its trunk.
Conclusion
Elephant crafts are a great part of doing art with your child, and they offer so many great options. With their long trunks and large, floppy ears, even a small child can recognize and love elephants, and that means you can make them blue, green, orange, purple, red, or even rainbow, and everyone will still know that it’s supposed to be an elephant! We hope you have great fun with these elephant crafts.
Comments
0 comments