
For diehard DIY fans, you can rest assured everything under the sun quickly becomes a project. From hardwood floor installation or even building a new flagstone patio in the backyard, doing it yourself is a satisfying and less expensive approach to improving the quality of lifestyle.That’s true even when making your own set of game pieces for those marathon family game nights of 42 or straight-up dominoes. Not only do you enjoy the opportunity to relax as you focus on creating a set, but the result will provide you and the family hours of entertainment and fun.It’s relatively simple learning how to make dominos, and you’ll discover you and the family can play dominoes until the dots wear off because now you can always make another set.
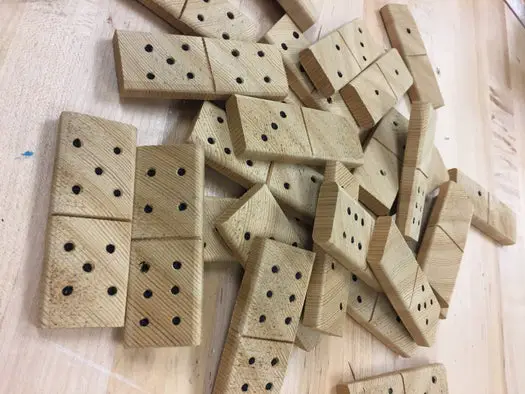
Wood Dominoes
 Source: Inspired by James Slater @ Instructables, “Dominoes” (https://www.instructables.com/Dominoes-1/)Making a double six set of dominoes out of wood is an exacting process of measuring, cutting, sanding, and drilling. If you excelled in woodshop back in the day, you know it’s all about having the right tools and products for the job. At the very minimum, here’s a list of items you’ll need for this project.
- Dependable table saw
- Block sander or a power sander
- Drill press
- One quarter inch Oak Dowel
- Miter box
- Six to seven feet of one 1 inch by 3/8 inch stock (pine is an excellent choice)
- Domino pattern (downloadable on the internet)
- Safety glasses
If you’re attempting to make wood dominoes from scratch for the first time, here’s a tip. If you’re unsure about operating these types of equipment, then don’t. There’s another way to make dominoes covered here you may prefer to try.
Making the cut
Assuming you know your way around crafting things out of wood, you probably have most of these items in your shop or garage. Start by cutting your 1 inch by 3/8 inch wood stock. It’s best to cut at least 28 two-inch long blocks.If you accidentally mess up or lose one, there is no need to cut another one. After you’ve cut all your domino blocks, you’ll want to lightly sand the surfaces and edges using either a block or power sander. It’s unnecessary to hone the pieces heavily, but you should sand enough to smooth out the edges.Now, you’re ready to strike your dominoes. Measure and mark a line precisely in the middle of each domino, then using your miter box and a fine handsaw, strike or cut the line. Remember, you’re not cutting your domino in half, so don’t go too deep with your cut. 1/16 of an inch is perfect.This next part requires patience, a keen eye, a reliable drill press, and a sturdy wooden dowel made of hardwood such as oak. Sharpen the business end of the dowel until you achieve a dull point on end.You can do this by hand, but the best way is to insert the dowel in your drill press and use a hand rasp while the drill press does all the work. A pencil sharpener will work if you have one, but the point needs to be dull, not sharp.Okay, you’ve used the template you download to mark all the combinations of your dots known in the domino world as “pips,” and now it’s time to scorch each pip using the drill press and the dowel. Once you’ve scorched all of your domino pips, you have a fully completed set of dominoes you and the family can enjoy for years to come.
Resin Dominoes
Source: Inspired by Erica Jo Taylor, “Making Domino Game Pieces at Home Tutorial” (https://www.youtube.com/watch?v=aE2Bsui2Rtc) Don’t worry if you’re not a connoisseur of whirling saw blades, spinning drill presses, and woodshop power tools; you can still make a quality set of dominoes. Creating a set of Dominoes out of resin is also less expensive.There’s no need to go out and buy all the wood-making tools when most times, you can get everything at a one-stop arts and craft store. You can even find everything you need online if you don’t feel like getting out. Whether it’s an online purchase or an in-store buy, here’s a list of what you’ll need to make dominoes out of resin.
- Casting Epoxy
- Measuring cups
- Stir Sticks
- Domino Mold set
- Resin dye (your choice of color)
- Acrylic paint (your choice of color)
- Disposal gloves
- Protective eyeglasses
- Heat gun or spray bottle of 91% alcohol
Mixing and Pouring
There are a few things you need to keep in mind before you start. If you’re good at following application instructions, then you’re off to a great beginning. If you’re not reading the manual and like to go it alone, then mixing resin might end up a little more challenging for you. Either way, you need to know that resin applications typically come in two parts ““ the epoxy and the hardener. Both parts have to be precisely mixed and combined equally to cure correctly. Many quality resins are on the market today, and each has its properties and mix rates.Be sure to read the mixing instructions on your epoxy and follow them precisely as advertised. It is highly recommended that you mix and mold your resin in a well-ventilated area far away from any open flame from a safety perspective. You should also wear your protective eyeglasses and disposable gloves when mixing or pouring your compound for that added safety measure. Keep in mind; you’re dealing with chemicals, so you need to protect yourself.For mold casting, which is what you’ll be doing, several excellent epoxies on the market cure white (or your color of choice by adding resin dye). It will set in less than 15 minutes. However, you’ll want to let your mold sit for about 12 hours before you take each domino out.To make a set of double six resin dominoes, you’ll need around six fluid ounces of properly mixed resin. If you bought a complete casting set, you should get everything you need, except the mold you intend to use.The kit should include mixing cups with precise measuring lines to ensure you blend just the right amount of epoxy resin and hardener. If your kit doesn’t include the mixing cups, then you’ll need to pick some up.The last thing you want is a ruined project because the mix was wrong and nothing cured correctly. If you bought a complete kit, stir sticks also should be included, and some of the kits even come with disposable gloves.After mixing the precise amounts of resin and hardener in your mixing cup and stirring it for a couple of minutes, you’re ready to transfer the compound to a clean pouring cup.
Coloring it up
If you want to color your mixture, add a drop or two of acrylic paint of your color choice and continue to stir the mixture until the color is sufficiently blended in.Now, fill each mold space with resin slowly until you’ve filled each mold to the top. You were probably wondering what the heat gun or spray bottle of alcohol was for, and here’s where heat gun or alcohol spray comes in.Air is a beautiful thing. It’s all around us, we breathe it to live, and yes, tiny pockets of air find a way to get trapped in your resin mold. Eventually, these little bubbles of air will make their way to the surface of your domino mold.It’s time to use your heat gun to pop the bubbles. If you don’t have a heat gun, spray the mold’s top layer with a spray bottle filled with 91% alcohol. Should you have neither, use a small straw or even a hollow coffee stirring stick to burst the bubble softly.As mentioned earlier, although the fast curing resin sets quickly, you still need to leave your resin dominoes in the mold for at least 12 hours to be sure. The best way to determine if the dominoes have properly cured is the soft-touch method.Gently place a fingertip on one of the dominoes. If it still feels a bit tacky, the dominoes haven’t cured completely. It’s been a lot of mixing and dyeing and pouring and popping, and you’ve patiently waited sufficient time for your domino mold to set. Now it’s time to remove each one and paint. Remove each of the dominoes from the mold and trim or sand away any excess resin.Using about an ounce of resin and an ounce of acrylic paint of your color choice, apply the mixture carefully and slowly to the dots created by the mold (also known as pips in the domino world) until they’re full. Be careful not to overfill either the pips or the domino separation line.Set all your newly decorated dominoes in a dust-free area and let them dry for three or four hours. The same rule applies to the pips as the resin. If it’s still a bit tacky, then it hasn’t cured completely.You’ve now learned two different approaches about how to making dominoes.Soon enough, you’ll realize all your patience and perseverance have paid off when you collect your newly made resin domino set and go looking for a partner to beat.
Comments
0 comments