 Source: Inspired by CreativeSocialWorker @ Instructables, “DIY Glitter Snow Globe” (https://www.instructables.com/DIY-Glitter-Snow-Globe/)Snow days are wonderful. Even as an adult I still get excited right along with my kids when we get the phone call saying that school is canceled. That is until I realize that I have to be the one to entertain them all day!After we play in the snow, drink our hot chocolate, make snow angels, and attempt a snowman, there is still a lot of time to burn when there is no school. That’s where our snow day craft comes in!The DIY Sensory Snow Globe is an easy, entertaining way to make a craft that is both fun to make and usable in the long run. All you need are a few supplies and a big imagination.This craft is suitable for all ages, but a parent’s help is required.
Supplies:
For the sensory snow globe, first, you must gather your supplies. You’ll need:
- Glass jar with a secure lid. A mason jar will work, but I like to use empty jam jars that I’ve washed out and removed the label from.
- 2 bottles of clear glue. Elmers works best for me.
- ½ to 1 full cup of warm water.
- Silver, blue, or white glitter.
- Snowflake confetti or blue and white foam beads.
- Optional-hot glue gun.
Feel free to use different mix-ins for your snow globe. Different colored glitter, beads, and confetti can all be used. I’ve just listed the ones that will make your globe the wintriest!
Directions:
While some older kids may be able to make the sensory snow globe themselves with adult supervision, I have to recommend helping kids of all ages out with this one. The idea of a mess involving glue, glitter, and confetti is a scary one! Of course, if you’re using the glue gun, that part must be done by an adult. Safety first!
- Make sure your jar is clean and dry.
- Dump one bottle of glue into your jar with some of your mix-ins.
- Pour ¼ cup of warm water into your jar, screw the lid on tightly, and shake.
- See how your “snow” is moving. Continue to add in layers of glue, mix ins, and water, shaking to combine after each water layer until everything flows the way you want it. Fast, slow, it’s all up to you!
- When your sensory snow globe has the right flow and amounts of glitter, beads, and confetti you desire, you’re almost done! If you aren’t using the hot glue gun, twist your lid on very tightly, and always remember to shake with care.
- If you are using the hot glue gun: Before you seal your snow globe for the last time, dot a few dots of hot glue around the inside rim of the lid. That way when you screw the lid back on it will also be glued on. Still use your snow globe with care and caution! The hot glue is just a little safety net.
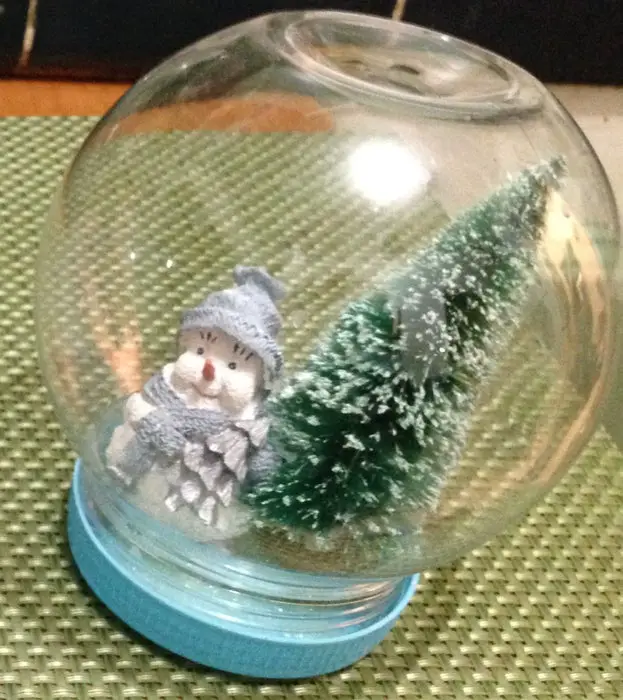
There you have it! Your own personal snow globe, filled with all your favorite mix-ins. This DIY sensory snow globe is great for young children and older children alike since it’s so customizable. And since it’s glass, it will keep for a long time.
Notes
Different Globes for Different Seasons
This DIY sensory snow globe can be used for other seasons, too. For summer, why not use some rainbow glitter and tropical-colored foam beads? I’ve even seen sun-shaped and palm-tree-shaped confetti at my local craft store!Red glitter and heart-shaped confetti would make a lovely Valentine’s globe. For fall, black and orange glitter, pumpkin foam beads, and some spooky-shaped confetti would make a hauntingly fun craft!
Alternate Supplies
Sometimes a glass jar can be hard to come by. In that case, a plastic bottle or jar will work just fine! The only things to consider with a plastic container are that it won’t last as long as glass, and to be extra cautious with the hot glue, since it can melt the plastic.I’ve also seen the sensory snow globe made with Elmer’s clear glitter glue. This glue works just as well as the regular clear glue. It does tint the water a little purple, and you will need to use way less additional glitter. Still, a fun variation!Another fun addition is Orbeez. Orbeez is tiny beads, that when combined with water, expand into squishy bubble-like orbs.They are so cool to play with on their own, and look super neat in the snow globes. The only thing I’d recommend with these is to use less glue, since they are quite a bit bigger and more buoyant than the usual mix-ins, therefore moving a little slower.I hope everyone enjoys my DIY Sensory Snow Globe Craft! It’s one of my favorites and is super quick to put together. Have a happy snow day!
Comments
0 comments