Sewing is a crucial life skill, and many parents want to teach their kids to sew at a young age so that the child can later mend clothes and make things with ease. We’ve chosen some simple sewing crafts for kids to help them boost their skills with a needle.You shouldn’t run into any issues with needles as long as you explain to your child that they need to be careful, but make sure you supervise needle crafts so you can keep an eye on things.
Button Butterfly
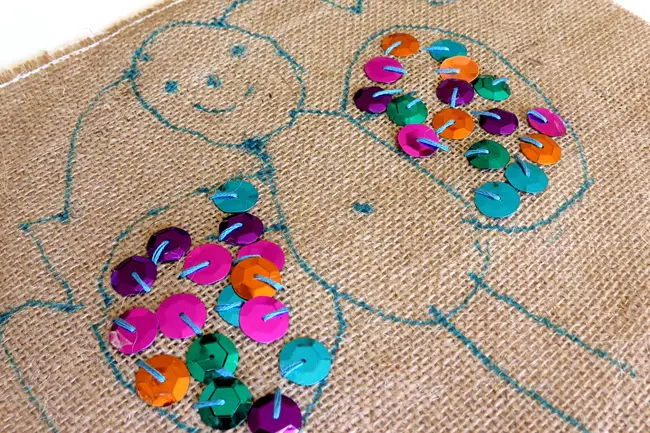 Source: https://childhood101.com/sewing-projects-for-kids/This craft can have two steps, or you can keep it simple and just do the butterfly outline if your child isn’t very focused.
Materials
You will need:
- 1 piece of burlap in an embroidery hoop
- 1 black marker pen
- 1 reel of thick cotton
- 1 needle
- Mixed buttons in different colors
- Scissors
Step 1: Draw The Butterfly
Before you get your child to come and join you, cut a piece of burlap and slip it into an embroidery hoop. Next, take your black marker pen and draw a nice, clear, simple butterfly outline on the fabric.Your child is going to use this to practice their sewing skills!
Step 2: Begin The Outline
Help your child thread the needle and cut them a thread about the length of your forearm. You don’t want much thread, or it’s much more likely to get tangled into knots.You may want to assist them in getting started. They should put the needle on the underside of the work and come up through it, and then dip back through about a centimeter along the line. It doesn’t need to be perfect, but having a guide can help them to get their stitches similar in size.Show them how to pull the needle through so that some of the tail stays beneath the craft, and then turn the hoop back over so they can see the underside again. Guide their needle to the same point they went in through at first, and repeat the stitch.This will hold the thread in place; they can go over it again if they’re worried about it pulling loose.
Step 3: Sew The Outline
Your child can now sew along the outline of the butterfly’s body. Help them to keep their stitches even where possible. If they get bored, they can always move on to the next part of the craft or come back to it later.
Step 4: Add The Buttons
Get a big pot of mixed buttons and let your child choose a whole selection to fill in the butterfly’s wings with. They can use different sizes and hues. If you want to have a bit more influence, you could suggest contrasting buttons for the wing spots, or just let them go wild.Once your child has chosen some buttons, help them start sewing these into place. Show them how to sew tightly and go in and out of the buttonholes neatly. This will help with their motor skills and coordination.This may be a craft to do over several days or even a week or two so they can take a break and do other things, but it’s a great way to practice sewing skills and end up with a gorgeous button butterfly at the end.Once the craft is finished, you could frame it, or sew it onto a cushion cover.
Sew A Bag
Cloth shopping bags are very popular at the moment, and everyone knows how much kids love bags. They like taking things out, putting them back, taking them out, and putting them back again ““ and they’ll love it even more if they’ve made the bag themselves!
Materials
For a cloth bag, you’ll need to gather up:
- Some fabric your child loves
- 1 cotton reel
- 1 needle
- Scissors
- Pins
- Measuring tape
You’ll need to cut your fabric to size before you get started on this project; remember to scale down a bit so your child’s bag is the right size for them to use comfortably.
Step 1: Pin The Bag
Once you have your squares (or rectangles) of fabric, turn the right sides of the fabric so they face each other and the bag is inside out. Pin all around the edges of the bag, making sure the two sides line up nicely.
Step 2: Sew The Bag
Help your child sew the first stitch to make sure it is secure, and then get them to do a running stitch all along the outside of the bag. You can also use this as a chance to teach them other stitches, such as blanket stitches.It helps to keep the thread they’re using short and just join on a fresh piece by finishing off and sewing in the new length, rather than them struggling with a very long thread. It’s very frustrating when the thread gets tangled and snaps, so cut shorter lengths instead.
Step 3: Add A Pocket (Optional)
It’s very easy to add a pocket, so if your child is having fun with the craft, cut another square of fabric. Make it a bit larger than the pocket wants to be; you need to allow space for the seam and a bit of slack in the fabric so things can be stored inside.Pin it into place, and help your child sew around the edges. It’s good to use a thread that won’t show up much against the material, as these stitches will be visible on the other side.You can add more pockets if your child is keen, or move on to the next step.
Step 4: Attach Straps
It’s not a bag until it has straps, and you have a few different options here. You can either attach ribbons or cords to the bag or help your child to sew matching straps out of the same fabric. If your child is quite young, they may find this a bit boring and slow; another option is to run some quick tubes of fabric up yourself using a sewing machine.Pin the ends of the straps to the top of the bag, getting them as even as you can on both sides, and then help your child sew through the ends to join them. These want to be sewn nice and securely, so it’s a good opportunity to talk to your child about sewing stitches on top of stitches.
Step 5: Add A Fastener (Optional)
If your child is having fun, they may want to add a fastener to the bag. For this, you’re going to want to turn it in the right way again. Take a pause to let them admire all their hard work so far, and show them how the seam is very neat as a result of sewing the bag inside out.Next, cut a small strip of fabric and help them turn over the edges and sew them so that they won’t fray. You can now add a velcro patch to the end of this strap and to the other side of the bag, or add a button. Buttons look nicer and usually last better than velcro.To add a button, you will want to sew it tightly to the side of the bag opposite the fastener you have just added, and then help your child make a button loop on the fastener strap. This can be made with a ribbon or cord. You will need to help with the measuring to make sure that the button will fit through easily but not slip out.Sew the cord or ribbon in place once you’re happy it’s working, and add a spot or two of glue to help hold it tightly. You can also add a little glue to the underside of the button.Your child now has an amazing tote bag they can show off and take to the shops wherever you go!
Applique Letters
If you’re not sure your child is ready for a big sewing project, teach them some applique. This just means sewing decorative patches to a larger piece of fabric. Many kids will enjoy sewing their name (or initials) onto things, so this can be a good place to start.
Materials
You’re going to need:
- A piece of fabric to applique onto
- Some bright fabric letters
- Pinking shears
- A cotton reel
- A needle
- Scissors
Step 1: Cut Out The Letters
First, you need to make the letters. Cut them out of fabric with pinking shears to reduce the fraying and save yourself from having to edge them.
Step 2: Pin The Letters To The Fabric
Pin the letters onto the fabric. Setting them level and evenly spaced.
Step 3: Sew Around The Edges
Help your child thread the needle and start off the first stitch, and then guide them to sew around the edges of the letters. This doesn’t need to be neat; they just need to look at holding down the edges. However, if you choose a pretty thread and pretty fabric, they’ll want to make it look as good as it can!When they’ve finished, they’ve got a lovely piece of applique art that they can hang up in their bedroom.You can also add other shapes, like a sun, a moon, or leaves, creating a picture in the fabric as an applique. Most kids will love this. If they aren’t interested in letters, choose other shapes and encourage them to build up scenes using fabric.
Conclusion
Sewing is a great skill for children to learn, aiding their fine motor skills and coordination. It does require some supervision and your child will probably need quite a bit of help to start with, but it’s a very valuable life skill and most kids will thoroughly enjoy the process once they have got started.Kids can make some amazing things with a needle and thread, so grab the sewing box and get stitching!
Comments
0 comments