Poinsettia is a popular seasonal plant often associated with Christmas and festive holiday decor. The arrival of these plants in stores often signals the start of the Christmas season, making it an unmistakable symbol of the holidays. Try a poinsettia craft this holiday season and create beautiful and fun Christmas decor and gifts. Here are four festive poinsettia crafts for the holidays.
Poinsettia Napkin Rings
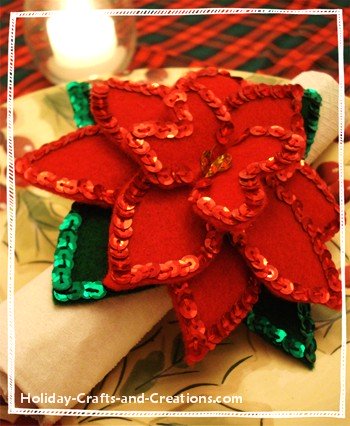 Source: Inspired by Holiday Crafts and Creations, “Poinsettia Christmas Napkin Rings” (http://www.holiday-crafts-and-creations.com/christmas-napkin-rings.html)If you need a little something special to dress your holiday table these poinsettia napkin rings are easy to make and sure to impress every guest at your holiday dinner! Gather the supplies you’ll need:
- Red and green felt
- Scissors
- Marker or pencil
- Hot glue or fabric glue
- Gold beads
- 2 small pieces of velcro
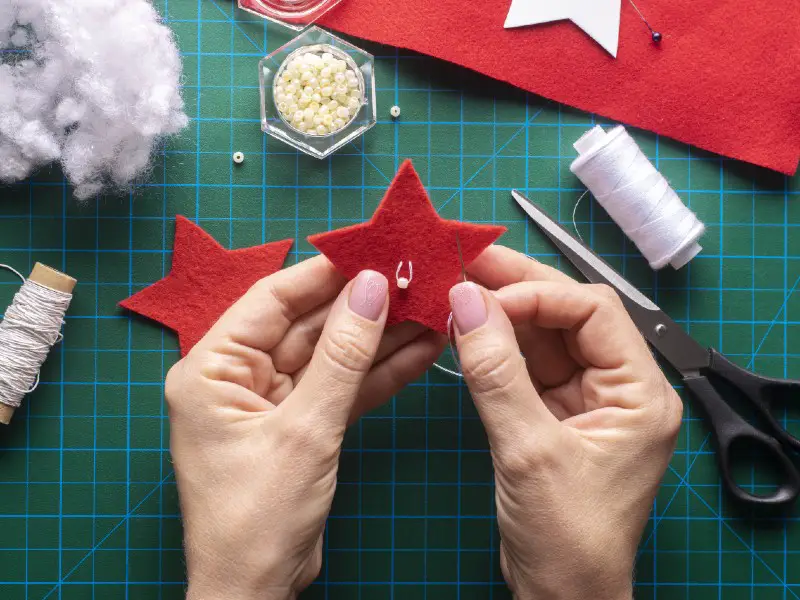
How to make a poinsettia napkin ring:With your red felt, draw a flower shape with six long petals (like poinsettia leaves). Cut out your shape, then use it as a stencil to cut out one more red flower and a green one. With your remaining green felt cut out a long strip of felt about 8in (17.5cm). Glue your two red flowers together ensuring the tips of the petals on the top flower line up between (in the spaces) of the petals on the bottom flower. Glue your green flower (the leaves) to your flower, doing the same – lining up the leaves to be in between (in the spaces) of your flower petals. Glue a small piece of velcro onto each end of your green strip of felt – gluing one piece to one end, flipping the felt, and gluing the other piece to the opposite end. You want to ensure you can close your felt strip into a loop. Glue your poinsettia to the center of your felt strip, and decorate the center of the flower by gluing on a few gold beads. Now you have your very own holiday napkin ring to use for holiday dinners for years to come, it’s that easy! Note: Instead of using velcro you can choose to create a button closure for your napkin ring by gluing or sewing a button to one side of your felt and cutting a small slit in the felt on the opposite end.
Poinsettia Garland
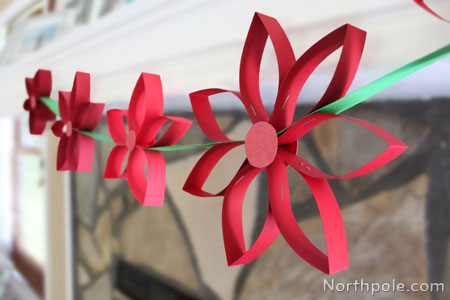 Source: By Northpole, “Paper Poinsettia Garland” (https://www.northpole.com/CraftCottage/paper-poinsettia-garland)A great craft to do yourself or get the kids involved, deck the halls with this beautiful poinsettia garland.Gather the supplies you’ll need:
- Red construction paper or cardstock (in various shades, if desired)
- Green construction paper or cardstock
- Yellow construction paper or gold metallic/glitter cardstock
- Scissors
- Ruler
- Stapler
- Ribbon, string, or fishing line
- Quick-dry glue
How to make poinsettia garland:Take your red and green construction paper and cut it into 1in (2.5cm) strips along the long edge of the paper. You will need 7 strips of red per flower, and 1 strip of green to join them, so cut your strips according to how many flowers you plan on having. Take your 7 red strips and fold them in half. Once folded, stack all of your strips together. Staple your stack together at the open (cut) end. You may need to staple them in two parts, that’s okay we will be covering up the center later on. Separate the stips, opening them up to form your petals. Staple your petals together on the side, leaving two unjoined petals. Place a strip of your green construction paper between your two unjoined petals, then staple them together. Repeat this process with as many flowers as you’d like, joining each flower by stapling the green strip between the petals of the next flower.To create centers for your flowers, cut two circles per flower out of yellow construction paper or gold/glitter cardstock. Glue your circles to the center of the flower on each side. Repeat for each flower.To finish your garland, string a piece of fishing line or ribbon through one of the petals on each end of the garland, and tie it to your desired fixture. Note: You can easily make smaller flowers for your garland by cutting your paper strips shorter and stacking 5 together instead of 7. This garland is a fun craft for teachers to make with their class, and use the finished project to decorate the classroom for the holidays!
Polymer Clay Poinsettia Ornaments
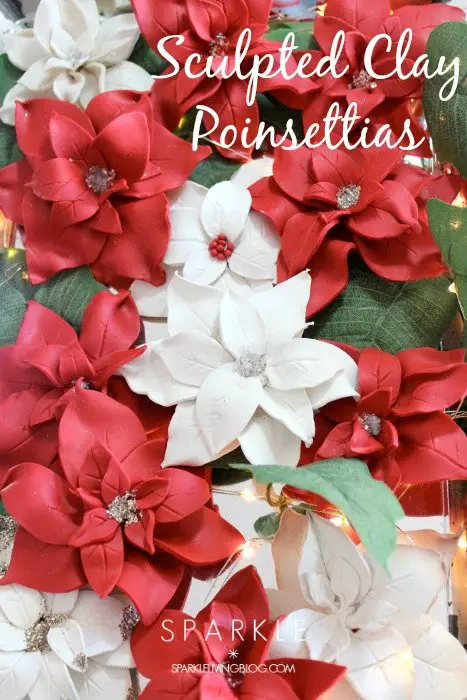 Source: Inspired by Jessa @ Sparkle Living Blog, “Make Sculpted Clay Poinsettia Ornaments” (https://sparklelivingblog.com/2014/11/make-sculpted-clay-poinsettia-ornaments/)These ornaments are easy to make and are a great addition to your Christmas tree – they also make beautiful gifts! Gather the supplies you’ll need:
- White or red polymer clay that bakes hard
- Rolling pin
- Craft or sculpting knife
- Toothpick or small sculpting tool
- Craft glue
- Glitter
- Ribbon or String
How to make polymer clay poinsettia ornaments:Pinch off a 2in (5cm) piece of clay and roll it out using your rolling pin until it’s about ¼ in (6mm) thick. Use your sculpting knife to cut out leaf shapes in various sizes – you’ll be looking to have about 5 or 6 of your larger-sized leaves and about 6 or 7 medium to small ones. Take your toothpick and sketch veins into your leaves. If you have a fake flower on hand, you can use one of the petals to press into the clay and form the veins for you.Pinch the base of your petal, and adjust the sides of your leaves so they have a more 3D shape (like a real petal). Take 5 or 6 of these leaves and arrange them in a flower pattern. Join your leaves together by pinching them together at the base until you’ve formed the bottom layer of your poinsettia. Take a few of your smaller leaves and position them as desired on top of your base layer. Squeeze them together to ensure they’re secure.Using your sculpting tool, create a small hole in one of the large base layer petals for your ribbon or ornament hook. When you have created a 3D poinsettia design you’re satisfied with, place your poinsettia on a baking pan and bake according to the package, making sure to check it regularly so it doesn’t take on any color. Let cool. To add a sparkly center to your flower, add glue to the center of the flower and sprinkle your glitter onto the glue. Tip your flower over to knock off any excess glitter. Thread your ribbon through the hole you created and tie it in a loop for hanging. Notes: You can use white or uncolored clay and then paint your poinsettia after baking. You can use green clay to create leaves for a more realistic poinsettia, just attach your green leaves underneath your base layer of petals.Instead of glitter (who wants to clean up that mess?), you can opt for gluing gold beads or buttons to the center of your flower.Clay ornaments are a fun project for you and your little ones. Show them how to shape the leaves, or let them use their imagination then bake their creations and let them paint them for unique sentimental ornaments you’ll cherish for years to come.
Foam Poinsettia Gift Toppers
Source: By Little Crafties, “DIY Poinsettia Christmas Flower | Christmas Decoration | Glitter Foam Flower | Easy Christmas Craft” (https://www.youtube.com/watch?v=CdCwRduVVT0)Personalize your gift wrapping by swapping ordinary bows for these cute foam poinsettia gift toppers and your gifts are sure to stand out under the tree!Gather the supplies you’ll need:
- Red foam sheets (glitter foam if you’d like!)
- Hot glue
- Pencil
- Decorative button
- Paper
How to make foam poinsettia gift toppers:Use your paper to create a template. Start by drawing a five-petal flower (it will look like a star but with rounded “points”) and a single petal shape. Cut out your templates.Use your paper template to cut out one flower, and five individual petals from your foam. Pinch each individual petal together at one end and hot glue, creating a 3D petal. Glue each individual petal to your flower-shaped foam-pinched end of the petal to the center of the flower. Stagger your petals so the points are lined up in the spaces between the base flower’s petals.Finish by gluing a decorative button to the center of your flower – ornate antique buttons work great, but any button will do, you can even use beads.To use your foam poinsettia on your gift – wrap your gift as usual and either tape to the wrapping, or if using ribbon glue your flower to the center of your ribbon. This creates a beautiful alternative to a typical bow on your gift wrapping! Notes: Create poinsettias in a few different colors to help you differentiate your gifts. For example, red is for one family and gold is for your spouse. Not only will they look extra cute under your tree, but it makes distinguishing your gifts a breeze when it’s time for the gift exchange!
Conclusion
If you’re looking for something a little different to make this holiday season, try one of these poinsettia crafts! These crafts are great to do on your own or with your little ones and make beautiful decorations for your home, table settings for your holiday parties, and gifts for your friends and family. With a few materials, you can create holiday magic with these beautiful crafts.
Comments
0 comments