What child is not fascinated by the ocean and the undersea world? What kid doesn’t get enthusiastic about the idea of pirate ships, sharks, dolphins, mermaids, sunken treasure, and glistening shoals of fish?There are so many crafts you can do that represent the ocean and the wonderful things in it, so let’s have a think about some ocean crafts for toddlers. We’ve tried to choose some very simple ideas to maximize what your toddler can do for themselves.
Paper Plate Fish
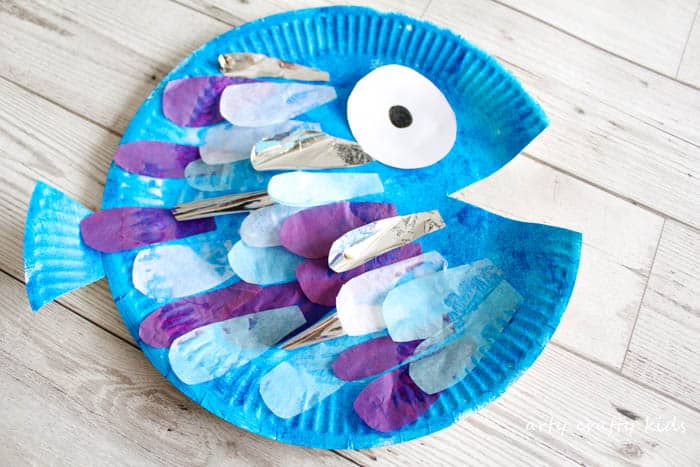 Source: https://www.artycraftykids.com/craft/paper-plate-rainbow-fish-craft/A paper plate fish is a very easy craft that won’t need masses of adult supervision and has endless possibilities. The supplies are also readily available, and you may even have some of them already.
Materials
For a paper plate fish, you’ll need:
- A paper plate
- White paper
- Scissors
- A black pen
- Paint
- Shiny/decorative papers
- Glue
- Clear fishing line
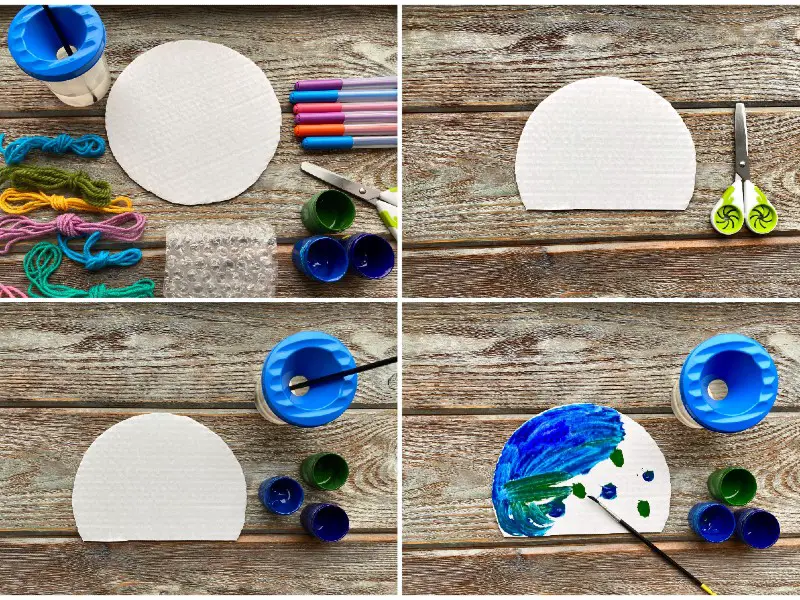
Step 1: Paint Your Paper Plate
To get this activity set up for your child, the first thing you should do is paint the paper plate. You can go for any color here, red, green, blue, yellow, orange ““ any color at all is fine for your fish. You could even do a mix of colors, but don’t spend too much time on it as your toddler is going to stick paper on top.You might want to do several plates at once so you don’t have to wait for more to dry if your child is very keen and wants to create a whole fishy shoal.
Step 2: Create Some Scales
Depending on how good your toddler is at crafts, they may be able to help with this part. You might not want to give them scissors, but they could help tear little strips of colored paper while you cut a few neater scales for them.Having lots of different colored papers for this step will make your toddler’s fish look particularly magical. Alternatively, you could do a theme, such as greens or blues or reds. You could even consider a gradient look ““ but don’t be too ambitious! Your little one will have their own ideas of how they want to stick things.If you want to add other decorations like buttons or sequins, that’s fine too. Don’t use very big and heavy buttons, as they may not stick to the paper plate very well, but otherwise, any decoration is fine!Tip: if you don’t want to do the scales, you could also help your toddler decorate a “fish plate” with paints or pens, adding stripes or spots or other designs instead of cutting and sticking. This is a less dedicated craft option as you won’t need to be handling glue or cleaning up lots of bits of paper.
Step 3: Cut Out An Eye
Grab a sheet of white paper and cut out an eye, using your paper plate to get a sense of scale. You can experiment with different shapes, or just cut a circle. Use your black marker to form the pupil. You can also add eyelids or eyelashes if you want to.
Step 4: Cut The Mouth Out
Decide on an edge of the paper plate to be the face, and then cut a triangle a couple of inches long out. This is the fish’s mouth. You can curve the triangle a little bit to make it look like the fish is smiling.Don’t get rid of the cutout part; you’re going to use it in the next step.If you prefer, you can also cut a mouth out from another piece of card and stick it on instead, having fun with kissy fish lips or even teeth.
Step 5: Add The Tail
Turn the cutout piece the other way around, so that the point faces in towards the plate, on the opposite side to the mouth you’ve just cut. With the wide edge out, you’ve got the perfect tail. If your paper plate is crinkly, this may even look like the frills on a fish’s tail. At this point, you can add further embellishments such as a fin or a dorsal fin if you’re inclined to; just cut them from other bits of card. However, you might prefer to keep the craft simple, especially if your toddler is inclined to get a bit bored while waiting for you to do these parts.
Step 6: Glue The Eye In Place
Now that the tail and mouth are in position, it should be easy to see where to put the eye. If your toddler is keen, help them dot some glue on, and then stick the eye down firmly.
Step 7: Glue The Scales On
Help your toddler start gluing the scales in place. They should overlap a bit, covering the plate and layering up like real fish scales, but let your toddler have as much fun as they want here. Mix and match colors and play around with the different shapes. By the end, you’ll have a really magical fish!Don’t worry if they cover the eye up a bit as they go; the craft doesn’t need to be perfect, and it won’t really matter. You can stick the eye on it after this step if you would rather it stayed on top, however.
Step 8: Add A Hanger
Punch a little hole near the top of the paper plate and thread the fishing line through. Now your toddler’s fish can “swim” through the air and turn in the breeze. This is a great way to make the craft feel finished and get the fish up to where it can be admired.
Paper Plate Jelly Fish
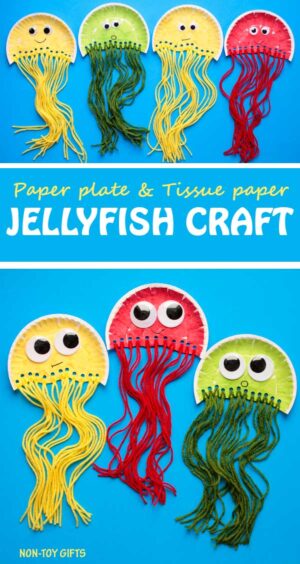 Source: https://nontoygifts.com/paper-plate-jellyfish-craft-kids/In case you still have some paper plates hanging around, here’s another great sea-scape option to turn them into fun underwater creativity.
Materials:
For this craft, you’re going to need:
- A paper plate
- A black marker
- Scissors
- Tissue Paper
- Googly eyes
- Glue
- Yarn
- A Hole Punch
- Clear fishing wire
Step 1: Cut The Paper Plate
Help your child draw a wavy line around halfway down the paper plate (or a bit below) and then cut this out for them. This is your jellyfish. If you want to be economical and environmental, you can make a second jellyfish from the other half rather than discarding it.
Step 2: Cut Or Tear The Tissue And Glue It On
Your child might find it easier to tear the tissue up, but you can help them cut or tear it into little pieces. Next, spread a thin layer of glue on the paper plate and start covering it in tissue paper. Don’t worry if it overlaps or doesn’t end up totally smooth; that’s no problem.Once the surface is covered (or mostly covered; this doesn’t need to be perfect), let the glue dry a bit before moving on to the next step.
Step 3: Hole Punch The Bottom Of The Plate
Grab your hole punch and work along the bottom of the paper plate, making a good amount of holes. These are going to form the tentacles in a minute, so don’t skimp on them! It might help to just use one side of the hole punch so you don’t end up accidentally punching holes in the wrong places.
Step 4: Add The Tentacles
Get your toddler to help you cut the yarn into different lengths. If they can’t handle scissors, ask them to hold the yarn for you, or help you determine how long to make each strip. This will keep them involved and help reduce the chances of them getting bored or impatient.Once you’ve got enough pieces of yarn, help your toddler guide them through the holes. Discuss what colors they want to use and where to put them as you thread the jellyfish, and then tie the yarn in knots to hold it in place.
Step 5: Create The Face
Get your child to pick a pair (matching or not!) of googly eyes for their jellyfish, and then help them to glue these in place. It doesn’t matter if they are a bit wonky; it will just give the jellyfish more character!
Next, draw a mouth on the jellyfish’s face using the black marker. Filling the mouth in will make it stand out and look more finished than just outlining it. You can also draw eyebrows or eyelashes, giving your jellyfish a good expression and plenty of personality. If you aren’t totally sure, use a pencil first and then go over it with a marker to get nicely defined lines.
Step 6: Add The Fishing Wire
Cut a length of fishing wire and make a little hole at the top of the jellyfish’s head and thread it through. Once it’s tied off, you can hang the jellyfish up out of the way, and watch his lovely tentacles wave and wobble in the air.He’ll look great alongside your fish, or you can make him some other jellyfish pals to be friends with. You could even tie a little shell or other decoration in his tentacles, but you should avoid making them too heavy, so don’t add lots of extra decorations or he may not hang nicely.
Conclusion
Sea crafts are particularly fun because they have such creative color options. Encourage your child to think about different colors and choose a selection they think will look good. Shiny paper, scraps of foil, colored film, and even sequins can make beautiful additions to undersea crafts.These two crafts are particularly nice in that they can be hung up out of the way, where your child can enjoy them but they won’t be adding to any clutter in your house. They will look lovely drifting in the air currents, rather than the ocean currents, and be a great reminder of afternoons spent with your child.
Comments
0 comments