Kids love ocean crafts, and there are so many different things you can do to recreate the undersea world in your living room or at your kitchen table. Let’s explore some great ocean crafts for kids.
Paper Whale Bookmark
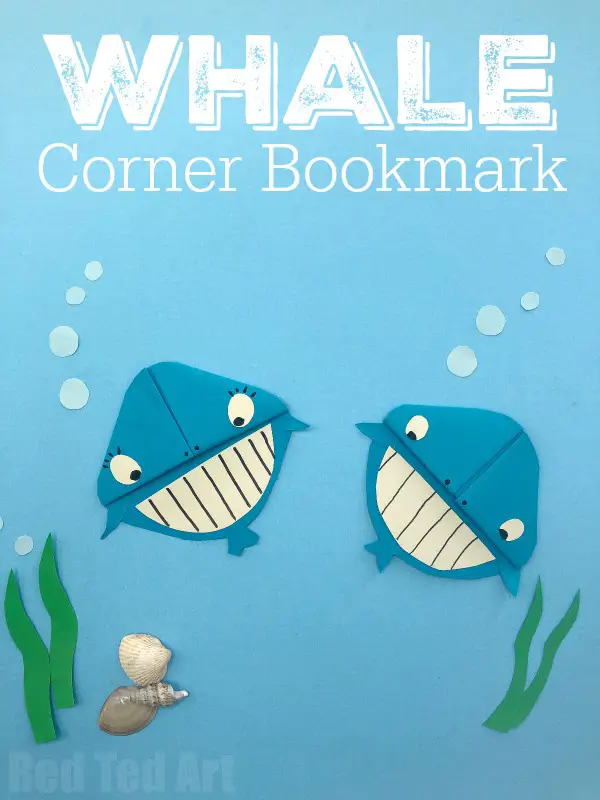 Source: https://www.redtedart.com/easy-whale-bookmark-corner-design/If your child is a fan of whales, they will enjoy this cool whale craft. It’s a pretty simple one, and they’ll get a great paper whale bookmark that they can show off to their friends and use to hold their page.
Materials
You will need:
- A square of blue paper
- Extra scraps of blue paper
- Scraps of pale blue paper
- White Paper
- Glue
- Scissors
- Googly eyes
- A black pen
- Blue ribbons (optional)
Step 1: Fold Your Square
Help your child fold the square in half to create a triangle. They then need to turn the triangle so that the long edge is at the bottom.Help them take the right-hand point of the triangle and fold it up to meet the top point. Do the same on the left. You should now have a diamond. Crease the edges and then open the edges back out.Take the central point at the top and fold the front half of the triangle down (only one side of the paper; leave the piece against the table flat).
Step 2: Tuck In The Edges
Next, your child needs to take the right-hand edge of the triangle which you creased earlier. Fold back along that crease, but this time, tuck it over the flap you have just folded down. Do the same on the other side.Rotate it so that the pocket your child has just created is at the top, and you’ll see the bookmark start to take shape. It’s now time to turn it into a whale!
Step 3: Shape The Whale
Help your child get started by rounding off the lower part of the bookmark, giving the whale a curvy body rather than straight edges.Round off the edges at the sides, and trim the top of the bookmark off as well. You should now have a nice, curved body shape for your whale.
Step 4: Make The Mouth
Now, give your child the white paper and get them to cut a nice big semi-circle. This is going to be the whale’s mouth. They can also use pink paper or another color if they prefer.Help them get a smooth shape and then get them to draw a tongue or stripes for baleen. You may want to talk to them about how whales’ mouths work or even look at some pictures with them.
Step 5: Glue Eyes And Fins
Help them to glue their eyes in the right place. These want to go at the widest points of the bookmark, just above the fold you made to create the bookmark pocket.Next, get your child to cut out two fins from your blue paper, and glue these on either side of the whale’s body. Put two dots in the middle of the bookmark to represent the whale’s nostrils.
Step 6: Add A Blowhole
Get your child to cut some thin strips from the paler blue paper. These are going to make the water blow out of the whale’s blowhole. Use your scissors to add curl to the paper (take a strip and run it briskly over the blade of one scissor). You can also use curling ribbons if you prefer.Get your child to glue these strips just behind the top of the whale’s head, and then they can use their black pen to draw a blowhole at the front. Now, the whale’s shooting water out of its blowhole!
Step 7: Glue the Tail
Show your child how to draw a whale’s tail in your normal blue paper, and then help them glue this at the bottom of the whale’s body. Next, if your child wants to, they can knot a couple of short lengths of ribbon around the tail. These will make it look as though the whale is creating a slipstream by swimming fast.They now have a great whale bookmark to keep their place in all their school books!
Seashell Sea Creature
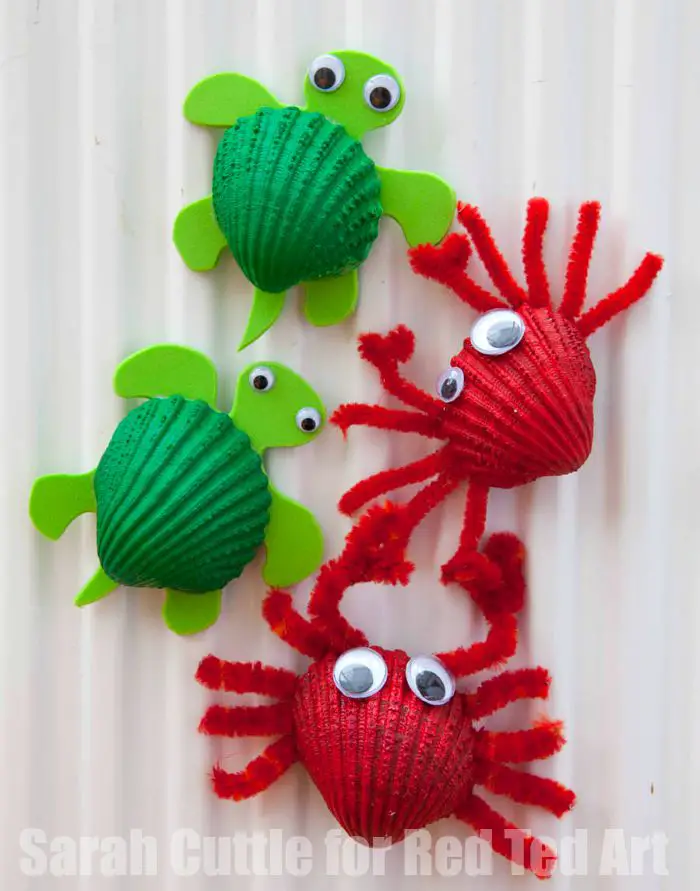 Source: https://www.redtedart.com/shell-crafts-crab-fridge-magnets/If you have some little seashells you’d like to turn into crafts, there are also some great things you can do. We’ll cover a few different options below.
Materials
For this craft, you’ll need to gather up:
- An assortment of seashells
- Acrylic paint
- A paintbrush
- Colorful pipe cleaners
- A fake pearl or shiny white bead
- Some colored card
- Colorful yarn
- Clear fishing wire
- Small googly eyes
- Small amount of sand
- A lidded plastic container
- Green tissue paper
- Scissors
- Glue gun
We’re going to show you how to make a crab, an octopus, a jellyfish, a turtle, and a clam from the above materials. Note that while there’s a suggestion for which shell to use for which creature, you can use whatever you have to hand.You can create any or all of these creatures, and then we’ll show you how to add them to an ocean scene. You might want several of one kind or just one of each.
Option 1: Crab
Help your child paint a common cockle seashell bright red, and set it aside to dry. In the meantime, cut six short lengths of red pipe cleaner, and two slightly longer lengths.Your child should twist the longer lengths to create pincers by folding them in half, twisting them together, and then gently turning the two ends outwards.Once the shell is dry, heat up the glue gun and glue the pipe cleaner legs and pincers into place, and then stick on the googly eyes.Your crab is now complete!
Option 2: Octopus
Let your child choose what color they would like the octopus to be, and check you have either pipe cleaners or colored cards to match. Paint a flat periwinkle shell and set it aside to dry.Ask your child whether they want to do pipe cleaner legs or card legs. Pipe cleaner ones can be a little more fun.If you are doing card legs, you need to help them draw a circle of eight tendrils onto the card, preferably fanning out and twisting in different directions.If you are going to use pipe cleaners, cut four long pieces. Cross one length over another, twist them together in the center, and then curl the ends out in different directions. Twist in the third and fourth pipe cleaners so that you have eight legs in total.Once the shell has dried, use the glue gun to stick the eyes to the octopus, and then glue the shell to your octopus’s legs. If you have used pipe cleaner legs, let the glue dry and then your child can reshape them so that the octopus is walking and waving its tentacles around.
Option 3: Jellyfish
Get your child to paint a conical limpet shell in blue or pink or white, and put it to one side to dry. Once it has dried, glue on the googly eyes, and then cut some lengths of yarn that match the color chosen for the shell.These can be glued to the inside of the shell, trailing down like a jellyfish’s tentacles. Next, glue a length of clear fishing line to the top of the shell so the jellyfish can be hung up.
Option 4: Turtle
Help your child paint a common cockle shell or a Baltic tellin shell bright green, and put it aside to dry.Again, let your child choose between pipe cleaners or cards for the flippers. You’re also going to cut a little head out of the cards.If they want to use cards, you can either cut four independent flippers or create a little round body to glue under the shell, with the flippers and head sticking off to the sides.Glue the googly eyes to the head, and then glue the dry shell to the body, or carefully glue the pipe cleaner flippers into place.Add a dot of glue to the turtle’s back so it can be suspended, or leave it sitting on its flippers.
Option 5: Clam
For the clam, you’re going to need two common cockle shells. Get your child to paint them dark purple on the outside, and then a paler purple or pink on the inside.Wait for the shells to dry and then glue the two together at the narrow point so that the “clam” is hinged open. Inside, glue the fake pearl or another shiny bead. You can add googly eyes to the clam, or leave it as it is.
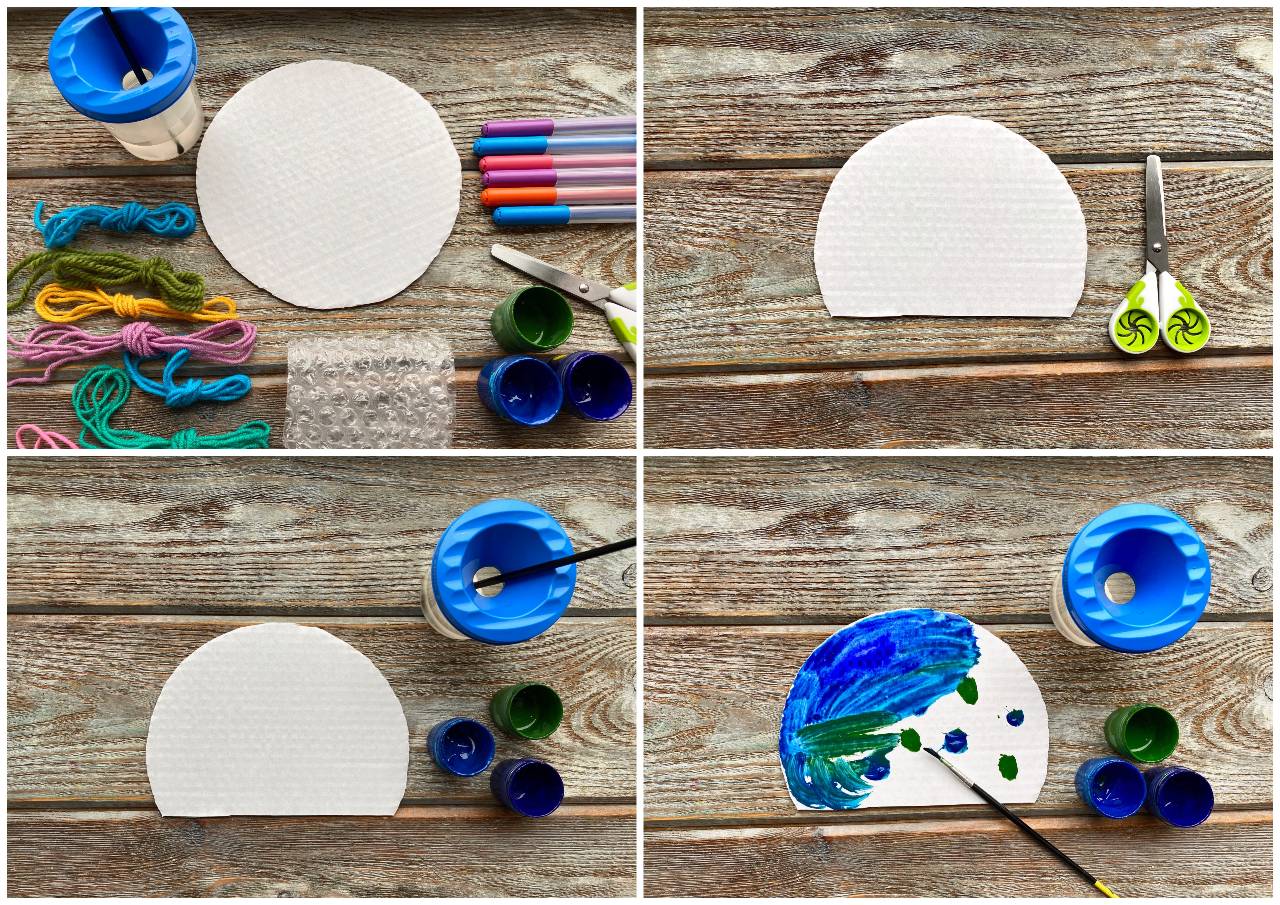
Option 6: Create An Aquarium
Get your child to draw around the bottom of your plastic container onto a piece of a yellow card, and then cut this out.They can add some glue and sprinkles of sand, and then twist up some green tissue paper into stalks of seaweed and glue this in.The jellyfish and turtle can be glued to hang from the top of the container, and the other animals should be positioned on the seafloor. Make some rocks from gray card or polymer clay, and your seascape is complete!If your child is having fun, help them to create a rocky cave for the octopus to hide in, using scraps of gray paper glued together. This seascape would make a wonderful decoration in any child’s bedroom.
Conclusion
Hopefully, you’ve got some great ideas for ocean crafts for kids now; you can have endless fun creating different sea creatures, and get as inventive as you like with the things you create. Whether you want a complicated project that will span several days or a five-minute craft to fill in a gap, there are great sea-themed crafts you can do!
Comments
0 comments