When it comes to newspaper craft ideas, your options are endless and the supplies you need are wonderfully few in number and easy to find: newspaper, scissors, glue, and the need for sealant now and then. Here are three amazing newspaper crafts for you to try, with multiple variations to explore and experiment with.
1. Newspaper Decoupage On An Empty Canvas
 Source: By Amelia Allonsy @ eHow, “How to Decoupage Newspaper on Canvas” (https://www.ehow.com/how_12060334_decoupage-newspaper-canvas.html)Here’s a chic newspaper craft for you: newspaper decoupage canvas. Nothing embodies shabby chic like newspaper decoupage. Whether you’re plastering a bookend, a frame, or even an entire wall, newspaper decoupage can take something old and tired like newspaper art and jazz it up into an eclectic and trendy expression of style.
Things you’ll need
- Scissors
- 1 canvas or poster board
- Foam brushes
- Decoupage glue
- Steel wool
- Sandpaper
- Polyurethane spray-clear coat
- Newspapers, and a lot of them. Feel free to use some magazine paper, wrapping paper, or anything else you have lying around.
Method
Step 1
With a pair of sharp scissors, cut up some newspaper, magazine clipping, and the like into clean-edged strips and pieces. If you prefer something more edgy and rustic, tear them up into pieces.
Step 2
Arrange the newspaper strips on the canvas. Just place it on and try to find a pattern you like. This is the time to design your canvas, move pieces around, play with color and patterns till you get what you’re looking for.
Step 3
On a small area of the canvas, dab or brush some decoupage glue. Start near the corners.
Step 4
Take a strip of newspaper and brush the back of the cut out with a small amount of decoupage glue. Carefully stick the newspaper onto the canvas, in the place where you initially brushed decoupage glue. Remember to smooth out any wrinkles. Repeat the process, first brushing some glue on the canvas, and then some more on the newspaper before carefully laying the latter onto the canvas. Continue till the entire canvas has been decoupaged.
Step 5
With your first layer done, feel free to add another layer of newspaper or colored strips of craft paper. You can form a picture, a word, or anything you want to, as long as you plan ahead, design, and figure out the layout. You can also use the decoupaged newspaper as a background, perhaps for a picture of you with friends, your favorite quote, or even go ahead and paint something over it, once the glue has dried up.
Step 6
The hardest step is waiting for the decoupage glue to dry up. This can easily take the better part of an hour, or more, depending on the amount of glue you used, as well as the number of layers. Just remember to give the canvas enough time to dry.
Step 7
Once your canvas is dry, brush another layer of decoupage glue over it. This will help protect your newspaper art. Then, wait for the top layer to dry up. Again.
Step 8
Sandpaper time. Grab your sandpaper, dampen it just a little, and lightly sand the canvas. You can repeat this process of applying a coat of decoupage glue, and then sanding it once it’s dry a time or two.
Step 9
The final step? It’s another thin layer of decoupage glue that is to be brushed over the canvas. Then, you let it dry. But this time, instead of sanding it, you can use the steel wool to gently polish it. You can even add a final spray of clear polyurethane to the finished canvas, to give it a nice, glossy look. Have the canvas framed and hang it on a wall to display your newspaper craft.
2. Newspaper Hat
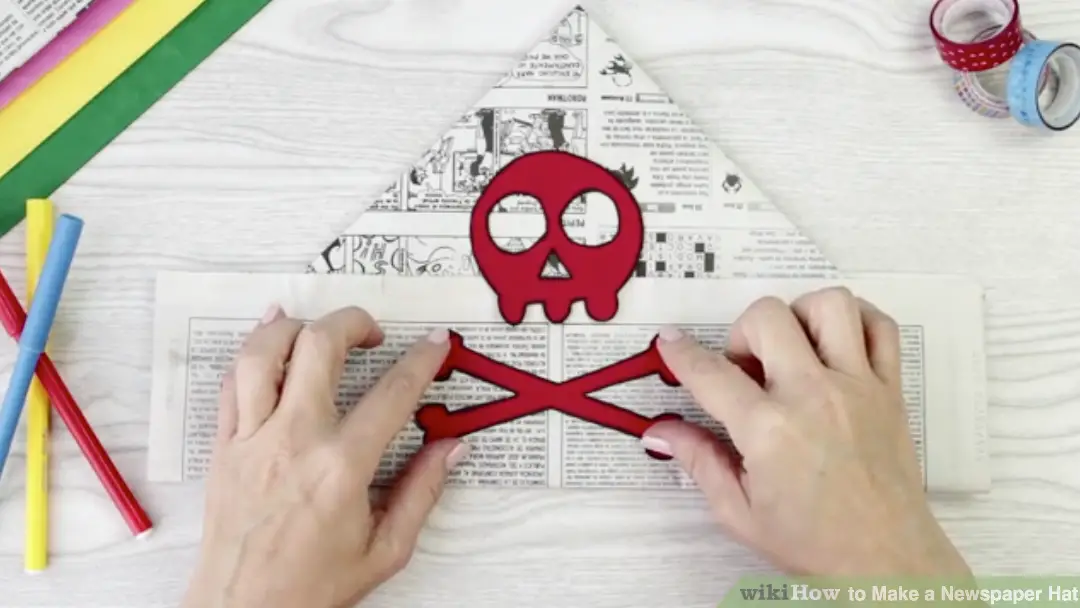 Source: By WikiHow, “How to Make a Newspaper Hat” (https://www.wikihow.com/Make-a-Newspaper-Hat)Here’s an age-old newspaper crafts hack for the kids, and a pretty easy one at that. Have you really lived till you’ve stomped over puddles wearing a newspaper hat and clutching a rolled-up newspaper “˜telescope?’
Supplies
Newspaper, and that’s it.
Method
- Find yourself a flat surface, like a table. Open up the newspaper and lay it flat out on the table
- Fold the paper down vertically into two halves. Now fold it again, this time horizontally, by bringing the right corner over to the left corner. Make sure you crease the fold in a clean line.
- Unfold the fold you just made and check for a crease that runs down the center.
- Fold-down the corners to the center. First, grab the left corner and fold it over with the edge following the crease line. Repeat this with the right corner. Make sure the edges are even and that they run along the crease you just created.
- You’ll find that there will be two layers of the bottom flap, just under where the folded corners end. Carefully pull up one bottom flap and fold it, creasing the fold evenly.
- Flip the paper over to the other side and fold the second bottom-flap up, once again creasing the fold.
- That’s pretty much it. Open up the bottom by gently pinching the tip of your hat and popping it into shape.
- It doesn’t have to end here. You can decorate your newspaper hat any way you like: use feathers, beads, and buttons, glitter, and paint – both of which need to dry before you put on the hat for obvious reasons – and any other bobs and bits you have lying around that would look great on your hat.
Method 2
You can also go for the classic cone hat, rather than the one you just read about. It, too, is pretty easy to make, but you’ll also need a little strip of tape and a pair of scissors to go with the newspaper if you’re making a list.
- Once again, on a flat surface, place a half sheet of newspaper.
- Pinch the top right corner of the newspaper and carefully bring it across to the left side, either by rolling it into a cone right away or, if you don’t mind the crease, folding it first and then popping it open into a cone. Cut out a strip of clear tape and stick it onto the edge of the cone to keep it in place.
- Now, cut off the extra bits jutting out to even the edges. You can decorate the cone with a nice strip of washi tape around the diameter, or stick a bright flower on the top.
3. Newspaper Coiled Bowl
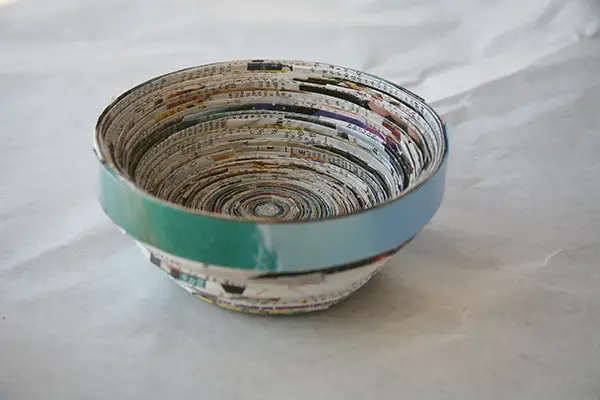 Source: By Alyssa Navapanich @ San Diego Family Magazine, “Art with Alyssa: Recycled Paper Bowl” (https://www.sandiegofamily.com/for-the-kids/crafts-for-kids/art-with-alyssa-recycled-paper-bowl)Just because it’s a newspaper craft, doesn’t mean it can’t look absolutely beautiful and refined. That’s exactly what this coiled newspaper bowl is: refined, beautiful and inspiring! You can use it as a display, you can gift it, or even sell it and make a pretty penny.
What you’ll need:
- Tape
- Sealant
- Brush
- Scissors
- Newspapers
Directions:
Method 1
Step 1
Pick out your newspaper. If you decide early on that you’re going to paint your bowl then you can pick anything. Alternatively, you can choose bright, colorful parts – the more colorful paper, the more colorful the finished bowl. You can ever use magazine strips.
Step 2
First, fold your paper in half down the middle, up the vertical length of it. Then, fold both the edges inward, towards the middle crease. Now, fold the new edges once more towards the center. Repeat this one till you have a long narrow strip of paper. Next, fold it in half down the center. Your finished product should look like a “˜slat.’ Repeat this step numerous times, until you have a lot of new slats.
Step 3
Now you need to tape the slats together. Cut out a strip of tape and lay it, sticky side up on your work table. Then lay two slats, end to end, and carefully wrap the tape over and around them. You’ll have a nice long slat to work with. Repeat this till you have a good pile of them ready.
Step 4
Coiling the slats is perhaps the trickiest part of this process, so make sure you complete this step in one sitting, seeing as how the coil will spring loose and unwind if you let go. Take one of the long strips and start coiling it, bending and curling it inward till you get a snail-shell-like structure. Now, when you get to the end of one strip, with one hand holding the coil in place, quickly tape another coil to the end. (Tip: You can have small strips of tape cut and stuck on along the edge of your work table. This way you can just grab them and stick them around the ends.)Continue to coil, keeping a good grip on the structure and coiling as tight as you can as you go. Once you coil enough strips together and have a big enough diameter, tape the end of the last strip down onto the bowl itself.
Step 5
This part can get hairy. You’ll need to slowly, and I can’t stress how important it is to be slow, push up the sides of the bowl, one round of coil at a time, and build a wall of sorts. Alternatively, you can also coil and stick together more strips around the bowl, starting from your solid bottom, coiling, and then taping in an upward manner.
Step 6
All that’s left to do now is to seal your newspaper craft. A sealant is needed to harden and strengthen the bowl. You can use a water-based sealant and brush it on, generously coating it over the bowl. Consider covering the insides first so your bowl is pretty much stuck together before you get to the exterior. When it’s time to cover the bottom, just flip the bowl upside down and apply the sealant to the base. Let the bowl dry completely and then, you’re done!
Method 2: Coiled Newspaper Coaster
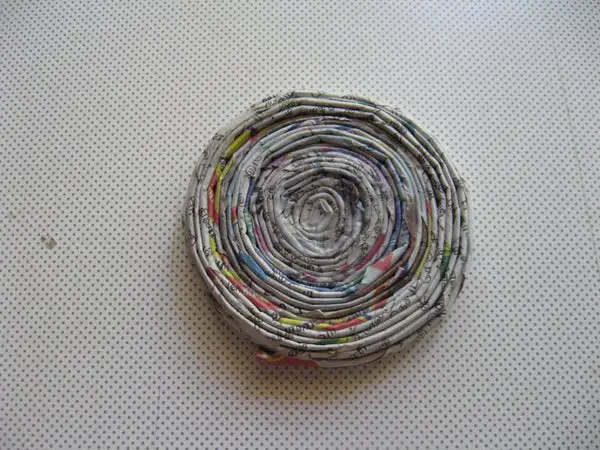 Source: By aliceniraimathi19 @ Instructables, “Rolled Newspaper Coasters” (https://www.instructables.com/Rolled-News-Paper-Coasters/)Another fun craft to make with these coiled strips of the newspaper is a coaster. Once you finish step 4 and stick to your last strip, you pretty much have your coaster. Coat it with a sealant on either side and once it’s dry, your coiled newspaper coaster is ready.
Method 3: Coiled Newspaper Mat
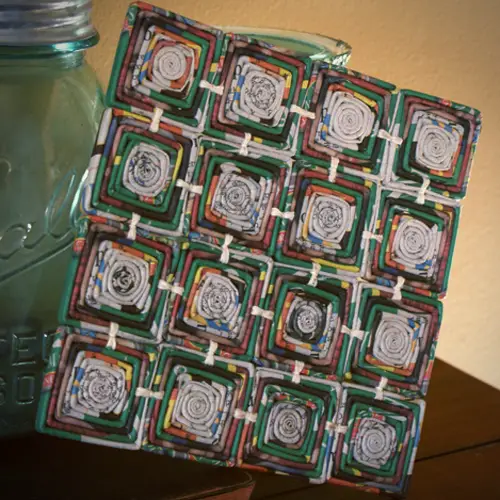 Source: By Johnnie Collier @ Saved by Love Creatioins, “Coiled Newspaper Trivet” (https://savedbylovecreations.com/2011/08/coiled-newspaper-trivet.html)Since we’re on a roll with coiled newspaper, pun intended, why not make a mat while we’re at it?You’ll definitely need a good deal more strips of folded newspaper slats, but if you’ve got time on your hands and a stack of newspapers you want to get craft with, settle in.The process is pretty much the same. You can coil the strip into a circle, or try something new and fold them around into squares. A good-sized mat will need about 9 such coiled squares, each one at least 4″x4″ in size, with a three-three-three placing, or you could go freestyle with your circled coils and get a nice, wonky mat. Once you have enough coiled circles or folded-up squares or rectangles, you’ll need to get out some industrial glue that holds up well.
Square/Rectangle
Use a brush to coat one side of the square with glue, and do the same with another square. Bring both glued sides together and hold them in place for a minute, applying firm pressure. Now, glue the other side of the first square and the side of a new square and stick them together. You’ll have three squares in a row. Repeat this step twice more and you’ll have three rows of three squares each. Now go ahead and stick these three rows together, one below the other and you’ll have a solid 9×9 structure. Once the glue dries up, you can apply the sealant using a brush over both the top and bottom of the mat. Allow the sealant to dry and the mat to harden.
Circle
Sticking the coiled circles together might be trickier, but the same applies. You can either stick 9 circles together, three in a row, and form a curved-square mat, or you can design a more free-styled mat, make coils of different sizes, and glue and seal them together. Either way, just make sure you coat them generously with a water-based sealant and allow the mat to harden before you use it.You can use it as a decorative piece, a placemat, a hot pad, or a potholder…the options are endless when it comes to making crafts from old newspapers!

Comments
0 comments