Looking for a fun and easy craft to do on a rainy day? Try making these yarn dolls! They don’t need a lot of materials – aside from the yarn, you’ll just need glue and a few scraps of cloth or ribbon which you probably already have at home.We chose yarn doll crafts that don’t require expert crafting skills. You don’t need to know how to crochet or knit (although you’ll find plenty of patterns for yarn dolls for those types of projects). Some of these projects are so easy, you can do them with kids! Here are some ways to make yarn dolls.
Simple Yarn Doll
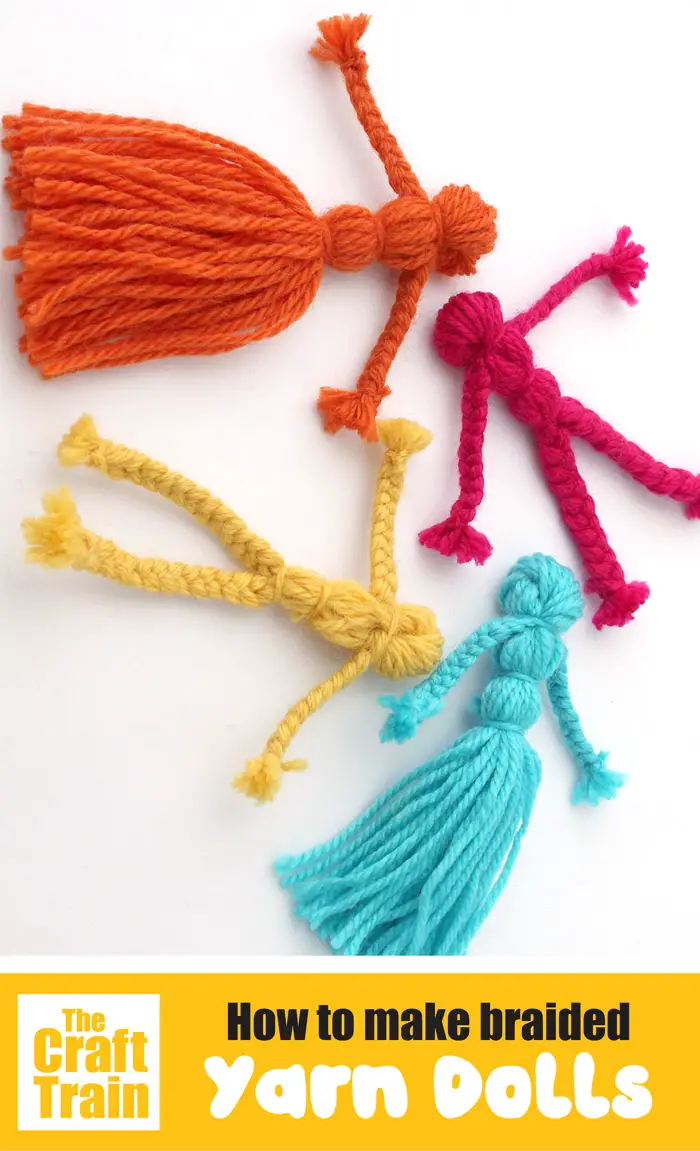 Source: By The Craft Train, “How to Make Yarn Dolls” (https://www.thecrafttrain.com/braided-yarn-dolls/)Difficulty level: EasyThis really simple craft project from The Craft Train doesn’t need a lot of tools or previous craft skills. In fact, you can do this with these kids, and make a bunch of them into keychains or bag chains that they can give away as presents.
Materials:
- A scrap of thick, heavy cardboard. Ideally, cut it out from a delivery box or any heavy carton. We find that cereal boxes are too thin and flimsy unless you double them up and glue them together.
- Scissors
- Yarn of any color
Instructions:
- Cut the cardboard into the same length as your yarn doll.
- Start winding the yarn vertically across the cardboard. Keep rolling until you’ve reached the thickness you desire.
- Remove the yarn from the cardboard.
- Hold one end with one hand, and then snip the other end. You will end up with several strings of yarn that are exactly the same length.
- Make the doll head. Twist the yarn and fold the yarn strands in half, and then tie the top end with another piece of yarn. Your yarn will now look like a tassel.
- Divide the loose yarn into three sections. The middle section, which will be the torso, should be thicker. The left and right sections will become the arms.
- Divide and tie off the middle section in three to form the chest, waist, and what will later be the legs. It’s up to you to form the proportions you like or decide how you want to design it. You can braid the “legs” section and tie the ends to form feet, or you can leave it loose to make a skirt.
- Braid the arms and then tie the ends at the “wrist” to secure it.
This super simple yarn doll craft is great for young kids to help develop their motor skills and even teach them how to count and keep track of the “loops.” During Christmas, you can use white thread to make yarn doll angel tree ornaments. Or on Halloween, you can use an orange thread and make black paper hats to make yarn doll witches!
Pompom Yarn Animals
Source: By Klutz, “Making Klutz Mini Pom Pom Pets” (https://www.youtube.com/watch?v=ftRqiHcHyu0)Difficulty level: Easy to ModerateYarn pom-poms are one of those versatile craft techniques that can be as simple or elaborate as you want! The “basic” method is so easy even a preschooler can do it, but with a little creativity and practice, you can create beautiful pom-poms dolls of any size or design.
Materials:
- Fork (different sizes). A small fork will give you a smaller and tighter pompom, while a salad or serving fork will give you a bigger and fluffier pompom.
- Scissors
- Googly eyes
- Colored felt, ribbon, or other decorative materials
- Yarn of many colors
Instructions:
- Don’t cut the yarn yet! Get the loose end of a yarn ball and wrap it around your fork, just like you would do with your spaghetti.
- Keep wrapping until you reach your desired thickness. In general, you will need at least 20 “wraps” to get a small pom, and 50 to get a large one. Just keep the yarn tight, and stay within the center of the fork – there should be a small space left at the top and bottom.
- Once you’re happy with the wraps, hold it tightly with one hand and then cut the end of the yarn with the other hand.
- Cut a few inches of yarn and insert in the center of the fork, between two tines. Use it to draw the looped yarn together, and then tie it tightly.
- Remove the yarn from the fork. Tighten the knot until the yarn starts to curl and form a bunch of tiny loops. When you’re happy with the tension, do a double knot to keep it secure.
- Cut the loops and fluff up the strands to form a pompom.
- Decorate the pompom to look like your desired animal. Add eyes and other details, depending on the animal (wings, tail, feet, etc.).
You can glue the pompoms to make larger animals such as a caterpillar, or use different materials like buttons or beads to add more detail or color. Don’t be afraid to experiment! However, if you need to make pompoms of the same size, we suggest using the same fork and keeping track of the number of times you loop the yarn around it.These yarn doll pom poms are perfect for creating cute animals for a toy farm: make little sheep, chicks, pigs, cows, etc. You can also turn them into Christmas ornaments, key chains, or glue them on top of a ballpen cap for a DIY pencil topper. Make a bigger pompom to make a cat toy.
Simple Clothespin Worry Dolls
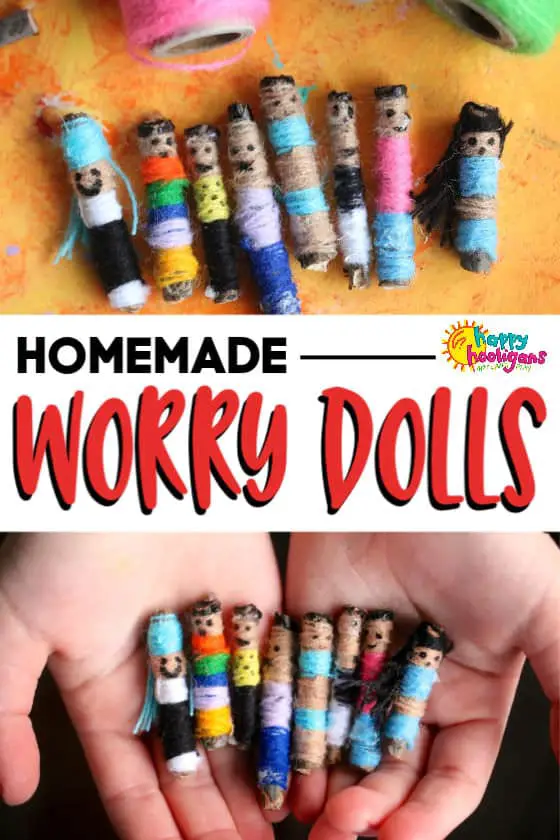 Source: By Jackie @ Happy Hooligans, “Homemade Worry Dolls for Kids to Make” (https://happyhooligans.ca/homemade-worry-dolls/)Difficulty level: Easy Worry dolls have a beautiful and meaningful history. In Guatemalan culture, you whisper everything you’re worried about to these simple yarn dolls and place them under your pillow. This doll will then absorb your fears and take responsibility for it. When you wake up, it will give you the wisdom you need to solve the problem.Worry dolls are traditionally made with a clay and wire base, and fabric that’s twisted around it. This modified yarn doll tutorial is simple enough for kids to do!This yarn doll can use any length of thread, so it’s a great way to use up leftover yarn scraps that are too short for your other projects.
Materials:
- Clothespin or popsicle sticks
- Glue gun or heavy-duty glue
- Thick black marker
- Scissors
- Yarn of different colors
Instructions:
- Glue one end of the yarn near the top of the clothespin or popsicle stick (leave enough space for the head).
- Apply glue on the rest of the clothespin or popsicle stick. Spread it – if it’s too thick, the yarn will slide, and it will seep through the fibers and make a mess.
- Keep tightly wrapping the yarn around the stick.
- Cut the yarn and change to another color, depending on your design.
- Draw eyes and a mouth with markers.
- Add strips of yarn for hair.
- Glue buttons and other decorations, if desired.
You can make more elaborate yarn dolls: cut the popsicle sticks to form arms, or add fabric scraps or patterned paper for more three-dimensional designs.You can also try braiding the yarn before gluing it into the stick, or alternating yarn with other types of strings so you get different widths and textures.
Yarn Voodoo Dolls
 Source: By Rhonda @ Dollar Store Crafts, “Make a Yarn Voodoo Doll” (https://dollarstorecrafts.com/2011/03/make-a-yarn-voodoo-doll/)
Difficulty Level: Moderate
Voodoo dolls are a big part of our pop culture, so even if you’re not planning to use these yarn dolls to place a hex on someone (at least, we hope not!), they can be a cool decoration or a fun gift.This craft isn’t really hard to do, but it does take patience and time. This tutorial from Rhonda of Dollar Store Crafts is the simplest we’ve seen on the internet (so full credit goes to her for the steps and the photos – thanks for the idea, Rhonda!).
Materials:
- Foam balls (the size of a ping pong or golf ball)
- Glue gun
- Yarn
- Beads or buttons for eyes
Instructions:
- To form the head, just glue one end of the yarn to the foam ball. Keep wrapping until it is completely covered. Don’t worry if it’s not perfect – it’s supposed to have that organic, slightly messy feel. It adds to the charm! When you’re done, cut the end of the yarn, add a dab of glue, and tuck it under one of the loops for added security. Leave to dry completely.
- Decide how long you want the doll to be. Then, yarn in that length several times. Make two pieces of these.
- Now, take another piece of yarn and loop it around the yarn you prepared in step 2. Glue the end to the tip of the section, and keep tightly wrapping around it – adding glue periodically to secure the loops.
- Now that you have the head, torso, and limbs, it’s time to put it all together. Cut pieces of yarn and tie them around the head, then knot it tightly. Leave several inches of yarn, then cut.
- Position the head and the two pieces of yarn you prepared in step 3 so that it looks like a head, extended arms, and the length of the torso and legs.
- Start tightly wrapping yarn around the torso area. Not only will this connect the head to the two other pieces of yarn, but it will form the thicker chest for all the voodoo pins! Glue the end at the back.
- Glue beads or sew buttons for the eyes.
Big Rainbow Yarn Doll
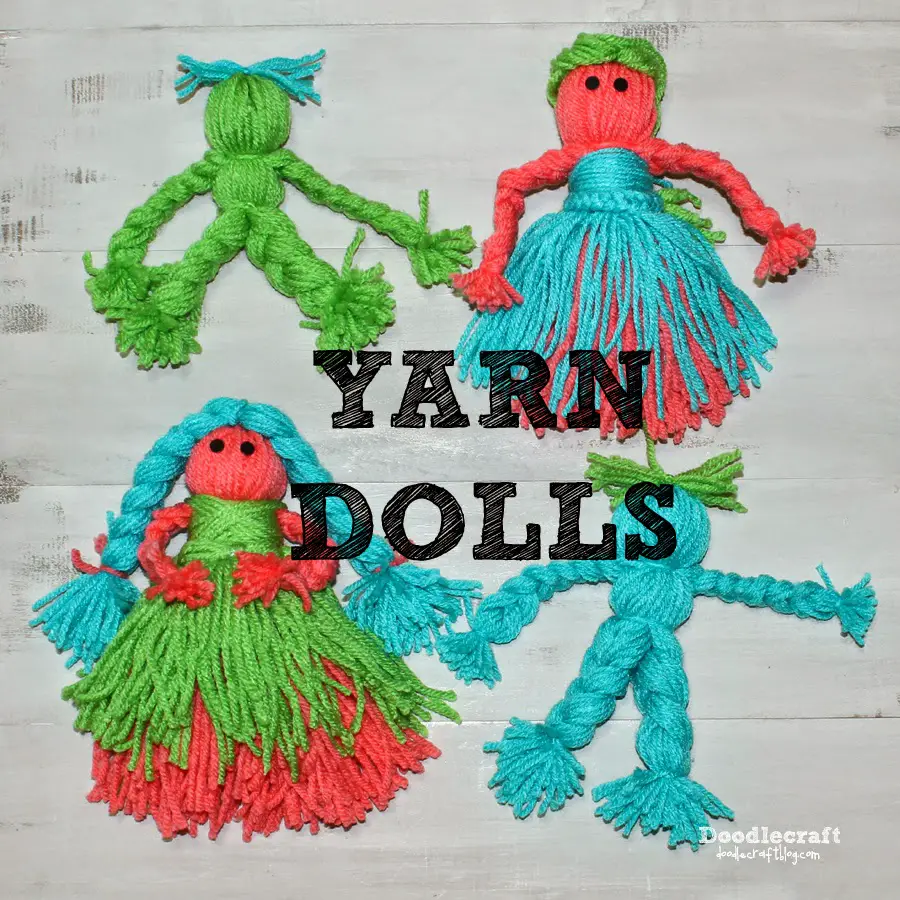 Source: By Natalie @ Doodle Craft, “Yarn Dolls” (https://www.doodlecraftblog.com/2014/09/yarn-dolls.html)Difficulty Level: Moderate This is the “Advanced” level of the Simple Yarn Doll craft we mentioned at the start of the article. You follow similar steps of wrapping yarn and tying it off to form sections of the body, but use different colors and incorporate more details to make a really impressive-looking DIY toy!
Materials
- A thick book
- Scissors
- Yarns of different colors
- Buttons
- Ribbons
- Stick
- Googly eyes
Instructions
- Wrap yarn several times around a thick book. Most crafts looped it around 70 to 80 times to get a hefty yarn doll.
- Tie the yarn tightly, then gently remove it from the book. So it doesn’t accidentally get loose, keep your thumb on the knot.
- Grab one end of the yarn to form the head, then tie a small string to secure that section. Do a double knot so that it doesn’t become loose.
- Cut the other end. Your yarn will now look like a thick tassel.
- Divide the loose string into sections, with the middle section being the thickest.
- Braid the left and right sections to form arms.
- Get yarn of a different color. Wrap it several times around the middle section to form the bodice of a dress.
- Get another ball of yarn for the skirt of the dress (it can be the same color as the bodice or another color). Loop it several times around your hand. Tie the loops together with another piece of yarn, and connect to the bodice. Cut the other end of the loops and trim it to form the skirt.
- Get another yarn to make the hair of the doll. You can make braids or any hairstyle you like. Glue to the top of the head.
- Glue googly eyes on the face. You can also use black felt circles or buttons.
- You can further decorate the doll’s dress or its braids with ribbons or any trimmings you have on hand.
You can prop the yarn dolls on a small stick and turn them into puppets, or use them as bookends or bedside décor. Of course, you can also play with them like any other doll, but you may have to reinforce the glue and the knots so they don’t fall apart while they’re being handled.
Have fun with yarn!
See, we told you these yarn crafts were easy! Most of the crafts are easy to follow. Don’t get discouraged if your first creations are too loose or look a bit wobbly – after a while, you’ll instinctively know how much tension you need to make them look as fluffy and polished as the ones you see in craft books.Also note that different kinds of yarn will have different thicknesses or qualities, so you may have to experiment to get the results you want. Have fun!

Comments
0 comments