Cow crafts are great fun for any little one and offer them a chance to think about the shapes and spots that cows often have. You can do black and white cows, brown cows, white cows, or even yellow cows or fluffy highland cows ““ so you can get very inventive.Here are our top cow craft ideas for you to do with your little one.
Paper Plate Cow
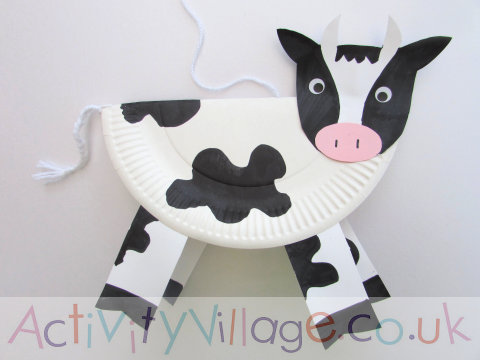 Source: https://www.activityvillage.co.uk/paper-plate-cowThis is a nice and simple craft but will let your child play around with decorating the cow, and doesn’t require you to have lots of different art materials in order to do it.
Materials
You are going to need:
- 1 paper plate
- Googly eyes
- White card
- Black paper
- Pink paper
- Scissors
- Black pen
- Pencil
- Glue stick
- White glue
- White yarn
- 1 bell (optional)
Step 1: Fold The Paper Plate
Start by helping your child to fold the paper plate in half so that the two sides are level. You can either glue the plate shut and make a flat cow with your child, or just crease it and let it open out a short way so that your child’s cow will stand up.
Step 2: Make The Head
On the white card, draw your cow’s head. Cows have quite rectangular, solid heads, so drawing an oblong and then curving the edges a little more can be a good way to reflect this.
Step 3: Decorate The Head
You can now cut two ovals out of black paper and help your child to stick one on either side of the cow’s head, trimming off the excess so the cow’s face has markings. Alternatively, your child can color in some spots.Cut an oval of pink paper and draw two nostrils onto it, and then glue this to the cow’s nose. Next, add two black ears to the top of the cow’s head using black paper. Cut out some little horns from your white card, and stick these up by the ears.Finally, help your child stick the two googly eyes on the cow’s face.
Step 4: Add The Head
Help your child cut it out, and then it can be stuck to the paper plate. It may be easiest to stick it so that the cow is looking to one side, rather than trying to glue it to the crease in the paper plate.If you have a craft bell, your child can tie this around the cow’s neck, or glue it underneath, but this is optional; the cow will look great with or without it.
Step 5: Make The Legs
Next, you’re going to help your child cut four legs out of the white card. Simple rectangles will do. Curve them a little bit so that the cow will stand up better, and then let your child decorate them, either by using the black pen or by cutting and sticking black splotches from the black paper.You should add a thin black rectangle to the bottom of each leg to form the cow’s hooves, and then help your child glue the legs to the inside of the paper plate.
Step 6: Decorate The Body
Now it’s time to decorate the cow’s body with a few black splotches. Help your child cut them out or outline and fill them in using the black pen, and the cow is almost finished!
Step 7: Add The Tail
The cow still needs a tail, so take your white yarn and twist two pieces together. Tie a knot in one end, and then knot the other about a centimeter from the end. Fluff up the yarn beyond the knot so that the cow has a tuft at the end of its tail.Help your child glue the tail to the back edge of the paper plate, and the cow is complete!
Toilet Tube Cow
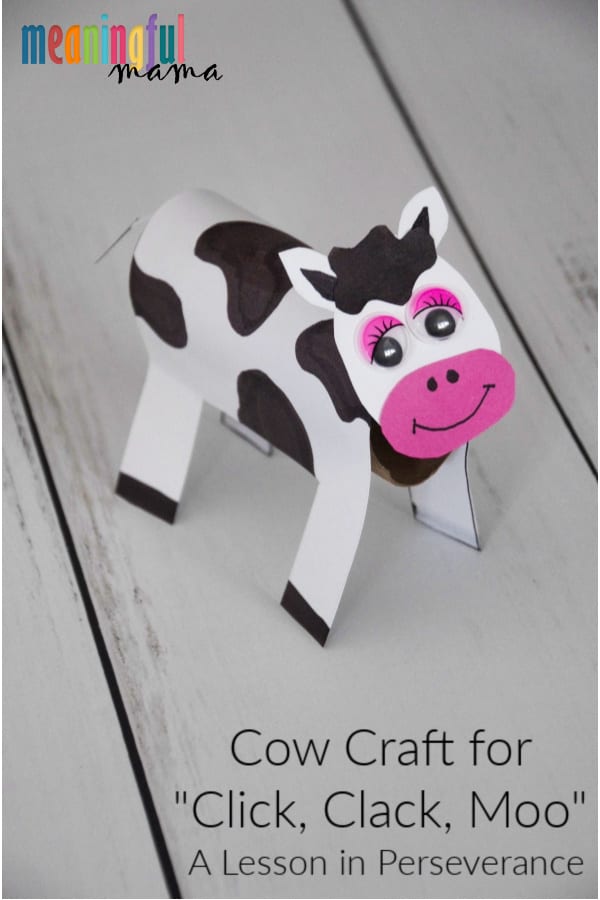 Source: https://meaningfulmama.com/cow-craft-for-click-clack-moo-lesson-on-perseverance.htmlA toilet tube cow makes a good addition to any homemade farm and shouldn’t prove too tricky to create. You can help your child make a whole field of these, and cut some toilet tubes in half to make calves.We’ve given instructions for a black and white cow here, but you can easily adapt them to other colors ““ and your child can make rainbow cows if they like!
Materials
You’re going to need:
- 1 empty toilet tube
- Black pen
- White paint
- Paintbrush
- White card
- Googly eyes
- Pink paper
- Scissors
- Glue
- Glue gun
- Green tissue paper
- White yarn
- Black yarn
Step 1: Paint The Toilet Tube
Start off by helping your child to paint the toilet tube white, and then set it aside to dry.
Step 2: Cut Out The Head
Draw an oblong head onto your white paper, with two triangular ears up at the top. Help your child cut this out.
Step 3: Decorate The Head
Cut out a pink oval for your child to stick onto the nose, and then a couple of pink triangles to go on the insides of the cow’s ears. Your child can draw some splotches on the cow’s face, a couple of nostrils on the pink circle, and a smile.Take some snippets of your black yarn, fluff them up, and help your child to glue them to the top of the cow’s head like tufty hair.
Step 4: Cut Out The Legs
Help your child to cut four legs out of a white card, or another toilet tube (paint them white if you use another tube). Next, they can decorate these with splotches and draw hooves on them.
Step 5: Decorate The Body
Your child should decorate the cow’s body next, drawing spots anywhere they like. When they have finished, decide which is the head end, and use the glue gun to glue your cow’s head to the top of the toilet tube here.Help your child arrange the legs evenly beneath the cow’s body and glue them in place.
Step 6: Add The Final Details
You can make the tail as you did in the last craft, by twisting up some white yarn, knotting one end, and then knotting the other a centimeter in so that the cow has a little tufty tail. Your child might want to draw a spot on the tail using the black marker.Glue the tail to the end of the cow’s body.Add some little horns to the cow’s head by cutting two curved triangles of white card and gluing them in front of the cow’s ears.Next, shred up a small amount of green tissue and glue this to the underside of the cow’s head, so just a little bit sticks out on either side of the cow’s mouth. Your cow is now munching away at some grass, ready to join its herd.
Cow Finger Puppet
 Source: https://kansaslivingmagazine.com/articles/2016/05/12/cow-finger-puppetsIf your child is into finger puppets, you can easily make a cow puppet with minimal effort or time.
Materials
For a cow finger puppet, you’ll need:
- White felt
- Black felt
- Pink felt
- Googly eyes
- Scissors
- Black marker
- Glue gun
- White glue
Step 1: Make The Body
Cut two ovals with one flat end out of your white felt to make the cow’s body. Check that these will slot over your child’s finger, and then line the two sides up, glue them together using the glue gun, and trim them so they are neat.
Step 2: Decorate The Cow
Cut out some little black splodges for your child to glue to the cow’s body. These should be irregular, rounded shapes of various sizes. Make some for the front and some for the back of the cow, and help your child stick them in place using white glue.Next, cut a little pink circle for the nose, and two pink triangles for the ears (you can also use black or white triangles if you prefer). Help your child to glue these on, and add two little dots for the nostrils using the black marker pen.Help your child draw a smile on the cow’s face, and then glue the googly eyes on. They can also add little white horns if they would like to.
Step 3: Add The Tail
Cut a wavy strip of your white felt and then a little black teardrop shape. Glue the teardrop to the end for the tuft of the cow’s tail, and then glue the tail to the back of the finger puppet to complete the cow.
Step 4: Add Legs (Optional)
If your child wants to give the cow legs, just cut four small rectangles of white felt, decorate with another black splodge or two, and glue them to the cow’s body. They can also add a snippet or two of green felt or paper to the mouth, giving the cow some fresh grass to munch on.
Conclusion
Cow crafts are great fun for children of all ages, and you can use a whole variety of different craft mediums to recreate the perfect cow. Whether your child wants a desk mascot or an addition to the puppet show, you can easily make something that’s perfect for them.
Comments
0 comments