
 Source: http://www.supercoloring.com/drawing-tutorials/how-to-draw-the-white-houseHave you ever wanted to draw the White House? You may find that it’s a bit more complicated than it looks; there’s a lot to take in, and even getting one part wrong can make it hard to distinguish this iconic building.If you want a little help, we’ve created a White House drawing guide to get your White House sketch perfect!
Materials
Before getting started, gather up:
- Some plain paper or grid paper
- A sharp pencil
- A pencil sharpener
- An eraser
- A ruler
- A fineliner
Find a comfortable spot and a flat surface to draw on, and let’s get started. You are going to be using your ruler for almost every step, so make sure you have enough space.
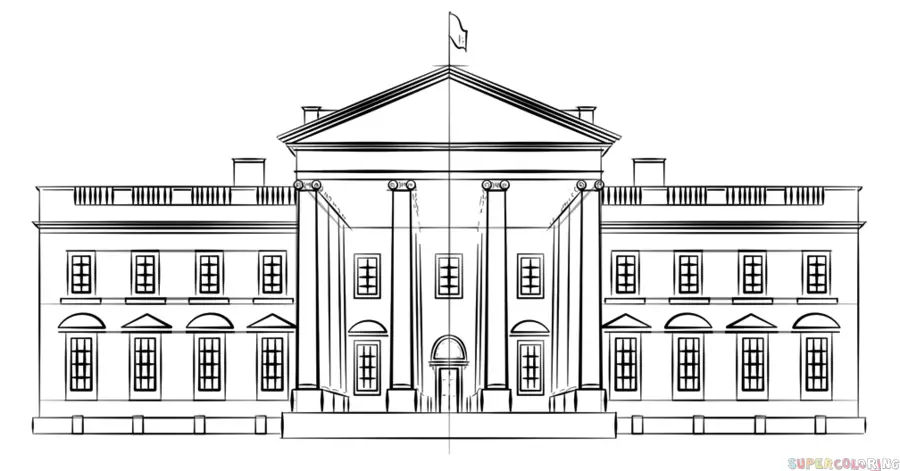
Step 1: Draw The Outer Squares
Using your ruler, draw two squares of equal size on either edge of the paper, leaving a gap of approximately the same size again in between the two squares. These form the two wings of the White House; the middle space will be the main entrance, which we’ll come to later.A short gap from the top of either square, draw a parallel horizontal line. At the bottom of each, draw another parallel horizontal, but closer to the bottom line, so you have a narrower gap.
Step 2: Draw The Inner Square
Draw the inner part of the White House. This should have a slightly lower bottom line and a top line that is higher than on your other two squares.Lightly sketch a central line, and use this to guide your roof; set the ruler at an angle that allows you to draw between the central line and one edge of your main square, and then repeat this on the other side. The roof should be fairly shallow.
Step 3: Start Adding Definition
You’re now going to begin adding details. On the outer squares, draw another line between the two at the top of your squares, dividing this in half, but stopping about a centimeter from the outer edge on both.At the bottom, draw a line between your two bottom ones, all the way along.In both squares, add another horizontal line, a little above the halfway point, going right across. These will all be used to add windows and floors soon.In the main building, add a short line a little way from the top; this is going to become the ceiling inside the building. It should stop a couple of centimeters from the edges of your main building, covering about three-quarters of the building’s width in total to allow for perspective.Just below the second-to-top of the square, add four short, evenly-spaced horizontal lines. These will form the tops of pillars.
Step 4: Add The Windows
Using your ruler, add the windows in the two outer buildings. You should have four windows on both stories with taller windows on the lower floor. In total, there should be eight windows on each side.In the three-quarter line, you drew along the top of each of these squares, fill in some little tight vertical lines.Draw another line directly above all the lower floor windows. Above this line, over the first left-hand lower floor window, draw a semi-circle. Over the next one, draw a triangle. The next should have another semi-circle, and then another triangle.Repeat this on the other side, with a semi-circle by the outer wall and a triangle by the inner wall.Draw a line above the higher set of windows.
Step 5: Add The Pillars
Draw four tall pillars in the main building, stopping a little way above the floor. Draw the ceiling in place by connecting your second-to-the-top line with the lower, shorter line.Thicken up the lines around the windows and add the flag and the chimneys. One chimney should go on either edge of the roof at the lowest part, and then on either roof of the lower buildings, close to the roof. Aim for symmetry here, except for the flag.
Step 6: Finish The Central Building
Draw blocks at the bottoms of the pillars. Add two little circles at the top of each, and then fill in thin lines to indicate the pillars continue toward the back of the room. Do this on both sides, and add some thin, faint lines to suggest a continuation of the central pillars too.Next, draw a door with a semi-circle above in between the two inner pillars, touching the floor, and a long window off to either side, a little higher up. Each window should also have a semi-circle above it. They should be positioned in the remaining gaps between the inner pillars and the outer ones.Level with the upper windows of the two side buildings, add three more windows in the main building, one between each of the pillars.Draw lines to add detailing to the roof, building up a few lines on top of each other to add depth.
Step 7: Finish The Windows And Other Details
Add a small secondary frame to all the windows in the whole White House sketch, joining up the horizontal lines you put in earlier. Add a frame to the door, and give the chimney’s secondary lines at the top to indicate the depth of the chimney rim.Sketch grids into each window. The smaller, upper windows should have one vertical line and three horizontal lines, while the larger downstairs windows should have two vertical lines and three horizontal lines.
Step 8: Erase Mistakes And Fineline Finished Picture
Erase any lines you aren’t happy with and then grab your fineliner. Keep using your ruler so that you get nice straight, crisp lines for your building. You don’t have to finish with fineliner, but this lends the picture a professional, confident air.
Conclusion
You’ve now got a great, accurate sketch of the White House. If you want to add further details or you need any more help, pull up a picture of the building to glance at while you work; this is the best way to get a really realistic picture.Buildings are hard to draw, so use your ruler and take the time to line up your angles well; this will make all the difference to the quality of your finished piece.
Comments
0 comments