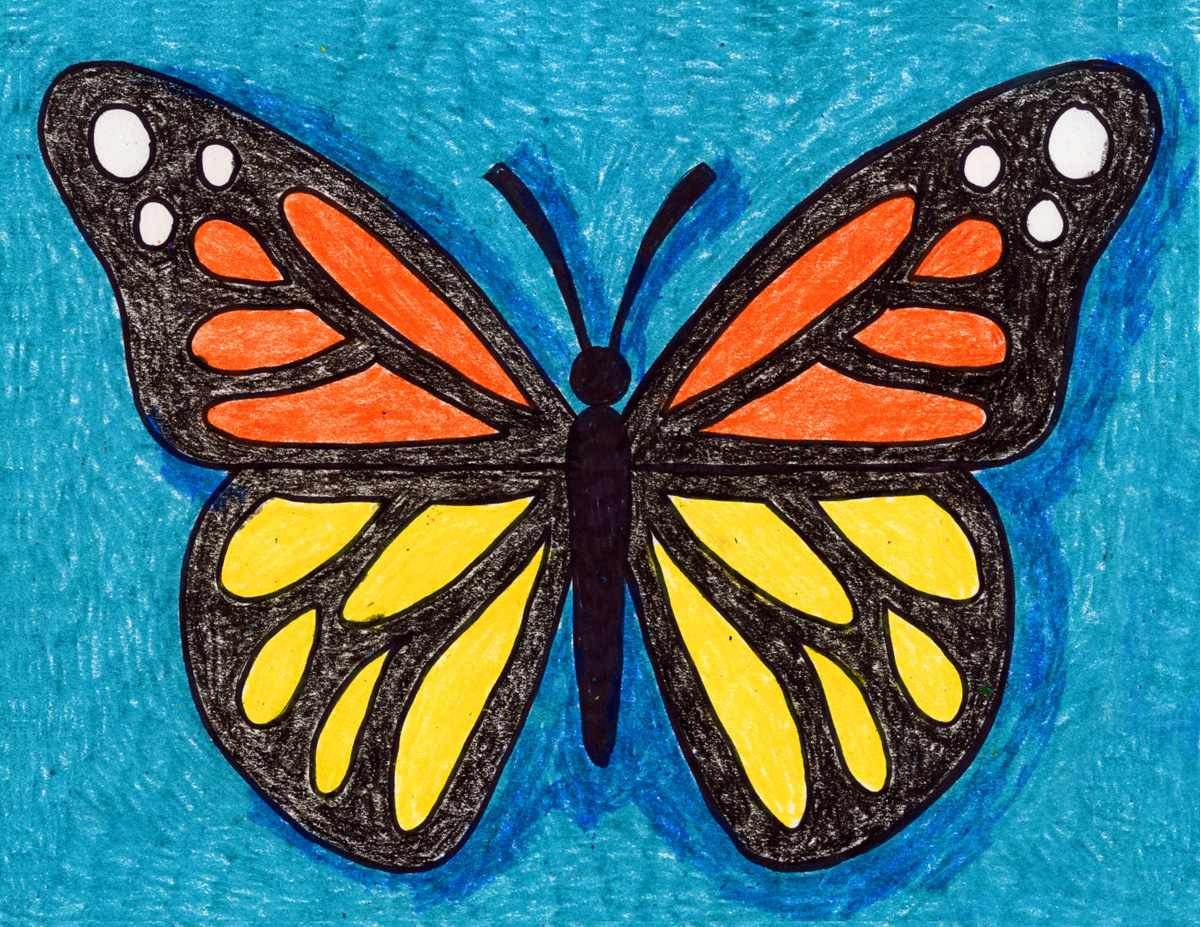
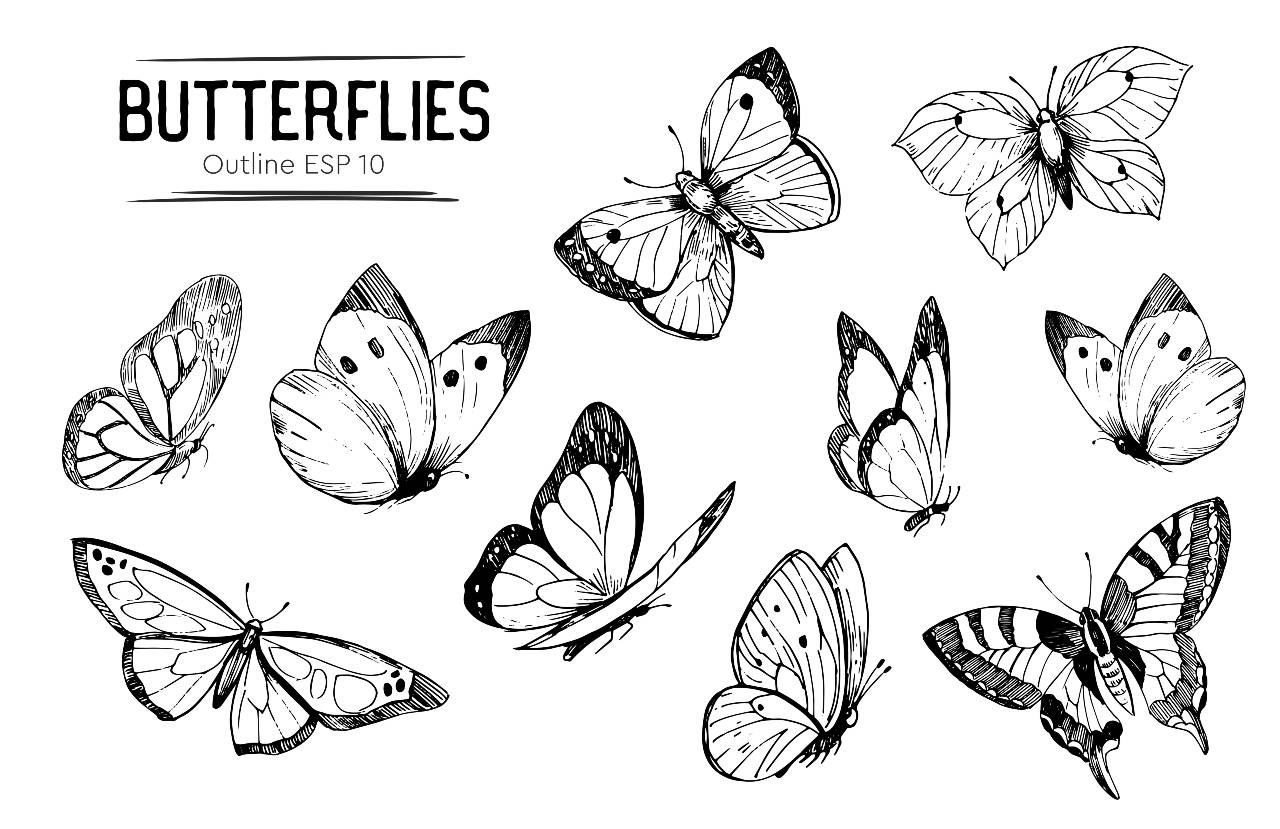
Some people just seem to have amazing drawing skills that they can apply to any situation and any circumstances, no matter what it is they want to draw. Most of the world, however, don’t. That’s very frustrating if you have a need to draw, and there are lots of craft projects that require it.You may well encounter situations in which you want to draw a butterfly, and while this might sound easy, butterflies can actually be surprisingly challenging.After all, they have quite complicated body sections, and the challenge of getting the wings symmetrical can be considerable.A further difficulty is presented by the fact that most of us have a good idea of what butterflies look like, but have rarely observed a real one sitting still for a long period of time. Before you get started, take a look at some pictures online so you have a clearer idea of what you’re trying to recreate.If you’ve ever wondered how to draw butterflies, here are some top tips that will have you drawing like a pro in no time! These tips can help both adults and children.
Materials
 To draw a butterfly well, you’ll need:
- A sharp pencil
- A nice black fineliner or marker pen
- Plain white paper
- A flat surface to lean on
- A ruler
- An eraser
So, let’s get to drawing!
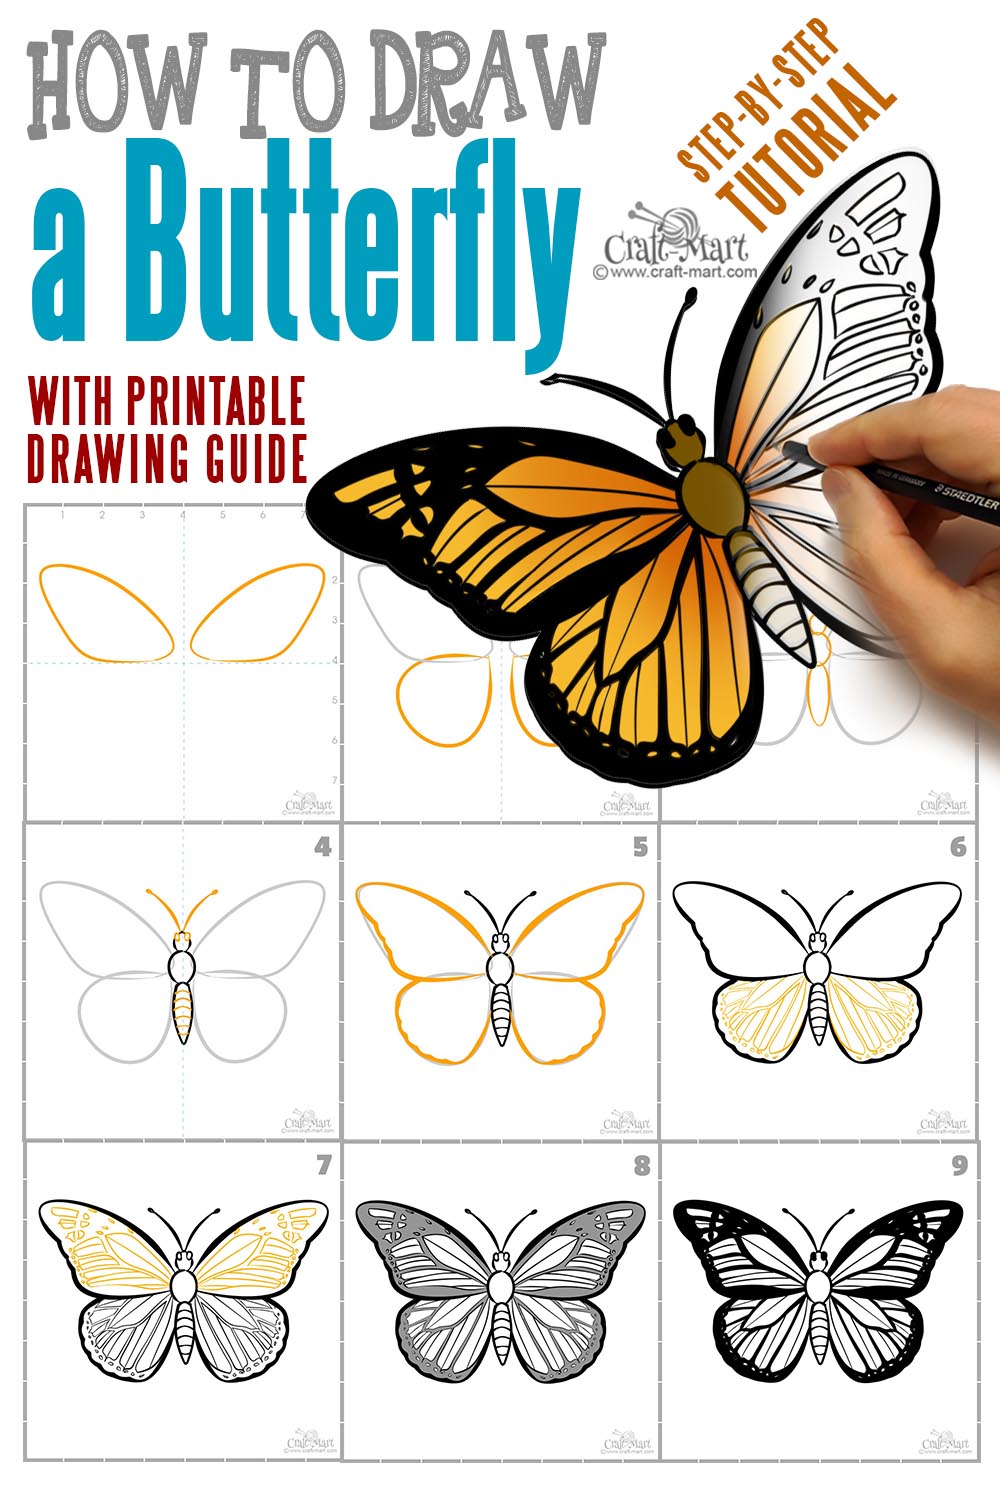
Step 1: Mark Your Paper
Use your ruler to find the central point on your piece of paper, and lightly draw a line going both horizontally and vertically across the paper, dividing it into four pieces. This will help you immensely when it comes to keeping the butterfly symmetrical, as it will make it much easier for you to tell when it’s gone wrong.
Step 2: Draw The Head And Body
On the central line, sketch a small circle for the head. Next, draw a body. It should be about the same width as the head for about half of the body, and then gradually narrow it to a rounded point about half the width of the head as you reach the end of its body.
Step 3: Draw One Top Wing
Draw a top wing on one side of the butterfly’s body. Glance back at your online pictures if you need to. Many butterflies have a smooth curve at the very top of the wing, and then the wing curves around and dips in slightly as it heads back down for the central horizontal line.Shortly before you reach the central horizontal line, curve around and then draw a straight line along this line. This is the bottom of the top wing.
Step 4: Draw The Second Top Wing
Do the same on the other side. If you need to, use your ruler to get the top of your second wing in line with the second. This should help you make it roughly the same size. It doesn’t have to be perfect, but it should be close.
Step 5: Draw One Bottom Wing
Flip back to your butterfly example and study the shape of the bottom wing before you draw it. Usually, you will want a straighter line that travels down from about the halfway point on your butterfly’s body. Curve this around a few centimeters below the end of your butterfly’s body, and transition into a fuller curve as you travel up to meet the top wing. You should aim to finish your line a few centimeters from the bottom of the top wing, and the lower wings should usually be fatter and shorter.This will help you capture that classic butterfly shape that is so familiar and well-loved.Don’t be afraid to erase your pencil a few times if you think you could do it better; this is a learning curve! Sometimes, it helps to re-draw a line before you erase the old one, or you can end up putting it back in exactly the same spot, which is very frustrating!
Step 6: Draw The Second Bottom Wing
Once you are happy with your first lower wing, do the same on the other side of the paper. Again, you may want to use your ruler to guide you on how low the bottom wing should dip before it starts to curve back in.
Step 7: Start Filling In At The Top
Begin by drawing symmetrical shapes in the top wings. It can help to work on one shape in each side first, so if you draw a spot in the tip of the right-hand wing, do the same in the tip of the left-hand wing before you move on to other shapes.Rounded and simple shapes look best for butterfly wings. They don’t really have triangles or squares in nature, so aim for ovals or circles of varying shapes. These can curve to accentuate the edges of the wings.It often looks good to have some circles near the top parts of the butterfly’s top wings, though you don’t have to, of course.
 Step 8: Start Filling In At The Bottom
Work on the lower wings next. You may find that it’s effective to flatten the curves of any ovals that touch the top part of the bottom wings; this adds an “overlap” impression that looks great. However, for the rest of the wings, stick to natural curves, and remember to keep them mirror images of each other.
Step 9: Add The Antennae
Draw antennae onto your butterfly. You can also take a moment to add more shape to the body if you want to; this can be done by segmenting the top half and giving it a tighter curve before it flows into the rest of the body. However, you don’t have to do this if you’d like to keep things simple, especially for your first go.Don’t add legs to your butterfly. These often look cluttered and are very hard to draw, and will spoil the effect of the wings. Also, if your butterfly is perching on a branch or a leaf, you wouldn’t see its legs, so there’s no reason to include them in your drawing.
Step 10: Review
Take a moment to look your butterfly over and make any corrections that you feel would benefit it. Tidy up any messy half-erased lines and re-angle any bits of the wings that you aren’t happy with.Erase your original markings that divide your paper into four sections; you won’t need those anymore and they’ll spoil the finished look of the butterfly.
Step 11: Add Marker Or Fineliner
Once you’re happy with your butterfly, it’s time to finish it with a black marker pen or a fineliner. You don’t have to do this, but it will give your butterfly more definition and confidence than a pencil outline.The trick here is to work slowly, going carefully around the edges of each part, and working from the top down so that you don’t smudge your work. If necessary, pause to let the ink dry before you go back over a bit; you don’t want to ruin your hard work at this point.If you’re going to color your butterfly, you may not want to outline the patterns you have drawn on the wings, but if you’re leaving it in black and white, this can look effective.
Step 12: Color Your Butterfly (Optional)
Butterflies are by their nature colorful, but you don’t have to color yours if you would rather leave it plain. However, if you do want to add a bit of brightness to your drawing, have another quick look at some sample butterflies before you choose your colors.You don’t have to make your butterfly realistic by following the color scheme of any particular type, but you might notice patterns or similarities that guide your choices, and you may also get ideas on what you think will look good.Black is a striking color to include on your butterfly and often looks good as a background around the patterns you have drawn. Alternatively, use black for some of the spots to make them stand out.Don’t forget to keep the butterfly symmetrical in its colors. It is easy to get a bit carried away at this point, but your butterfly should still match itself on either side, or it will get an odd, lopsided sort of look.
Draw a Butterfly – Option 2
Butterflies are undoubtedly something that many people want to be able to draw, but they aren’t particularly easy. Their wings are awkward shapes and overlap in unintuitive ways and their bodies often come out looking lumpy and clumsy, rather than sleek and graceful.If you’re looking for how to draw a butterfly in easy steps, we’ve compiled some of the best techniques to get your butterfly looking beautiful, symmetrical, and well-proportioned.
Materials
For your butterfly drawing, you need to make sure that you have:
- Plain paper
- A sharp pencil
- An eraser
- A ruler
- A good fineliner
- Colors if you want to color it in
Step 1: Divide Your Paper Into Quarters
To get the proportions of your butterfly right, it will help to have clear divisions on your paper. You can then draw a wing in each of these, and it will make it much easier for you to see if the butterfly’s wings are even and the right size, or if one has ended up too big.You can either fold your paper into neat quarters or use your ruler to divide it up. Remember to draw the lines faintly so that you can erase them later.
Step 2: Begin With The Wings
You should start with just one of the wings, preferably one of the top ones. We’ll describe the process for the right; simply mirror this if you would rather start on the left.Put the tip of your pencil a short distance away from your central point. You are going to start with a very slight curve that follows the horizontal line to the right. Round it a little so that you get a natural line, rather than a hard edge.Travel along to just past the halfway point of the right-hand quarter, and then begin to sweep upwards, still moving out away from the center.When you have almost reached the edge of your paper, start to curve around to form the tip of the butterfly’s wing. As you round off the wing, make your curve more gradual and fatter; you want it to sweep back down to meet the start of your wing, near the middle.If it helps to have an overall idea of the shape, you are essentially drawing an oval diagonally in your upper right section of the paper, but the bottom edge of the oval is squarer and fatter, while the top is narrower.Erase any bits you aren’t happy with, and re-angle them until you are satisfied.Once you are pleased with your first wing, repeat the process on the other side. You may find that it helps to draw yourself another faint guide to show where the top of the wing should finish; this will make it easier to level the wings and get them even.When you’ve finished both wings, take a look at how well they match up. Are they similar in size and width? Is one much fatter than the other? Make some adjustments to get them as close as possible before moving on.
Step 3: Draw The Lower Wings
Again, starting with the right side, it’s now time to add the lower wings. Bear in mind that these overlap with the upper wings, and they should appear behind them; it’s fine to draw a line on top of the upper wings, but you’ll need to erase it later.Before you start, look back at the upper wing. Put your pencil and ruler on the point where the lower curve started to rise up, and draw a faint line down. This will give you a very rough guide for where your lower wing should end; the lower wings of a butterfly are much smaller and do not stick out as far as the upper wings.Now, you’re set to start drawing. Put the tip of your pencil just below the inner “corner” of your right-hand upper wing. This should be very close to your central lines and reflect pretty much where you started drawing the wing from.Your lower wings want to be much rounder than the upper set ““ almost circular. They should look something like a seashell, with a wide, fan-like circle narrowing at the top edge where they meet the butterfly’s body.Begin drawing a smooth curve outward. It’s fine to overlap with the upper wing (you can erase the line later). Keep going until you come to your guide, and then begin to curve around. It doesn’t matter if it sticks out a little beyond the guide; this is realistic.Curve back around and up, narrowing your circle until you reach the starting point. You’ve now completed the first lower wing! Check you are happy with it and make any tweaks before moving onto the other one.Next, put your ruler on the bottom edge of that wing and draw a faint horizontal line across to show yourself how far the left-hand wing needs to come down. If you like, you can also add the vertical guide from the top wing, just as you did before.Draw your second wing in, and take a few moments to look over your butterfly. Are the wings level? Are you happy with the shape overall? Use your ruler to help guide your eyes if you want to check different parts of the wings match up. They don’t need to be perfect, but this can help you get an even look.
Step 4: Draw The Body
It’s time to start joining the wings up by adding the butterfly’s body. You are going to draw three sections; the head, the thorax, and the abdomen.Let’s start with the thorax. This is where the butterfly’s wings need to join, so it’s going to go in the middle of all the wing points. It should be a slightly squashed circle, almost round but a little longer than wide. It should also be the fattest point of the butterfly’s body.All four wings ought to anchor into the thorax. If this doesn’t work, you may need to reshape your wings a little bit to try and make them meet. The wings don’t go into the abdomen or head.When you’re happy with your thorax, draw a smaller circle above it for the butterfly’s head, a little over half the size of the thorax. Next, add a long, thin oval for the abdomen. This should come to about ¾ of the way down the butterfly’s lower wings. Make the tip a little pointed, rather than a smooth curve.
Step 5: Detail On The Body
Your butterfly needs two eyes and its antennae next. Draw two small ovals at the top of the head for eyes, and then two curves with ovals on the end for antennae. The antennae shouldn’t spiral around themselves; they can follow roughly the same trajectory as the butterfly’s wings. Aim for them to finish around halfway along the upper line of the butterfly’s wings if you want an approximate guide for their length.Next, add some lines to the butterfly’s abdomen to divide it into sections. These should just be simple curves that run from one side of its body to the other, giving it shape and texture.
Step 6: Shape The Wings
You can now add a little more detail to the shape of the butterfly’s wings. You may want to add some frills along the outer edges of the upper wings, and possibly the outer curve of the lower wings. You can also increase the overlap of the top wings over the bottom wings.Remember to keep this symmetrical; use your ruler to add more faint guides if you’re struggling to ensure that your details end up level with each other.
Step 7: Erase And Add Details
Erase any bits of the drawing that have now become unnecessary (such as your guides or lines that should be hidden by overlapping parts). Once you have cleaned the butterfly up, you can spend some time decorating its wings.You may want to look at some pictures of butterflies to get a better idea of the different patterns they display, or just draw some simple shapes. Either is fine; just remember to keep your drawing symmetrical at all times.
Step 8: Finishing Off
Once you’re totally happy with the butterfly, it looks very effective to add some black fineliner, starkly defining all its edges. You could also color your butterfly to make the most of its delicate shapes and beautiful hues. Be careful not to smudge it!
Conclusion
Butterflies can be fiddly to draw, but setting yourself up to succeed by using guides and a ruler can really help. Once you have a sense of the shape and correct angle for the wings, you should have a much easier time of it.Other than that, as long as you remember to keep your butterfly symmetrical, you should find it relatively easy to create a beautiful, realistic butterfly to be proud of. The next time a craft project calls for a butterfly ““ or you feel like doodling one in a book, or anything else ““ you’ll be well equipped for it.Experiment with shapes and color and have fun, but remember that rounded lines and curves look best on a butterfly, while straight shapes will look unnatural and out of place.Source: https://artprojectsforkids.org/how-to-draw-a-butterfly/
Comments
0 comments