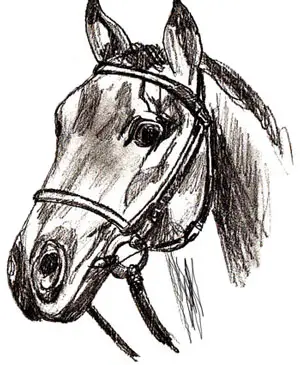
 Source: https://www.yedraw.com/how-to-draw-horse-head.htmlHorses are an animal that is both much-loved and very difficult to draw.A lot of people struggle with all kinds of aspects of the horse, but starting on one part can make the overall task less overwhelming, and gives you greater chances of success as you can really focus on getting that bit right before you move on.With that in mind, let’s look at how to draw a horse’s head step-by-step instructions. You may find that this takes you a few tries, as the proportions and angles of a horse’s head can be very tricky to master, but this guide should help you get a sense of how to shape the head.You Will Need:
- A pencil and pencil sharpener
- One sheet of plain paper
- An eraser
Step 1: Draw Three Circles
You are going to begin with just three circles. Draw lightly, so that you can erase lines if you make a mistake, and to make it easier to remove guiding lines later when you’re tidying up the drawing.Draw the first circle as quite a large circle a bit above the center of your paper. A second circle, about a quarter of the size, should overlap with the bottom right side of your first circle.Draw the third circle a short distance from the two, off to the left and lower down. This should be between the two sizes, just under half the size of the first circle. It will later become your horse’s nose, while the upper two are the horse’s forehead and the horse’s jaw.
Step 2: Draw The Forehead To Muzzle
You are now going to join the upper circle with the left-hand lower one. Start a little behind the circle and draw a curve upwards to meet it; this is the top of the horse’s skull.When you reach the circle, follow its curve until about the halfway point of the circle, and then turn and begin a diagonal line straight down to meet your lower circle. You are drawing the horse’s nose at this point, so the line can be quite straight.
Step 3: Draw The Jaw
Next, you’re going to join the nose and the jaw muscles; this will give you the basic head shape you’re looking to achieve.Place the point of the pencil at the bottom of the lowest circle, around halfway across it. Draw a line down a short way, and then curve around to follow the same trajectory as the circle (but a little below it), until you reach its edge. This is the horse’s lower lip.You now need your line to curve outwards into the horse’s jawbone. This line is going to join up with your smallest circle and continue past it. Draw a fairly shallow curve between your current position and the bottom of the smallest circle, and then continue around in a steeper curve.Your pencil should come into line with the first line you drew in the previous step; this is the edge of the horse’s head, where its jaw and top of the skull join onto the neck. The two lines should finish approximately level with each other (vertically, not horizontally). Pause and review the shape you have got. If you need to erase any lines, you can do so, but it is best to fill in some more details before worrying too much; you can make corrections later when you have more guides that will help you to spot lines that aren’t quite right.
Step 4: Add The Eye And Nostrils
In your topmost circle, you are now going to draw your horse’s eye. This should be a small circle that appears on the right-hand side of the circle, just above the halfway point. You can adjust the size later if you find it is too big or small. Only one eye will be visible.Next, in your medium circle near the bottom, you’re going to add both nostrils, one fully visible and one hinted at. Draw an oval in the top right half of this circle, and a half-oval touching the circle’s outline in the left half. Again, you can make later adjustments if necessary.
Step 5: Add The Neck And Ears
Although this is about drawing a horse’s head, their heads tend to look very odd without at least a hint of the neck, as this adds depth, and will also let you fill in a mane later. To draw the horse’s neck, you are going to start at your very top line, where the horse’s skull is.Continue the curve a short way, and then angle round and draw a straight line down, just past the horse’s jawline.Next, put your pencil on the curve of the horse’s jaw, around the left-hand lower edge of your guide circle, and draw a similar line heading down a little way below the horse’s body. Your necklines should follow roughly the same angle as each other, so the horse’s neck is a consistent thickness.To add the ears, you’re going to move back to the top of the horse’s head. These aren’t directly at the top, but off to the sides a little.Position your pencil a bit behind the eye, but higher up, and then draw a loose oval with a pointed tip for the first ear. This should come above the line of the head, so you’ll need to erase a bit.The second ear will be behind the skull and should come to a similar height. Again, draw two curved lines pulling into a point at the tip of the ear.
Step 6: Erase Your Guides
You may find that it is worth erasing some guidelines now that you have the basic head shape ““ or you can leave this until later if you prefer. If you’re ready to erase them, you’re going to start by taking out the whole of your smallest circle.Next, erase the part of your rounded nose that is within the horse’s head (leaving the end that forms the horse’s muzzle intact). Finally, erase all of the big circles, apart from the bit of the line that makes your horse’s forehead.
Step 7: Detail The Mouth
You’re now going to draw in the mouth line. You should have a curved nose that dips in and then curves out again, from your original circle and the line you drew below it. You are going to draw your mouth line along the original circle’s trajectory but in a straight line.You can curve it a little to make it look more natural, but you essentially want to follow the lower line of the jaw, which should be approximately straight.You may also want to add a line near the top of the nose. You will see that the head swells out to make space for the eyes here; simply put your pencil at the straight line below this bulge, and add some light sketches to suggest it continues. This will give your horse’s nose more definition.
Step 8: Detail The Face
You can now start making any necessary amendments to the face. You may want to draw a second outline to your eye, giving it a little more shape and extending its lines a bit. Shade the pupil, leaving a circle for the shine in the eye, and then add a few lighter lines to hint at the horse’s eyelids.Bring up a photo of a horse and study which lines on the face are most clearly pronounced. You may want to draw a second line or two to hint at the straight line of the nose, making it clear this runs up toward the horse’s eyes.You may also want to add some details around the top of the horse’s head, shaping the bones that form the eye socket. Don’t add too much; just lightly suggest the shapes where you want the face to curve out or tuck in.On the ears, draw an inner curve that lends them a bit more detail and indicates which way they are facing.
Step 9: Add The Mane
Your horse will look better when you add a mane. Add the forelock first; this is the part that spills down over the horse’s face. Try to draw curved lines that come to a point at the bottom, following the lines of the skull you have defined. These should vary in thickness.You can leave the mane down the back of the neck indistinct if you like since it’s a suggestion of a neck rather than a detailed drawing. Just add a few trails of mane and a pencil line or two to suggest its curves.
Step 10: Finishing Off
Erase any last lines that look wonky to you, and then you can use a fine liner to go over your work if you want to make it look finished and professional. Alternatively, do a bit of shading with your pencil.
Conclusion
Horse’s heads aren’t easy to get right, so don’t be discouraged if you still aren’t totally happy with your drawing. Try to compare it to some real horses to work out what it is that you feel is not shaped well, and then have another go.Remember, drawing is all about practicing! If you are pleased, that’s great!
Comments
0 comments