There’s always room at home for a little decorating. What better way to go about it than making something– something you can display as your own that is not just functional, but also something unique and beautiful.If you are handy with a crochet hook and know your way through some of the basic stitches, then this is just the right place for you.Here’s a list of five quick and easy, but beautiful crochet home decor items for you to try.
Puff Stitch Coaster
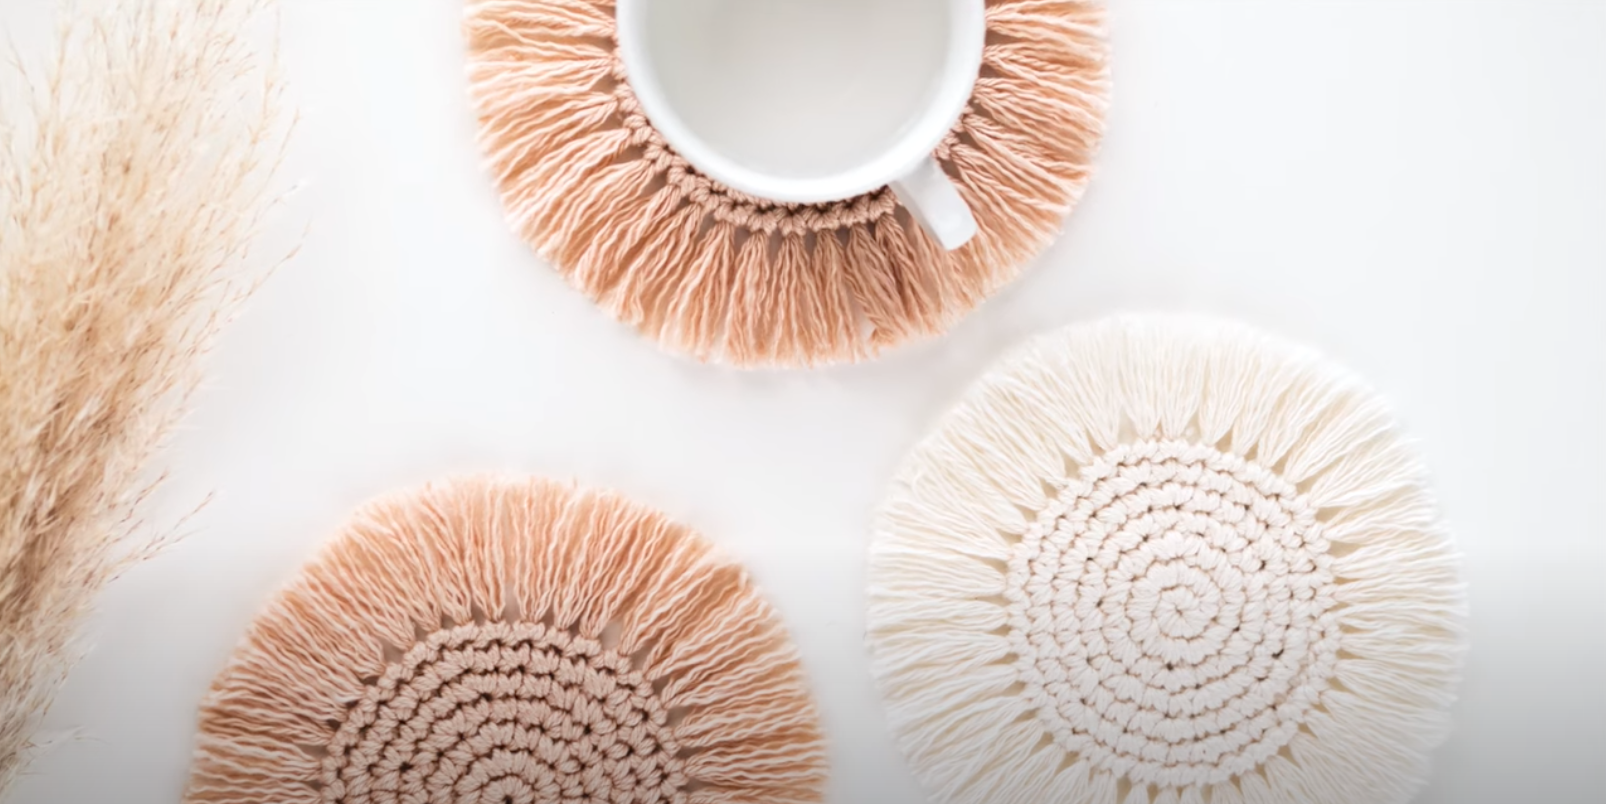
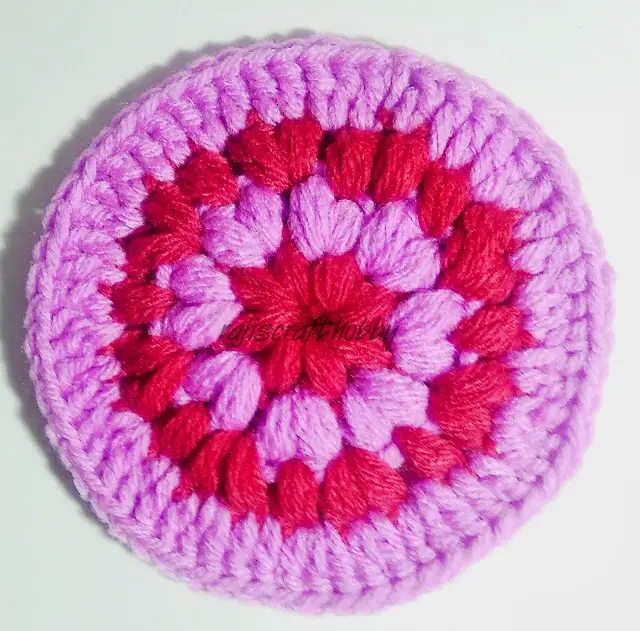 Source: By Raj’s Craft Hobby, “Puff Stitch Coaster” (https://rajiscrafthobby.blogspot.com/2018/09/puff-stitch-coaster.html)This particular pattern for a crochet coaster turns out a nice, round, and padded coaster – courtesy of the puff stitch – that can withstand a good dose of heat or cold from your mugs or glasses.
Materials required
- Yarn of choice, preferably ara or worsted weight yarn
- Appropriate sized hook, usually between 4.5mm to 5.5mm
- Scissors
- Yarn needle (optional)
That’s all you need to get started on your puff stitch crochet coaster
Method
Slip your yarn into a slip knot and insert your crochet hook into it. Then, chain four. Slip stitch into the first chain and form a circle with a gap in the center. Chain one to secure the circleRound 1 Next, insert your hook into the center gap of the circle, yarn over and make a single crochet. That’s the first single crochet. You can go ahead and place a stitch marker in there if it helps. Proceed to make 11 more single crochets into that center gap, and weave in the tail from the slip knot in as you go along.You should have 12 single crochets at the end of this row. Slip stitch into the top chain of the first single crochet. That is the end of Round 1.Round 2Chain one. Then puff stitch into that same stitch. Consider this the first puff. Into each of the next 11 chain spaces, which brings the total number of puff stitches in this row to 12. Slip stitch the last puff stitch into the slip stitch created in round one. That is the end of round 2.Round 3 Chain one, and then, single crochet into the next space, the one between the two puff stitches from the previous round. This is the first single crochet, and you can mark it with a stitch marker.Place another single crochet into the top of the next puff stitch, and the next, once again, in the space between the two puff stitches. Continue to make single crochet stitches across the circle. You will end up with 24 single crochet stitches. Slip stitch into the first single crochet after you remove the stitch marker.Round 4Chain one and then place the first puff stitch into the very same stitch. Go around the circle, placing one puff stitch in every single crochet from the previous round. The last puff stitch goes into the space created by the slip stitch from the previous round. You will have 24 puff stitches in this row before you finish it with a slip stitch into the first puff stitch you made. Round 5Chain one to secure the circle. Now, repeat round 3 and single crochet around the circle. Place a stitch marker to indicate the first single crochet. You will have 48 single crochets. Finish up with a slip stitch in the top of the first single crochet. Trim the yarn and pull through, giving a tight tug to secure the knot. Leave a tail. Round 6The last step is to weave in the ends of your yarn tails. You can use your crochet hook or a yarn needle to finish this round.
Moss Stitch Potholder
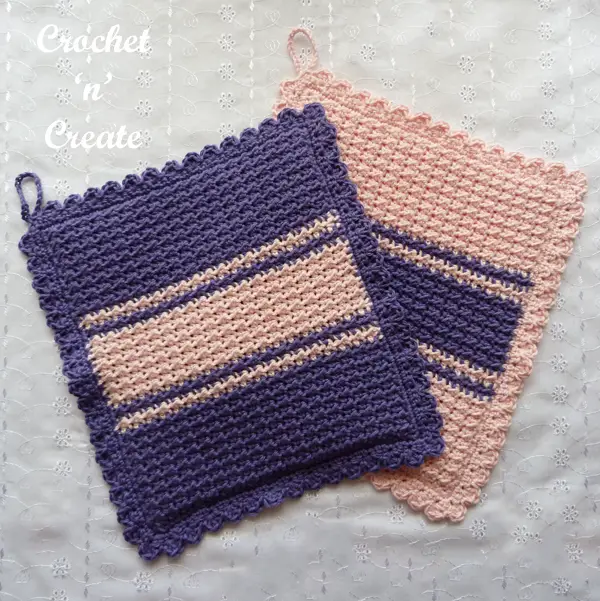 Source: Inspired by Create “˜n’ Crochet, “Moss Stitch Potholder” (https://crochetncreate.com/crochet-moss-stitch-potholder/)Speaking of pot holders, crocheting a few of them and using them as hot pads or hotplates to hold your dishes is a great way to brighten up your dining table. Here’s a pretty simple pattern to get you started.
Materials used
- Yarn of choice, preferably worsted or bulky.
- Crochet hook of appropriate size.
- Scissors
- Yarn needle(optional)
Method
To start with, slip your yarn into a slip knot and insert your crochet hook into it. Then, chain 16.Round 1Single crochet into the second chain from the hook. Then, chain 1, skip one stitch and single crochet into the next chain. Continue to work this rep * chain one, skip one chain, single crochet into next chain * till the end of the row. The last stitch will be single crochet into the last chain. Turn your workaround.Round 2Chain one and then single crochet into the chain one space from the previous row. Continue to do this till you reach the end of the row, where you will put the last single crochet into the turning chain from the previous row. Round 3-15Continue to crochet round 2 for the next 13 rows, with a total of 15 rounds. Round 16Chain 1 and then single crochet all the way around the border. When you reach the corners, place one single crochet, chain one, and then make another single crochet. Fasten off and use your crochet hook or yarn needles to weave the end in. Tip If you pick out the right yarn, your potholders can be washed in the machine.
Bunting Banner
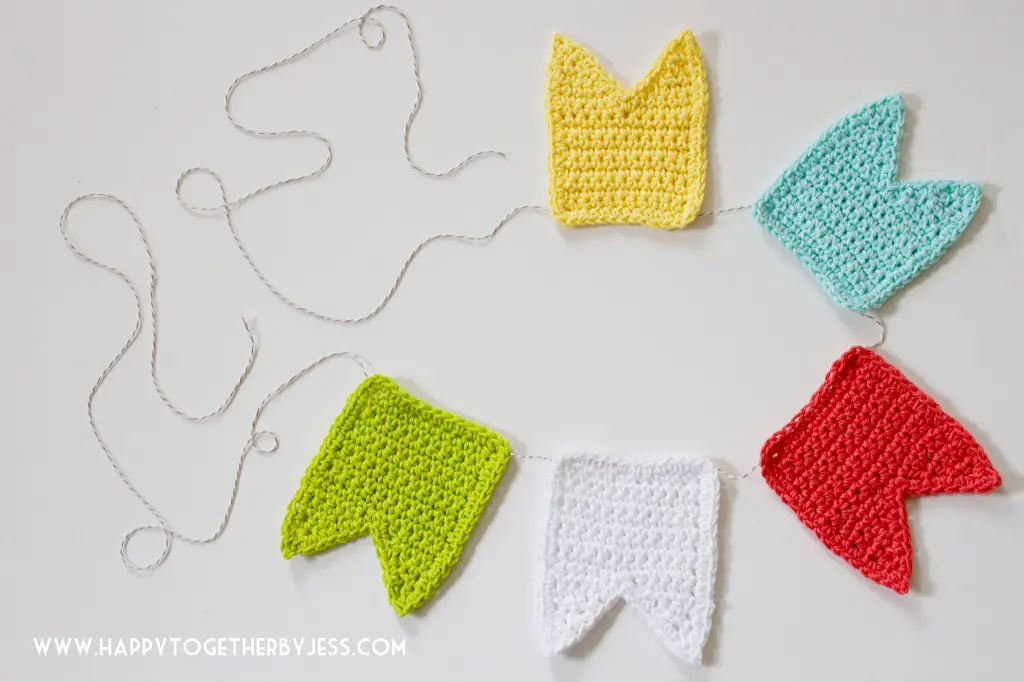 Source: By Jessica Fediw @ Happy Together, “Crochet Banner DIY” (http://www.happytogetherbyjess.com/crochet-banner-diy/)
Materials required
- Yarn of choice, preferably worsted weight yarn. (Note: This design will work well with different colors for each triangle that is placed in the chain. So once you figure out the pattern, go ahead and feel free to make a nice, colorful bunting.)
- Crochet hook
- Scissors
- Yarn needle (optional)
Method
To start, slip your yarn into a slip knot and insert your crochet hook into it.Round 1Insert 2 single crochets into the second chain from the hook, which should be the first chain from the knot.Round 2Chain 1 and then insert another 2 single crochets into that chain. Turn over your work.Round 3Chain 1, and then place 2 single crochets in each stitch. Turn over. Round 4 Chain 1, and now, single crochet four. Turn over your work.Round 5Chain one, then place 2 single crochet in the first stitch, two more single crochet in the next 2 stitches, and 2 single crochet in the last stitch. Turn over. Round 6 Chain one and make six single crochet along the row. Turn over.Round 7 Chain 1, place 2 single crochets in the first stitch. Next, place 4 single crochets one after the other in the next 4 stitches. Finally, place two single crochet into the very last stitch. Turn over.Rounds 8, 10, 12, 14, 16, 18, 20, 22For every even row, continue to chain 1 and then single crochet the appropriate number of single crochets along that row. Eg: 8 single crochets in row 8, 10 single crochets in row 10, and so on. Turn over at the end of each row.Rounds 9, 11, 13, 15, 17, 19, 21, 23For every odd row, chain 1, and then place 2 single crochet into that first chain. Then, place one single crochet in every individual chain till you reach the last chain (6SC in row 9, 8SC in row 11, 10 SC in row 13, 12SC in row 15, 14SC in row 17, 16SC in row 19, 18SC in row 21 and 20SC in row 23). Then, place two single crochet in that last stitch and turn over at the end of each row. Round 24Chain 1 and single crochet 24 times. This is the last row, but do not fasten off.Round 25: The BorderWithout fastening off, single crochet into the ends of each row, starting with the top left corner where you finished. You will need 23 single crochets to get you to the tip of the triangle. Then, make 3 single crochets in the stitch to turn the corner. Place single crochets along the other side, another 23, and 3 more into the same stitch to turn the corner. Single stitch all the way up to join the first stitch in a row of 24 single crochets. Fasten off. You have one triangle.Note: You can make several of these triangles, depending on how big–or small–you want the size to be.Round 26: The BannerOnce again, slip your yarn into a slip knot and insert your crochet hook into it. Then, chain 20 (or more depending on your measurements).Place single crochets along the top of your first triangle, crochet from the right corner to the left. Chain 10 and single crochet in each stitch across the top of your next triangle. Repeat this process till you finish placing single crochets on the last triangle and then chain the same number you started with, which, in this case, is 20. Now, turn over and slip stitch the same way back. Slip stitch in the back loop of your chain and place slip stitches into the single stitches that run along with your triangle. Fasten off, and check out your fabulous bunting!
Comments
0 comments