Homemade Christmas gifts are undoubtedly the best Christmas gifts, and if you want to make something useful and practical, crocheting is the way to go! Anyone can learn to crochet, though it does take a bit of patience to get the knack. Once you have, however, the craft world is your oyster and you can make anything!If you’re interested in making a crochet Christmas gift, we have put together a list of some of the best and most interesting crochet crafts that you could make for the people you love.
Christmas Scarf
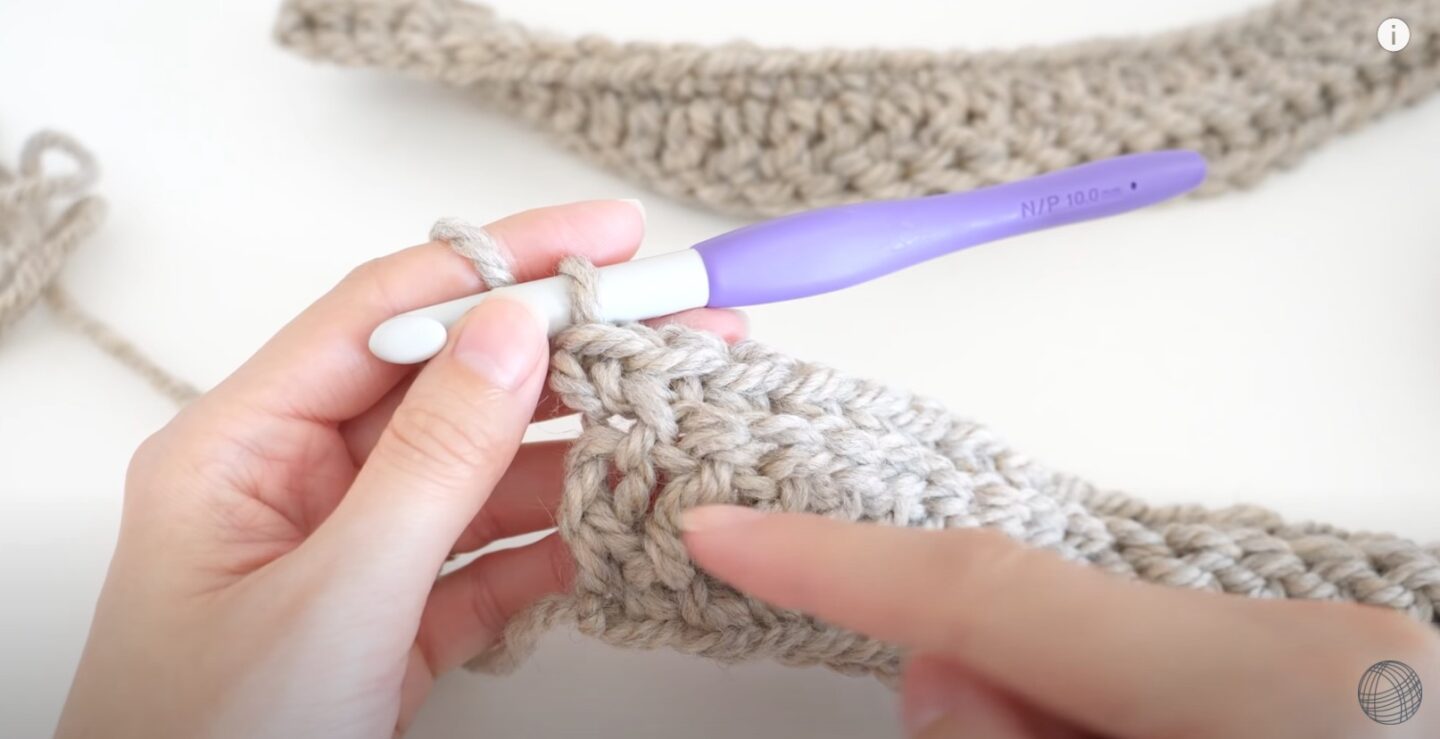 Source: https://www.youtube.com/watch?v=rXQvufVGCoQSocks might be a notoriously “bad” gift, but what about scarves? Many people love getting a really nice snuggly scarf when the weather is cold ““ and handmade Christmas scarves are even better. You can crochet a lovely long scarf quickly and easily, even if you are a beginner at crochet.The great thing about scarves is that even if you’re not confident with crochet yet, you can have a go at them, and if you are experienced, you can do fancy patterns and stitches.
Materials
You are going to need:
- A 10mm hook
- 4 skeins of yarn in one or more colors (double weight is best)
- Darning needle
- Stitch counters
- Scissors
- Stitch markers
Step 1: Slip Knot And Chain
Start off by making a slip knot and then begin chaining stitches. You can add or subtract stitches to make longer or shorter scarves, or just follow the instructions if you’re feeling uncertain.Chain 154 stitches; this is going to be the full length of the scarf.
Step 2: Begin The First Row
In the second stitch of the chain, work a single crochet. Single crochet into the third chain, and then continue working along the chain until you reach the slip knot at the end. Row one is done!
Step 3: Begin The Second Row
Turn your crochet around and get started on the second row. You are now going to put two chains into the end, and then begin double crocheting along with the scarf. Before you start, slip a stitch marker into the last chain so you can find the top of the chain as you come back in the third row.In the first stitch, work a double crochet. Continue double crocheting all the way along row two, until you reach the very end.When you have got to the end, you are going to turn your work around again and start row three.
Step 4: Begin Row Three
Chain one (as we are moving back to single crochets) and then start doing another row of single crochets. Single crochet in every stitch, counting as you go to make sure you still have the same number of stitches that you started with.Remember to use stitch markers to help you keep track if you need to; these can save you a lot of time, especially if you find it hard to count your stitches.
Step 5: Begin Row Four
Chain two, and begin double crocheting into each stitch as you work your way back along with the scarf. Keep counting, and make sure you have enough stitches for each row you complete.
Step 6: Continue The Pattern For Another 5-7 Rows
Keep alternating single crochet and double crochet rows for another 5-7 rows, or even more if you want a particularly wide scarf.By choosing an odd number, you will make sure that your scarf finishes on single crochet, just as you started on. This will give it a neater look and ensure it can be worn either way around. Perfect!
Step 7: Fasten Off
When you reach the end of your final row, cut the yarn, leaving yourself a tail of around 6 inches. Pull the tail through your last loop, and then it’s time to weave in the ends.Thread the yarn end through the darning needle and then pull it through some of the stitches you have already made to weave the yarn in and hide the end. Do this for all ends. Trim any last little bits, and you’ve got a beautifully finished scarf!
Step 8: Decoration
You can change colors in your scarf (see the tips below), or embroider it using a darning needle and yarn in a contrasting color, or even thread. You could also run a glittery thread in with your needle, creating a pretty border.Other alternatives include adding tassels or pom poms to the scarf ends, or sewing a line of buttons at either end to add an interesting look. If you can find winter-appropriate buttons, such as little snowflakes or Santas, that will make this scarf an even better Christmas gift!
Tip: Changing Color/Adding Yarn
When you either need or want to switch yarn, leave yourself about ten inches of yarn. Take your new ball of yarn, and give yourself about eight inches of tail, and then fold a loop into the yarn.Halfway through one of your stitches with your already attached yarn, loop your new ball onto your crochet hook, and pull it through to finish the stitch. Carefully knot the two loose ends you now have, and you’ve got a secure join that will not come undone.This will give you a nice, invisible tie between the two, and you can cut the tails short and then weave in any leftover ends. This is a very neat way to join yarn without depending on a knot to hold everything in place; your yarn is held by being part of a stitch.
Santa Ornament
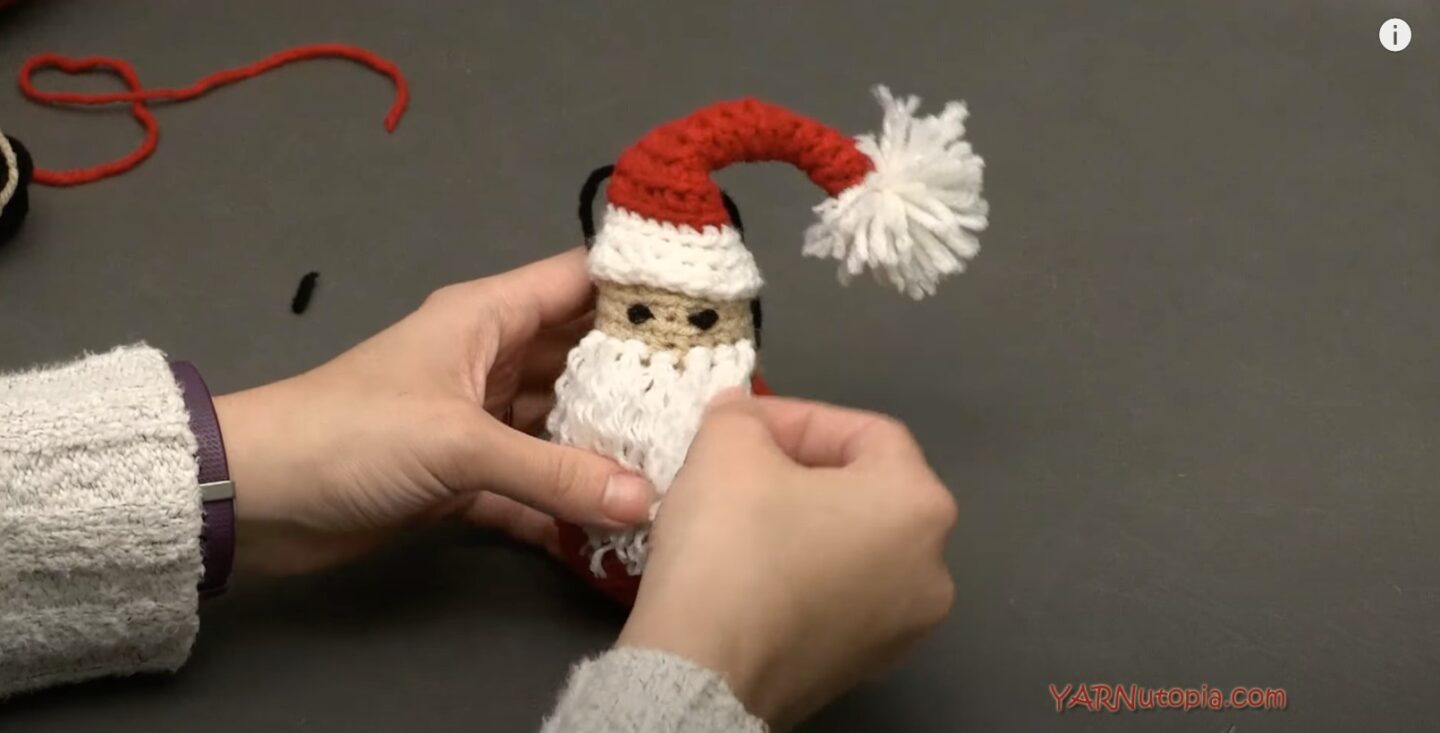 Source: https://www.youtube.com/watch?v=DVkQ79e8fOIIf you’re feeling ambitious and you’d like to do a bit more than a scarf, how about something for the Christmas tree? Yarn Christmas ornaments are wonderful; they will never break, and the recipient will think of you every single Christmas. This Santa is adorable, but quite an involved project, so be prepared to spend some time on it!
Materials
You’ll need:
- 1 skein of red yarn
- 1 skein of white yarn
- 1 skein of skin-colored yarn
- Some stuffing
- 1 pair of sharp scissors
- 1 yarn needle
- 3.5mm hook
- 1 cotton reel
- 1 sewing needle
- Stitch markers
Step 1: Begin Santa’s Base
Start with a slip knot, and chain two. In the second chain from the hook, you are going to work six single crochets. You will see the bottom of Santa’s body start to take shape as a little circle.Slip a stitch marker in and mark the round.For round two, repeat the process, but this time you will be working two single crochets into each stitch of the body. Some people find they get a better result only working in the back loop of the stitch, rather than both loops, but this is not essential.If you count at the end of round two, you should find that you have twelve stitches in total. Move your stitch marker and move onto round three.Put two single crochets into your first stitch, and then one single crochet into the second one. Repeat this pattern of two single crochets and one single crochet in alternating stitches until you get to the end of the round. You should have eighteen stitches at this point.
Step 2: Continue Santa’s Base
You are going to keep increasing in round four. Put two single crochet in the first stitch, and then one single crochet in the next two stitches. Put two single crochets in the fourth stitch, and then one single crochet in the fifth and sixth stitches.Repeat this all the way around, leaving yourself with 24 stitches. Move your stitch marker.Round five is the last round of increasing. Put two single crochets in the first stitch of round five, and then one single crochet in the following three stitches. Put two single crochets in the next stitch, and then one single crochet in the following three stitches.Keep doing this, until you have finished the round and got back to your stitch marker. You should now have 30 stitches.
Step 3: Make Santa’s Body
For the next six rounds, up to around 11, you are going to put single crochet into the back loop of every stitch. Your Santa should start to form, creating a nice round body.When you get to the end of round 11, single crochet your first two stitches together so you can start decreasing Santa’s body size. Do single crochet in the next three stitches, and then do another decrease by single crocheting two stitches together. Keep repeating this pattern until you have got round again.You should now be at 24 stitches, ready to start round 13.Decrease again in the first stitch, and then single crochet in two stitches, and decrease on the next stitch. Go all the way around with this sequence, but stop before the last stitch.
Step 4: Change Color For Santa’s Face
Go into the stitch and pull a loop of your red yarn through, and then pick up your skin-tone yarn. Make a loop and pull it through your loop. Tie the yarn onto the red, and then do five rounds of single crochet in the back loop of every stitch. This will form Santa’s head.Tug your loop of yarn through and take your hook out; we’ll come back to this in a moment so you don’t want to finish off here.
Step 5: Making The Eyes
Turn the work so your color join is at the back and then use your yarn needle to stitch two black eyes to the front of Santa’s face. You can also sew buttons on if you prefer. Make sure both your eyes are on the same row and leave space for the beard.
Step 6: Stuff And Close
Fill Santa up with your stuffing so he’s nice and fat, and then put your hook back through the yarn loop. Resume decreasing, single crocheting the first two stitches together. Do single crochet in the next stitch, and then decrease, do a single crochet, decrease, etc., until you get to the end of the round.In the next round, single crochet two together in every stitch. When you reach the end, single crochet the last stitch to the one directly opposite it, closing the head. Chain one, and fasten off.
Step 7: Making The Hat
Make a slip knot, chain two, and do six single crochets into the second chain from the hook, just as you did for Santa’s body (work in the back loops again). Mark the stitch. Do the next three rounds, doing just single crochet in each stitch.In round five, do two single crochets in the first stitch, and then single crochet in all the other stitches. In round six, do the same. Do this for the next four rounds, increasing until you have 12 stitches around the hat.Next, you will do six increases. Put two single crochets in the first stitch, and single crochet in the next stitch. Repeat this throughout the round. In the next round, single crochet in each stitch, and then join with your white yarn. Do single crochet in each stitch using your white for two rounds.Put two single crochets in the first stitch of the next round, and then single crochet in the next two stitches. Do this for the whole round. Slip stitch into the final stitch, chain two, and then cut yourself a very long tail and pull it through.
Step 8: Attaching The Hat
Thread your yarn needle with the long tail and begin sewing the hat to Santa’s head. Weave in and out either side, making sure you stitch both sides of the hat to Santa’s head. Once you have gone right round, you can tie the yarn off and the hat is done!
Step 9: Making The Beard
Cut some lengths of white yarn around 6 inches and fold them in half, and then use the crochet hook to pull the yarn loop through a front loop of Santa’s face. Pull the ends through the loop to form a knot. Do this repeatedly, working up to Santa’s face, going close to his eyes, and creating several layers to make a nice, puffy beard.Next, use your yarn needle to fray the yarn into little soft tendrils, and then trim the front of the beard into a nice curve, with the longest part in the center.Add a loop to hang Santa from, and he’s finished!
Christmas Crackers
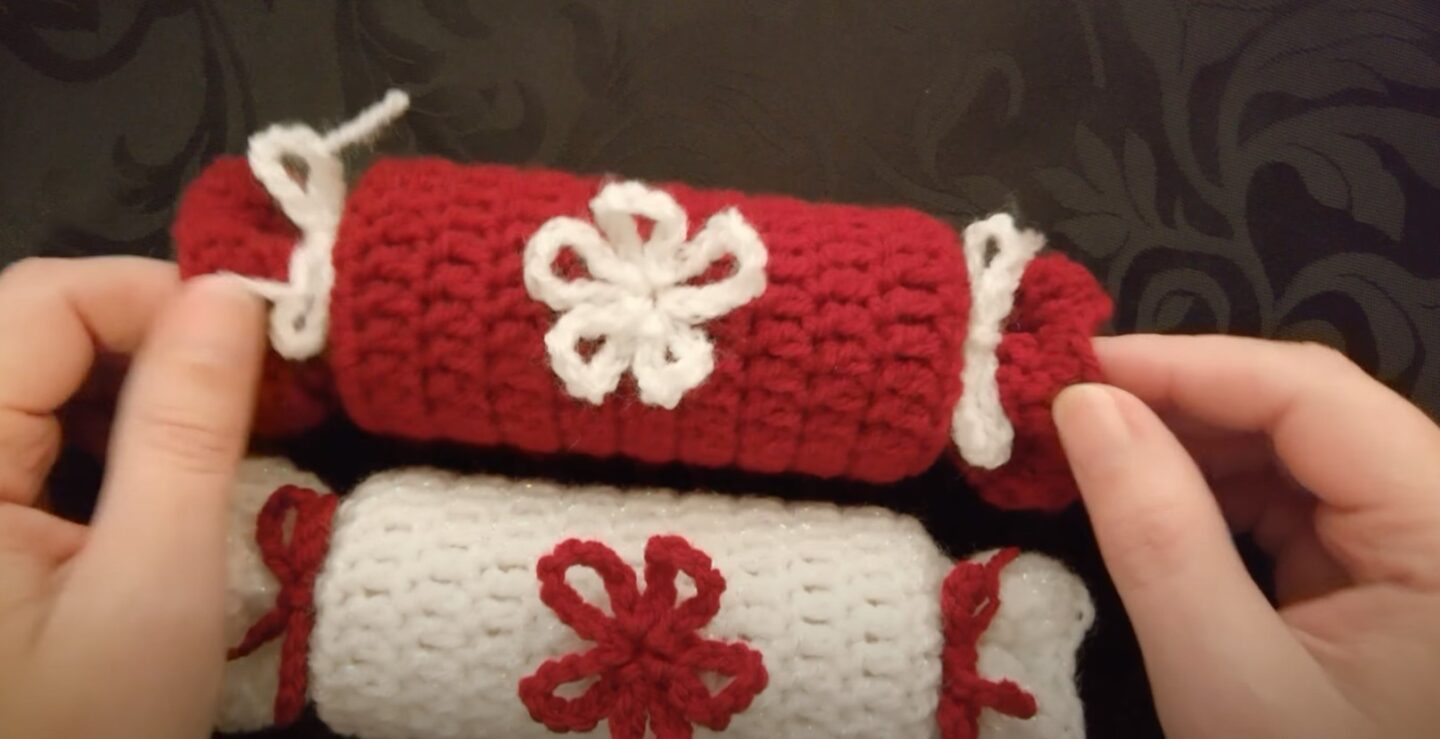 Source: https://www.youtube.com/watch?v=qhkbtli4MbYFor the last craft, how about a crochet Christmas cracker? This is a wonderful way to package another gift and can be used year on year. It’s great if your recipient is trying to reduce their environmental footprint and isn’t keen on the waste that crackers represent.
Materials
You’ll need:
- Red yarn
- White yarn
- 4mm hook
- Toilet roll tube
- Scissors
Step 1: Make The Tube
Slip stitch and chain 24 stitches. Straighten your chain so there are no twists, and then slip stitch into the very first chain stitch to join your chain into a loop. Chain two, and then double crochet into the same stitch.Double crochet into every stitch of the round; you should have 24 stitches.Slip stitch into the top of the first double crochet stitch of your previous round, and you should see a tube forming. Chain two, and double crochet into your first stitch. Again, go right around with double crochets.Slip stitch to join into the top of your first double crochet again, and keep double crocheting around the tube. Repeat this until you have a full tube, and then weave in the end. You can choose how many rows you want, but it may help to have your toilet roll handy so that you can measure. It needs to be longer than the tube so you can tie it.
Step 2: Make The Ties
Using your white yarn, create a chain of forty and then tie it off. Leave yourself a long tail on both sides. You will need two of these ties, so create a second one.In the third row from the end of your tube, slip your hook through a stitch near the center and pull the tail of your crochet chain through. Skip a stitch and then pull the tail through the next, and tug the first centimeter of the chain through. Be careful not to split the wool so the tie will run smoothly.Skip another stitch and pull the tail through again. Keep doing this, weaving your chain and its tail through. When you reach the final stitch, pull the tail through and it should come out of the same stitch you went in. Now, if you pull the two ends, they should nicely gather your cracker end.Trim the tail ends so you just have the chain.Do the same on the other side, weaving the chain in to form a tie.
Step 3: Slip The Toilet Tube In
Push the toilet tube in and then pull both ends of the first chain gently and tie it in a neat little bow, closing one end of the cracker.Slip some candy or other little cracker prizes in at the other end, along with a hand-written joke, and then pull the other chain tight and tie it off. You now have a reusable cracker that both contains a present and is a present in itself!You can also add decorations to the cracker by sewing flowers or tiny Christmas trees and then stitching them on. Alternatively, add the recipient’s name.
Conclusion
Christmas is a wonderful time for crochet, and you can make some amazing gifts with just some yarn and spare time! Have fun wowing your friends with your skills, and teach yourself some new ones at the same time.Whether you choose something to wear, something to hang up, or something to open, your friends and family will love that you’ve taken the time to make something just for them, so grab your crochet hook and get creative.
Comments
0 comments