• Menu
  • Skip to left header navigation
  • Skip to right header navigation
  • Skip to main content
  • Skip to secondary navigation
  • Skip to primary sidebar
  • Skip to footer

Craftwhack

Art Projects, Drawing Ideas, Creativity and Visual Inspiration

  • Art Techniques and Ideas
  • Art Printables
  • About
  • Search
  • Artist Spotlight
  • Art Materials
  • Art Techniques and Ideas
  • Art Printables
  • About
  • Search
  • Artist Spotlight
  • Art Materials
  • Facebook
  • Twitter
  • Instagram
  • Pinterest
  • Privacy Policy
string easter eggs

Cool Easter Craft: String Easter Eggs

string easter eggs
Affiliate links may be used within. See my disclosure for more informationhere.

03/31/2014 //  by The CraftWhack Team//  60 Comments

Sharing is caring!

39873shares
  • Share
  • Tweet

string easter eggs from Tiny Rotten Peanuts

Here is why you need to make string Easter eggs: they are messy, they take a long time to make, and the balloons make the coolest glass-breaking/creaky noises when you finally get to pop them. It’s SO satisfying.

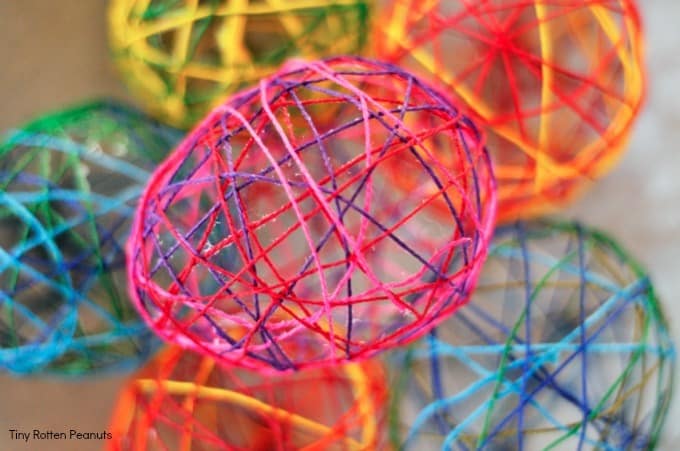
Oh yeah, they’re also kinda cute, aren’t they?

string easter eggs - Craftwhack

Supplies:

  • Embroidery Floss
  • Water balloons
  • Balloon pumper-upper
  • Elmer’s glue

Directions:

Blow up some balloons with the pumper-upper, because your face will explode if you try to blow these suckers up with your breath.

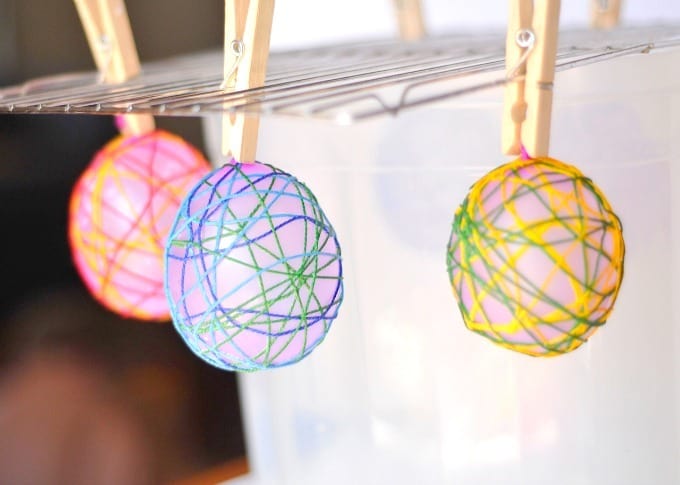
Set up the ingenious drying rack I devised for the paper mache pencils project.  Or you can probably just set the eggs on wax paper after you wrap them, but it’s not nearly as fun as clothes pinning them to a cooling rack.

Cut arm-lengths of embroidery floss- I used about 6-8 for each balloon. Experiment with putting different colors together, or use one color per balloon.

Mix up a bowl of glue with enough water (add a small amount at a time), to make it just runny enough to soak into the embroidery thread.

*Note* I’ve had several comments from people that their string never set up with their mixture of glue and water. I’m not sure how their mixtures differed from mine, but this is not an exact science: you may have to experiment until you find a good ratio. My rule of thumb is water down the glue just enough so that it coats the floss easily.

Take a piece of your thread and dunk it into the bowl of water glue, pressing it in all the way so that the whole length of the thread gets nice and saturated. Grab an end of the thread and wring it out between your fingers as you pull it from the bowl.

wrapping string easter eggs

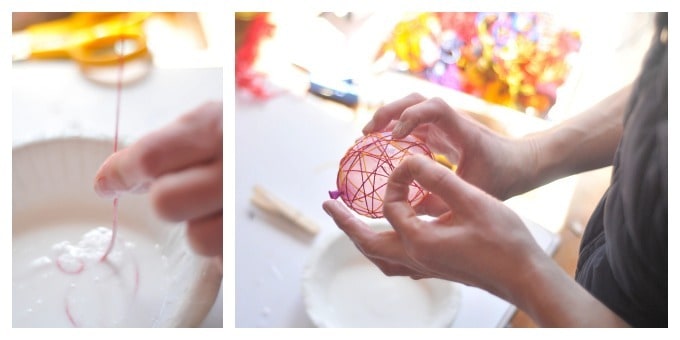
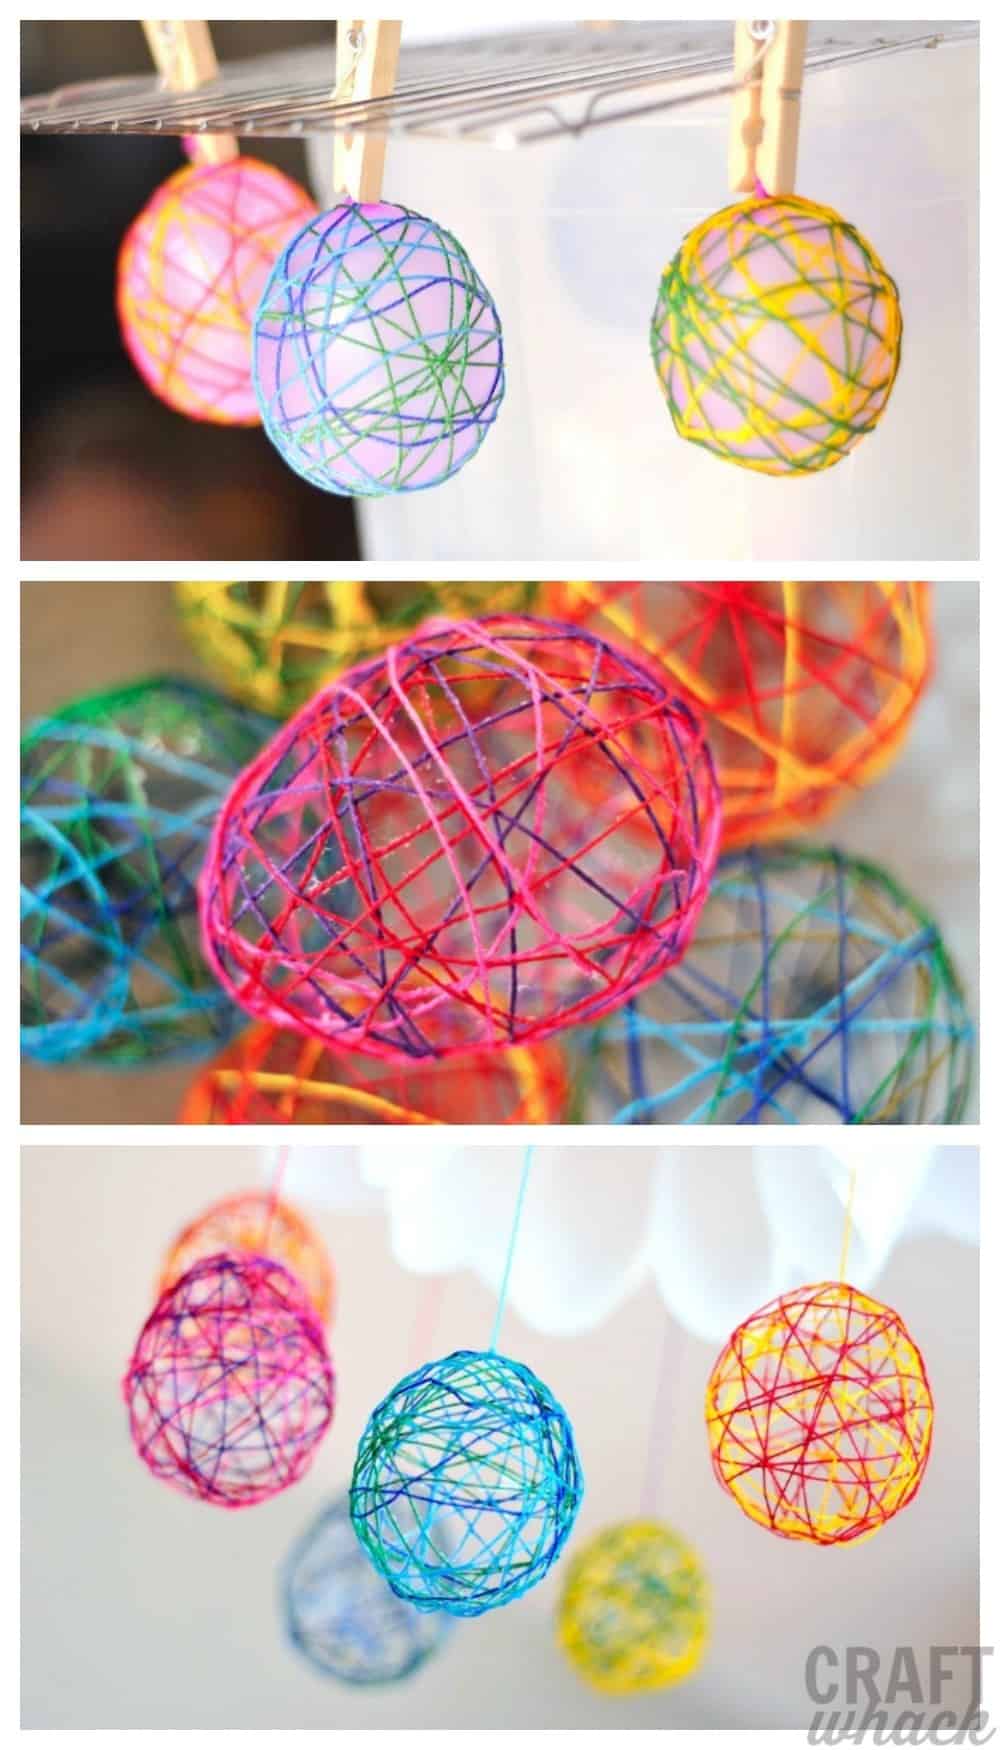
Now wrap it around the balloon, and follow suit with each piece of thread until it looks good to you.

I clipped the balloons to the drying rack with a clothes pin – just make sure they aren’t touching each other, and won’t be knocked over.

drying string balloons

After a few hours, your string will have dried and you can pop the balloons. We had a very fun family few moments poking tacks into the balloons and watching/listening to them as they slowly deflated. Pull the balloons out with your fingers or tweezers.

Note: To be safe, you might want to let these dry overnight or even up to 24 hours. You don’t want to go through all that work only to find they haven’t set up properly.

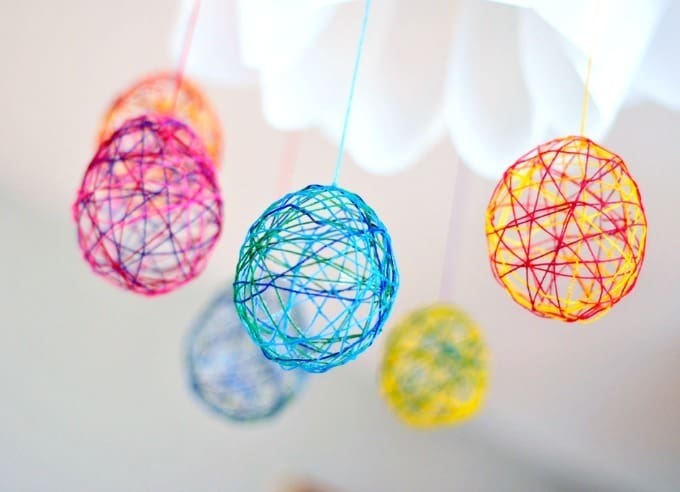
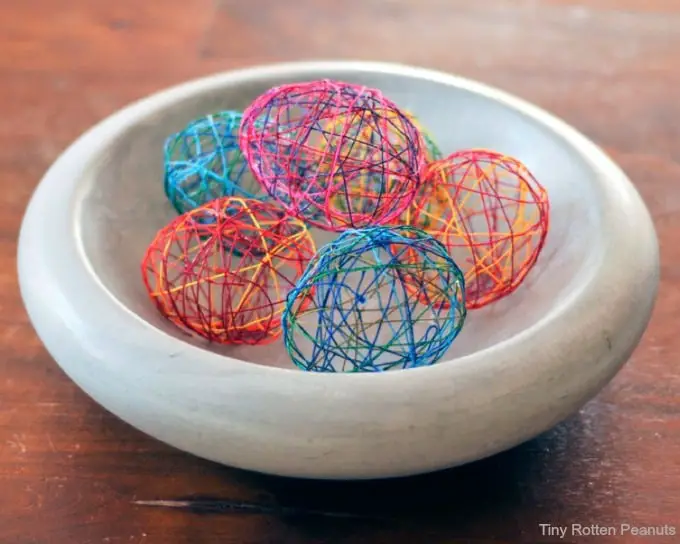
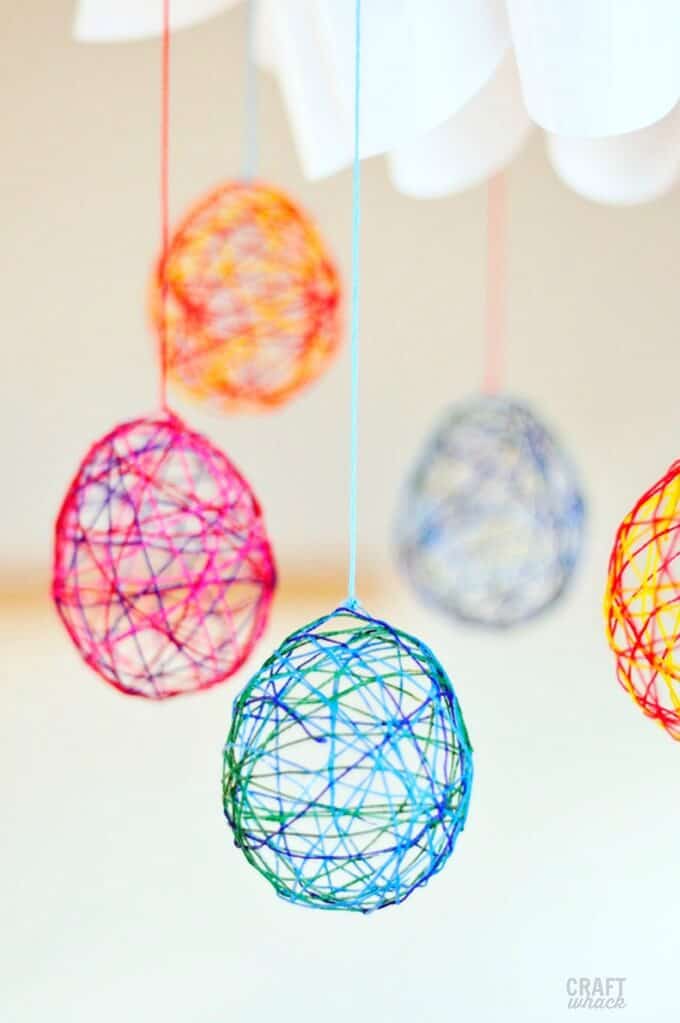
Now is the time to decide if you want to display your string eggs in a lovely bowl, or tie embroidery thread to them and hang them from your Ikea light. I was so tempted to tie them to a ceiling fan. 🙂

string egg craft

string easter egg craft

If you like these, you might love my alternatives to traditional Easter eggs.

string easter eggs

Sharing is caring!

39873shares
  • Share
  • Tweet

Category: DIY Art For KidsTag: 3d, craft, Easter

You Love Art. I Love Sharing Arty Stuff.

Hop on my email list and I will send you a free 5-day creativity reboot!

Thank you!

You have successfully joined our subscriber list.

You Might Like:

doodle art designs

Fun and Easy Winter Doodle Art Designs

doodle art gift tag

Doodle Art Gift Tag DIY

Beautiful DIY Christmas Tree Decoration

candy cane ornament

Simple Beaded Candy Cane Ornament DIY

Fun Hand-Tracing Ideas using Resist Art

best sewing machine for kids

Best Sewing Machine for Kids for 2021 [Our Reviews and Comparisons]

Previous Post: «crayon transfer closeup Crayon Transfer Technique
Next Post: I'm One of Those Evil Pinterest Moms »

Reader Interactions

Comments

  1. Erica - {Mom and Kiddo}

    04/01/2014 at 8:03 am

    This is so cool. I hate those plastic easter eggs, but love these.

    Reply
    • Jeanette Nyberg

      04/11/2014 at 11:08 am

      I hate the plastic eggs, too. Oh, who am I kidding, I love those things and I love stuffing candy in them and mixing the colors of the tops and bottoms. Carry on.

      Reply
      • Didi

        02/20/2018 at 4:05 am

        Ur so talented! I could never make that beautiful eggs!!

        Reply
        • Jeanette Nyberg

          02/20/2018 at 12:13 pm

          Oh, thank you Didi! You should try some though, they are really fun to make.

          Reply
      • Jane Fogle

        03/29/2018 at 10:07 am

        I enjoyed your sense of humor. It made the project more enjoyable. I am making these with my granddaughter.

        Reply
        • Jeanette Nyberg

          03/31/2018 at 10:54 am

          Thanks Jane!~ Hope you both enjoyed making the eggs!

          Reply
    • oking20

      03/19/2017 at 12:54 am

      it didnt work

      Reply
  2. Ana Dziengel

    04/02/2014 at 6:57 am

    This is so gorgeous! I love it!

    Reply
    • Jeanette Nyberg

      04/11/2014 at 11:08 am

      Thanks Ana!

      Reply
  3. Andrea

    04/05/2014 at 1:14 pm

    Very pretty! I wish I had an Ikea light to hang them from.

    Reply
    • Jeanette Nyberg

      04/07/2014 at 11:54 am

      Oh! Do you have Ikea near you? I will hand deliver one of these to you if you need me to.

      Reply
      • Andrea

        04/07/2014 at 2:28 pm

        We actually have TWO (2) Ikeas near us. I try very hard to stay away because when I go there I tend to spend all our grocery money. I will accept your hand delivery, though.

        Reply
        • Jeanette Nyberg

          04/11/2014 at 10:34 am

          We live halfway in between two Ikeas as well. I can feel the energy pull from them at all times. I can hand-deliver your light, but you might have to prepare a large, delicious dinner for me…

          Reply
  4. Gina

    04/08/2014 at 2:02 am

    These are so pretty and I’m amazed when I see how easy they are to make! Thanks for the great tutorial and for sharing!

    Reply
    • Jeanette Nyberg

      04/11/2014 at 10:42 am

      Thanks Gina! Easy crafts make me the happiest.

      Reply
  5. onel

    04/11/2014 at 3:11 am

    These eggs are wonderful!! I thought it would be difficult to take out the baloon but looks like they came out clean 🙂

    Reply
    • Jeanette Nyberg

      04/11/2014 at 11:07 am

      The balloon just deflated so easily and didn’t stick- it’s SO easy to make these, and my kids had a blast poking the balloons with pins.

      Reply
    • Ounita preece

      02/20/2016 at 3:49 am

      Do you just wrap the string around the balloons? Then just hang them up so you can see thru them(balloons)

      Reply
      • Jeanette Nyberg

        02/23/2016 at 10:02 am

        You use a glue and water mixture to dip the string into, wrap around the balloons, let them dry, and pop the balloons. When the glue and water mixture dries, it hardens the strings so they stay where they are when the balloons are popped.

        Reply
  6. [email protected]

    04/11/2014 at 8:29 am

    Love these! They look fabulous. But what I love even more, is the name of your blog. I’m sure there’s a great story to go with it 🙂

    Reply
    • Jeanette Nyberg

      04/11/2014 at 11:07 am

      Thank you so much! And do you know, there’s absolutely zero stories to go with the name. It just so happens that this is the way my brain works.

      Reply
  7. Het Kleine Avontuur

    04/15/2014 at 7:48 am

    This is great! Can I please promote your site in Holland? http://www.hetkleineavontuur.nl

    Reply
    • Jeanette Nyberg

      04/15/2014 at 7:54 pm

      Hi! Of course, and thank you. I just ask that you link back to my site, use only one image, and don’t re-post my content.

      Reply
  8. Cassi

    04/16/2014 at 11:15 pm

    These are so pretty! I’ll be featuring them on The Crafty Crow soon 🙂

    Reply
    • Jeanette Nyberg

      04/17/2014 at 1:19 pm

      Thanks Cassi! I’m excited!

      Reply
  9. Josh Mason

    08/31/2014 at 11:45 pm

    This type of material, including mache, is ridiculously fun to work with.

    Reply
    • Jeanette Nyberg

      09/01/2014 at 1:16 pm

      It so is. It also takes a lot of the stress out of it if you figure out the little tips and tricks to using it ahead of time. Have you made some cool stuff?

      Reply
      • Josh Mason

        09/01/2014 at 1:45 pm

        A yarn egg last year that was a complete flop. lol

        Reply
  10. Karen Attaway

    02/27/2015 at 7:20 am

    Love your eggs. But when I tried it, they just collapsed after I popped the balloon. What did I do wrong?

    Reply
    • Jeanette Nyberg

      02/27/2015 at 1:32 pm

      Oh no! The only things I can think of are that you need a ratio of more glue to water, they didn’t dry long enough, or maybe you used washable glue? I’m not sure if washable glue works or not…. If you have the energy to try them again, maybe make your glue-water mixture more gluey and less watery. Do you think any of these sound like what happened?

      Reply
  11. loretta

    03/26/2015 at 5:40 pm

    Have you heard if this works with yarn? Do I need to leave more glue on the yarn since it is thinker? I have one tester drying right now, but thought I would check before I get too far into this!!

    Thanks!
    Loretta

    Reply
    • Jeanette Nyberg

      03/27/2015 at 6:11 pm

      Ooooooh, let me know! I bet yarn will look really pretty- maybe just let it soak longer in the glue mixture so it gets really saturated?

      Reply
  12. Betty Johnson

    04/03/2015 at 1:38 pm

    will Elmer’s glue work when water is added? I tried one several months ago and it all stuck together into a ball when I popped the balloon!! 🙂 love these! and really want to make several people one for this Easter!!
    Oh and WHY WATER balloons?

    Reply
  13. Jeanette Nyberg

    04/03/2015 at 10:04 pm

    Yes to Elmer’s! Okay. Could you have popped the balloon too early? I’m picturing this caving in on itself if it’s not completely dry. Honestly, it took me a couple of tries before I got it right. But not so many to be frustrating. Oh- and I used water balloons just because of the size. You can blow up regular balloons, but they’ll be HUGE!!!

    Reply
  14. pragmaticmom

    02/21/2016 at 8:42 am

    Wow! These eggs are so beautiful!!! You are a yarn egg genius!

    Reply
    • Jeanette Nyberg

      02/23/2016 at 10:00 am

      Why I’ve never been called a yarn egg genius before! Blush.

      Reply
  15. Linda Frech

    02/22/2016 at 7:37 am

    I would love to make these with my classes but we are a latex free school because of health issues. Can anyone think of a substitute for the balloon? I’m stumped.

    Reply
    • Jeanette Nyberg

      02/23/2016 at 9:57 am

      Ack! That’s a tough one, because you need to have something that deflates so you can remove it and leave the dried string in tact. Unless you can find some sort of clear plastic eggs? Maybe? That’s all I got…. Good luck!

      Reply
      • Liesanne

        04/08/2017 at 1:51 am

        Weg werp handschoenen. Latex vrij.
        Heb het niet geprobeerd.
        Misschien als je de vingers er af knipt en die probeerde op te blazen.

        Reply
  16. Rebecca

    03/07/2016 at 6:30 am

    I tryed making these an Im not having any luck.. The last ine I made the balloon popped before it was fully dry..

    My question is when it is fully dry should it be movable at all?? Or rock hard…

    Reply
  17. Rebecca

    03/07/2016 at 6:34 am

    Wanting to know what the finished result should feel like?????

    The last one I attempted to make was hard but movable if that makes sense… The balloon poped before it was fully dry..

    A friend made one also but said her is harder.. What am I doing wrong?

    Reply
  18. Penny

    03/09/2016 at 11:28 am

    I have tried dipping the string in just glue, I tried the water and glue mixture, and have no luck when I pop the balloon the whole thing falls in. Not sure what I am doing wrong the last one I did I let it dry for 2 hours. It’s looks like the string is glued to the balloon so when I pop it it falls in.

    Reply
    • Jeanette Nyberg

      03/09/2016 at 7:55 pm

      Yuck, I wish I could help the people here who aren’t having luck with this project- what kind of glue are you using? Maybe it has something to do with that, or maybe let them dry longer? My glue stuck to the balloons a bit, but when I popped the balloons, it ended up pulling away. If parts of the string started to collapse, I would push it back out and gently separate the balloon from the string and glue.

      Reply
  19. Donna

    03/13/2016 at 12:23 pm

    Love this project. Just made some samples for my Kindergarten spring project. It will be a tad messy for little fingers, but I’m sure they will enjoy it!

    Reply
    • Jeanette Nyberg

      03/16/2016 at 10:53 am

      Oh, so messy! But they will love it if you are brave enough to tackle it with them. I’d love to see what they do.

      Reply
  20. chris

    05/13/2016 at 4:37 pm

    I love your egg craft..but I actually thought id get directions to make the dandelion?? That’s what was pictured on pintrest.

    Reply
    • Jeanette Nyberg

      05/14/2016 at 2:00 pm

      Hi Chris- I’m not sure which pin you clicked through from- was it one of mine? If it was someone else’s, maybe they added the wrong link to the pin? Sorry I can’t be of more help! I haven’t done a dandelion tutorial on my blog, so maybe it was part of somebody’s roundup of crafts?

      Reply
  21. chris

    05/13/2016 at 4:46 pm

    Ps have already pinned egg tutorial to my “spring” page…….

    I know most of the dandelion pompom tutorial was pictured on the page…but need clarification for step 2! (not sure what I’m seeing!?)

    Reply
  22. Teri

    02/20/2017 at 4:13 pm

    These are fun to cut a hole fill with easter grass and chocolate eggs and small chocolate easter rabbit instead of an Easter basket

    Reply
  23. Cindy

    03/02/2017 at 4:47 am

    I made these eggs with a flour & water mixture. Yeah, they do tend to collapse if they get wet – but my son could happily bite them without me stressing myself silly. He doesn’t eat them – he just bites them. Boys are so much fun….

    Reply
  24. Julie

    04/08/2017 at 10:09 am

    Mine didn’t work. I made one with embroidery floss and one with yarn. I used 1 T water to 1 T elmers school glue. I made them at 9pm last night and popped them at 7am. Both balloons POPPED when punctured, no fizzling here. The yarn egg completely collapsed but the floss one might be salvageable. Maybe. I’d like to try again but wish there was an exact recipe to follow.

    Reply
  25. Tasha

    04/08/2017 at 7:02 pm

    I used a regular sized balloon and put a treat or toy inside the balloon before blowing it up. And I only blew it up to the size of a duck egg or maybe a tad bigger. That’s a way to get something inside without having to cut a hole!

    Reply
  26. Rose

    03/18/2018 at 9:58 am

    Thanks for the instructions! The yarn collapsed the first time I made one. But I think that was because I didn’t wait long enough (it was about 3 hours of drying). I tried again and left it to dry overnight, and it worked perfectly. Thank you!

    Reply
    • Jeanette Nyberg

      03/18/2018 at 12:39 pm

      Oh! That’s good to know- I’m glad you had luck with them. I bet this is why other people have trouble with them collapsing, too. 🙂 Waiting can be sooooo hard…….

      Reply
  27. Donna

    03/18/2018 at 1:55 pm

    When I was in elementary school, about a hundred years ago or so, one of my teachers had us make string eggs. We used liquid starch instead of glue. She brought in enough empty egg shells for each of us to use. There is a trick to emptying out an egg without breaking the egg shell. But, forget about those sunny-side up fried eggs. We would dip string or yarn into the liquid starch to make sure it is well saturated. Then we wrapped the yarn or string around the egg like in your demo. After the string dried completely, she showed us how to break the shell without doing much damage to the string. I’m not sure if liquid starch is available to purchase anymore; so, glue would probably be the most available product and from your demo, it does the same thing.

    Reply
    • Jeanette Nyberg

      03/20/2018 at 3:07 pm

      How cool that you used real eggs for these! It must have been a bit messy, though. 🙂 My husband made a giant string hanging light cover a few years back using liquid starch, so I know it’s still available. I think he went through a lot of bottles of it and I can’t remember how much string he used, but it was rolls and rolls of it, because he wrapped it all around a giant punching balloon. Maybe I should do a test to see if the starch or glue works better for these. Hmmmmm….

      Reply
      • Tommie

        02/13/2019 at 6:14 am

        Hi Jeanette.

        I “bumped” into this site while I was looking for examples of African masks. I remember doing this string egg when I was a kid, a bizillion years ago. I still paper mache with my G-Baby. I have always mixed flour and water to get a nice smooth paste instead of glue and water. Old habits are hard to break. I tried the starch a few times, but my balloon always collapsed, so I went back to the flour and water trick. I love the drying rack you made and plan to add it to my art stuff. Anyway, thanks for the tips and the memories.

        Reply
        • Jeanette Nyberg

          02/13/2019 at 11:56 am

          Hi Tommie! Thanks for your feedback- it’s interesting to hear from people who have their tried and true techniques for doing things; I think it always takes a little trial and error when you first make paper mache especially.

          But then it’s so worth it when you figure out your favorite way. Sort of like cooking, huh? 🙂

          Reply
  28. Nancy

    03/13/2019 at 5:16 pm

    Does the Embroidery floss come in colors or am I missing something…

    Reply
    • Jeanette Nyberg

      03/14/2019 at 7:40 am

      Yes! I’ve updated the links – they should all be pointing to the right products now.

      Reply

Leave a Reply Cancel reply

Your email address will not be published. Required fields are marked *

Primary Sidebar

Join my email list

It's full of art and creative magic. 

Thank you!

You have successfully joined our subscriber list.

Latest Posts

valentine bookmarks

How to Make Cute Valentine Bookmarks using a Cricut

handmade valentine card

Handmade Valentine Cards using Zentangle Art

valentine doodles

19 Fun Valentine Doodle Art Designs You Can Do Easily

animal drawing for kids

Easy & Fun Animal Drawing Ideas for Kids

Favorite Projects

Inspired By Zentangle: Patterns and Starter Pages of 2021

Inspired By Zentangle: Patterns and Starter Pages of 2021
notan example

Easy Notan Paper Project – 3 Methods

Easy Notan Paper Project – 3 Methods
paper collage

How to Use Colored Paper as Your Drawing Tool

How to Use Colored Paper as Your Drawing Tool
National Geographic page art

Citrasolv and National Geographic Magazines Make Cool Melty Ink Art Pages

Citrasolv and National Geographic Magazines Make Cool Melty Ink Art Pages
printmaking with foam pieces - areally fun and easy art technique

Love This Printmaking Technique: Foam Shapes

Love This Printmaking Technique: Foam Shapes
Ideas for watercolor techniques with doilies and other stencils

Watercolor Techniques: Playing With Stencils and Doilies (Doilies!)

Watercolor Techniques: Playing With Stencils and Doilies (Doilies!)

Footer

I love it if you share my content on social media or your site, but please only share one of my images with a blurb and link back to my post. As an Amazon Associate I earn from qualifying purchases. See my disclosure and privacy policy here.As a Blick Art Materials associate I earn from qualifying purchases. Pinterest managed on this site with love and expertise by DigitallyApproved.com

Latest Posts

How to Make Cute Valentine Bookmarks using a Cricut
handmade valentine cardHandmade Valentine Cards using Zentangle Art
valentine doodles19 Fun Valentine Doodle Art Designs You Can Do Easily
animal drawing for kidsEasy & Fun Animal Drawing Ideas for Kids
brother CS7000X reviewThe Brother CS7000X Review – A 2021 Deep Dive
best sewing machine for home useBest Sewing Machine for Home Use for 2021 [Our Reviews and Comparisons]
  • Facebook
  • Twitter
  • Instagram
  • Pinterest
  • Privacy Policy

Copyright © 2021 Craftwhack · All Rights Reserved · Powered by Mai Theme