If you’re looking to keep kids entertained, crafts are always popular, much loved, and fun for everyone. Let’s look at some great butterfly crafts for preschoolers.These should be simple enough for kids to do with some supervision and assistance, and most kids will be delighted to learn more about and create pretty butterflies. Butterfly crafts are great ways to help kids engage with their learning and get them excited about insects.Today, we’re going to cover two easy butterfly crafts for you to try out with your little one(s)!
Butterfly Wings
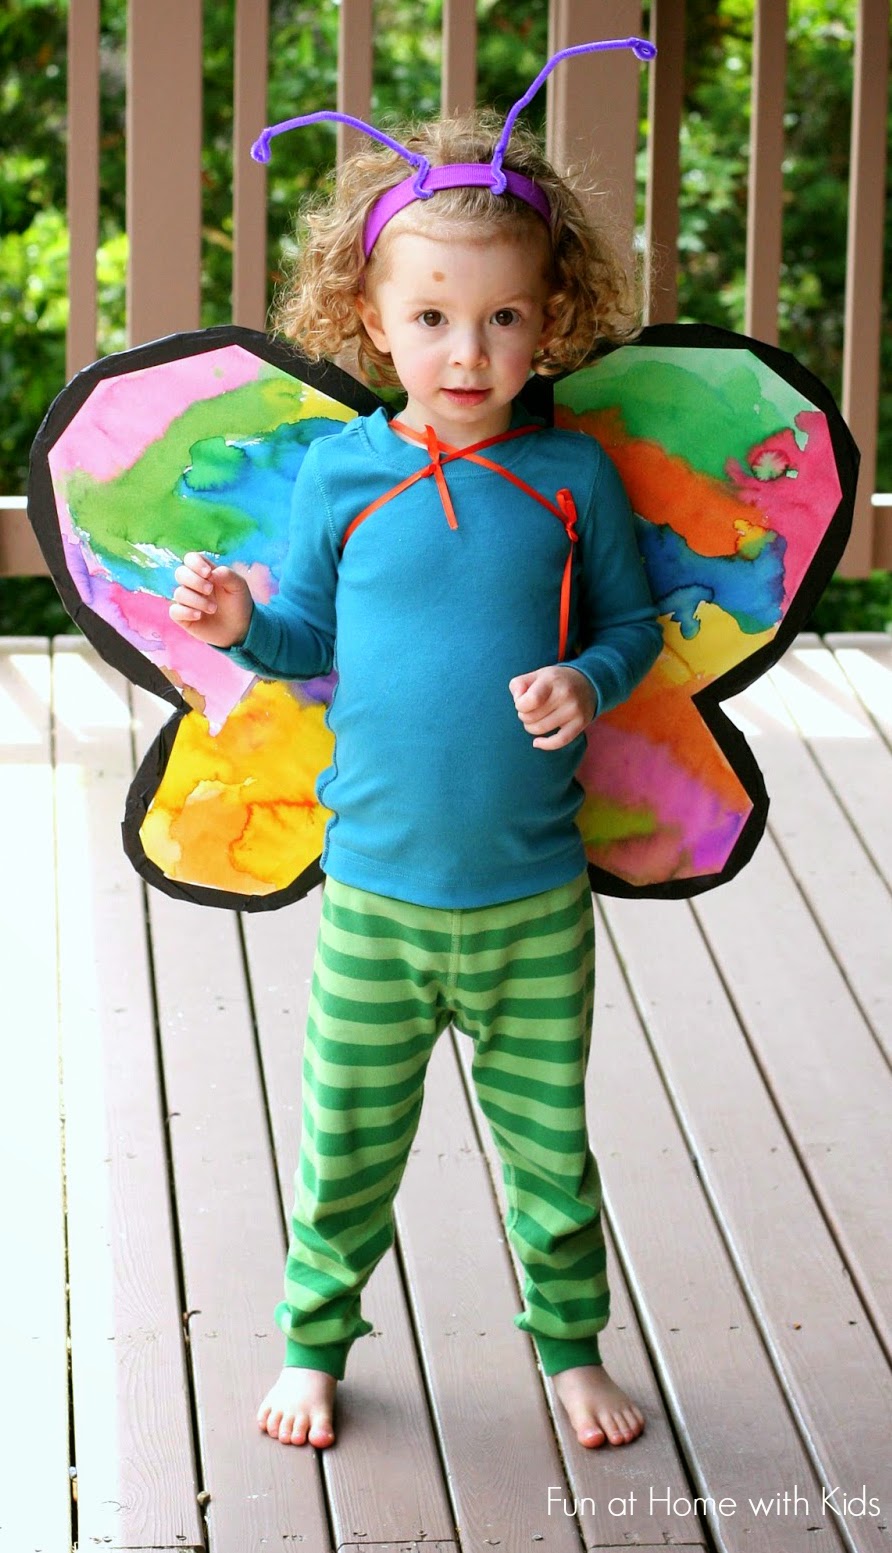 Source: https://funcraftskids.com/diy-costumes-cardboard-butterfly-wings/First, we’re going to learn about making butterfly wings out of cardboard. As an alternative to fairy wings, these are an excellent craft for any small child and result in a fun, wearable toy that everyone can enjoy. Kids will love designing their own wings and choosing colors and decorations just for them.Let’s make a start!
Materials
To turn your preschooler into a beautifully big butterfly, you will need the following:
- Large sheet of card to make the wings from
- Scissors
- Pencil/pen
- Ribbon, glue, or staples.
- Decoration options
- A sheet of thin, colored card
- Two pipe cleaners
Step 1: Draw The First Wing
Take your cardboard and get your child to lie down on it so you can get a good estimate of how big the wings should be. You might find you can do this without the child, but it will be easier to do it with them.Draw a single wing in pencil, and then go over it in pen so it’s easier to cut out.
Step 2: Cut The Wing Out
Cut around your wing carefully, leaving a bit of card at the center where it’s going to join to the other wing. You want some overlap. It’s easier to trim more off than add extra on, so cut generously.Measure the wing against your child and check that you’re happy with it.
Step 3: Draw The Second Wing
Use the first wing to draw a second onto the rest of the card. This will ensure the two sides are the same size and shape. Again, leave a bit of extra card in the middle so you can join the two together.Tip: you can draw both wings together if you want to and just cut them out as one, but this will make them stiff, or you may find that they flop if your card is too thin. It is also much harder to get them to look even if you don’t have something to trace around.
Step 4: Cut The Second Wing Out
Whizz around the second wing with your scissors. It doesn’t need to be super neat and perfect; your preschooler will love it no matter what.
Step 5: Join The Wings
There are multiple options here. If you like, you can use a stapler, tape, or glue (prepare for an impatient “is it dry yet” child unless you have a glue gun). However, you’ll get the best results by overlapping your two wings in the middle and punching a series of holes through the overlap. You can then weave a colorful thread through these, pulling it tight. This will give the wings a bit of “flap” and movement that will make them look more natural.
Step 6: Get Decorating
Here’s where your preschooler comes in at last! Make sure you have lots of options for them to play with and experiment with. Glitter isn’t very eco-friendly and many parents and schools are moving away from it, but there are lots of other choices.You could use watercolors to reflect the beautiful hues of a butterfly’s wings, or you could give your child colored pens or pencils. Stickers are also a popular choice. Alternatively, offer your child some wax crayons. If you’re feeling really creative, you could teach them a bit about symmetry and look up some butterfly wings together, explaining to them how they work and what the spots are for. You can then help your child to recreate these spots on the wings if you feel like it and they’re engaged.Ribbons, buttons, sequins, and any other scraps you have lying around may prove popular. You could also create a “recycling” butterfly with things from the garbage bin, such as tinfoil or little bits of colored paper. However, be aware that these things won’t be recyclable when your butterfly has finished with its wings, so it’s best not to use things that can actually be recycled; instead, choose waste that is destined for landfill anyway.
Step 7: Create A Headband
This little extra step can add to the magic of your butterfly. You can cut a headband from a strip of colored cards and then just staple it (carefully!) to fit around your child’s head. This is very simple. Next, grab a couple of pipe cleaners and punch two little holes in the band.Curl your pipe cleaners up at the ends and work them through the holes, and you’ve got a beautiful antennae headband for your new butterfly to wear!
Toilet Paper Roll Butterfly
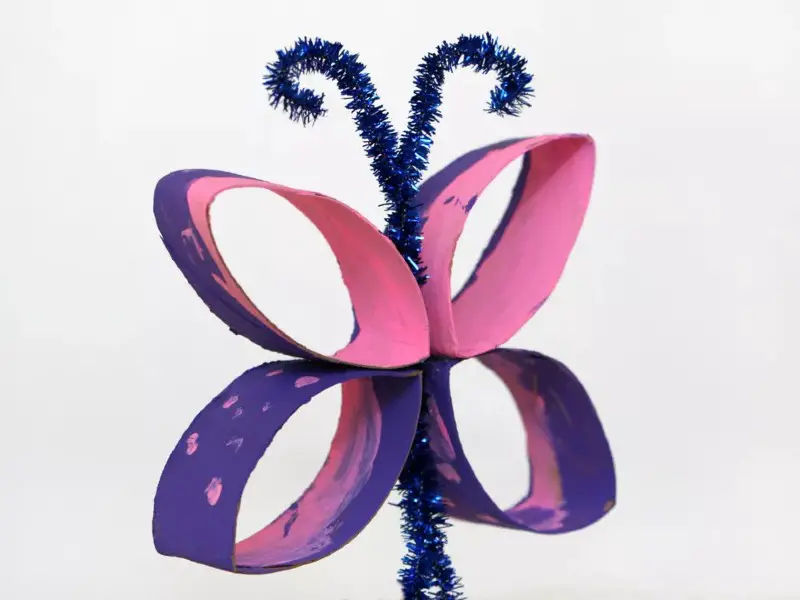 Source: https://www.thesprucecrafts.com/butterfly-craft-for-kids-4129195Maybe instead, you want to create a butterfly your child can decorate their bedroom with. If so, and you’ve got a few old toilet tubes hanging around, this is perfect and will delight your child.
Materials
For this craft, you’re going to need:
- A cardboard tube
- A pretty pipe cleaner
- A paintbrush
- Scissors
- A glue gun
- Paint
- Decorations
- Colored string or fishing line
Step 1: Cut The Cardboard Tube
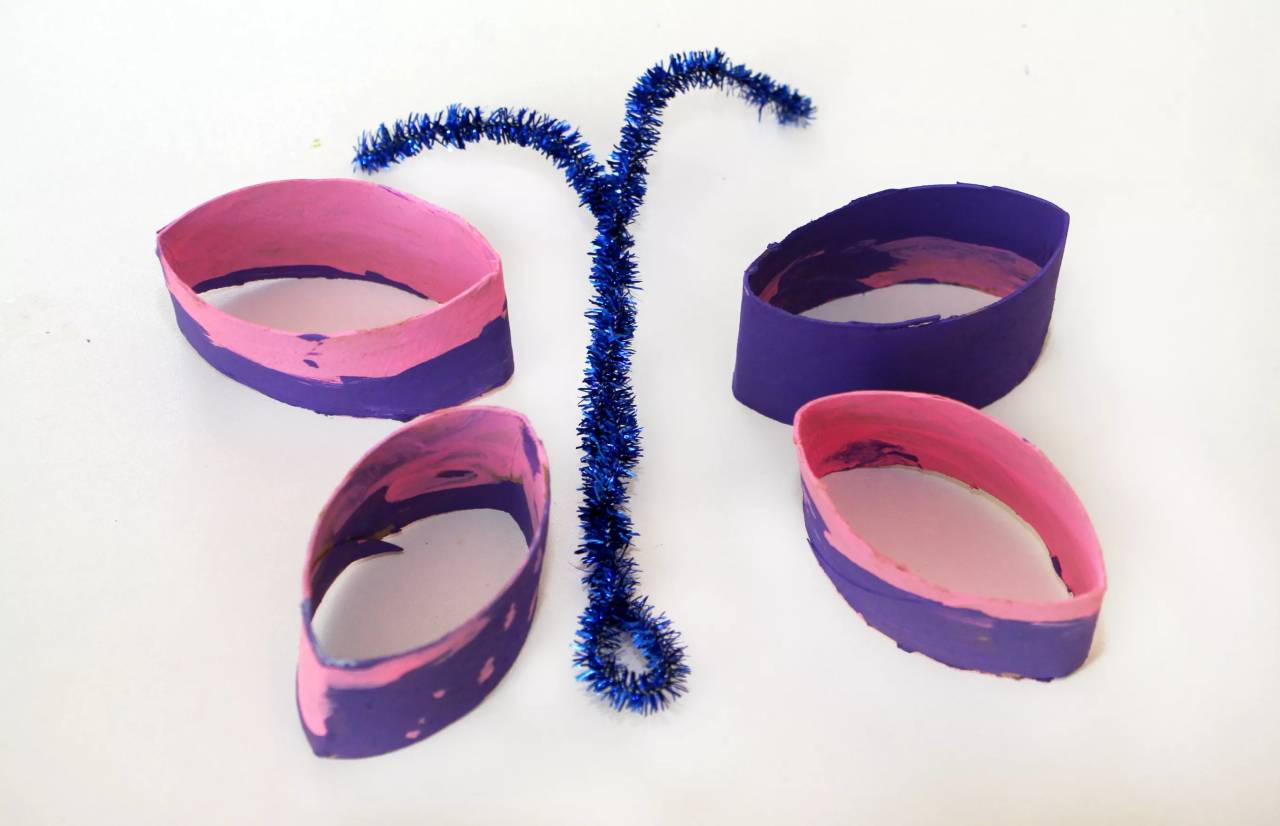
You should first cut the cardboard tube up into four roughly even pieces. It can help to cut the tube in the middle first and then cut each half again. These pieces are going to form the butterfly’s wings.If your child is particularly keen to help with this part, it might be a good idea to have an extra cardboard tube on standby!
Step 2: Paint The Pieces
Set your child free here! Give them the paint, the paintbrush, put down plenty of newspaper, and make sure they don’t paint anything that isn’t the butterfly (like themselves, the walls, the floor, etc.).Once it’s all dry, you can move on to the next step.
Step 3: Make The Butterfly Body
Take your pipe cleaner and find the midpoint. Fold it in half, and then gently twist it around itself, forming a lovely twisty body for the butterfly. Leave a few centimeters at the ends; these will be the butterfly’s antennae.You can curl them up, however, looks best to shape the butterfly’s antennae.
Step 4: Pinch The Tubes
Gently pinch the cardboard tubing to make ovals. These are now your butterfly’s wings, so arrange them around the pipe cleaner body and see if you’re happy with how they look.
Step 5: Glue The Wings Into Place
Time to get gluing! Grab your glue gun and carefully glue each wing to the pipe cleaner body. Mind that little fingers don’t get too interested in grabbing the glue gun at this point, as you don’t want to be dealing with burns and tears in the butterfly creation process.
Step 6: More Decorating!
You might have to help a little here so that the wings don’t get knocked off again, but your preschooler can now add further embellishments to the butterfly’s wings, such as stickers or gems. Make your butterfly beautiful and ready to flutter into the air.
Step 7: Create The Hanger
If you want to hang the butterfly up (which really is the best option for this craft), grab your colored string. You can glue the string on or tie it around the butterfly’s body, beneath the antennae. A fishing line is clear so it will provide an invisible line if you prefer the butterfly to look like it’s magically floating.
Step 8: Hang It Up
Find a hook and hang the butterfly up! If you can hang it in a window, it will twirl and dance and flutter beautifully in any breeze and will look just lovely in your child’s room. You could make a whole flock of butterflies to hang.
Optional Step 9: Colored Wings
If you want to hang the butterfly in the window, you could get some colored film to glue to the wings, in the ovals formed by the toilet roll tube. Cut out and glue the colored film to the back of each “wing” segment, and the sun will catch the colors and throw pretty lights on the opposite wall, leaving your child enchanted.
Conclusion
Butterfly crafts are fun, easy, and get you and your child to create. They are also a good opportunity to teach your child a bit about nature and symmetry, and they look both bright and beautiful either on the wall or as your child skips around with their wings on their back.Either of these will go down a treat with young children, and you can help as much or as little as they need (though obviously scissors and glue guns will require adult handling). They can go wild with the decoration and have a craft to be really proud of at the end of it.
Comments
0 comments