
Preschoolers love crafts, any crafts, whatever crafts ““ and bird crafts are a wonderful way to get them creating and imagining. You can do all sorts of different things, filling the activity with bright colors and wild feathers.So, with that in mind, here are our top bird crafts for preschoolers.
Bird Finger Puppets
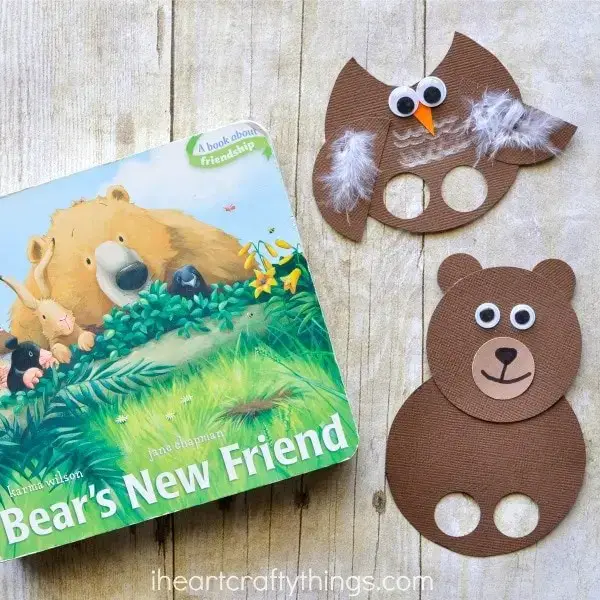 Source: https://iheartcraftythings.com/bears-new-friend-craft.htmlFinger puppets are a great craft choice; your kids can keep playing with and enjoying them even when you’ve finished the craft, and you can make a whole range of different animals to create a zoo for your child.You can do this craft for any bird (made up or otherwise) simply by changing the colors you use.
Materials
To make a cute little bird finger puppet, you’ll need:
- Glue
- Five small feathers in whatever color you like
- Googly eyes
- Orange card
- Cards in colors of your choice for the body
- Scissors
- A hole punch, ¾ inches
- A pen or pencil
Step 1: Draw And Cut The Pieces
Sketch a simple bird shape onto your card. If you’re struggling with the shape, glance at some templates online, or just draw a circle with a little nip above the halfway point to represent the bird’s head. Your child won’t care if it doesn’t look perfect.Cut this out.You’ll also need to cut a smaller circle and then cut it in half to create the wings.
Step 2: Punch Or Cut Out The Legs
Draw two small holes in the bottom part of the bird, where its legs should go. If you don’t have a large enough hole punch for this, you can probably do this with scissors, but it will be a little bit trickier. Carefully punch a little hole using scissors, and then trim around the edges until you have smooth holes large enough for your child’s fingers.
Step 3: Glue The Wings On
This is the part of the craft where your child is more likely to be able to help. Give them a bit of assistance gluing the wings into place.
Step 4: Glue The Googly Eyes On
Help your child stick the googly eyes near the top of the bird’s head, and then cut a little triangular beak from the orange card for them to stick just beneath the eyes.
Step 5: Add The Feathers
Dab a little glue on either wing and help your child to stick the feathers in place. Next, turn the bird over and put a little glue at the bottom of the body, and show your child how to stick the feathers at the bottom of the bird’s body. The tail feathers don’t have to match the wing ones if you want to go colorful!
Step 6: Draw Some Detailing
Guide your preschooler to draw some feathers along the bird’s chest using a pen/pencil. Next, slip it onto your child’s fingers and they can enjoy being the feet for a very cute little bird puppet!
An Owl Card
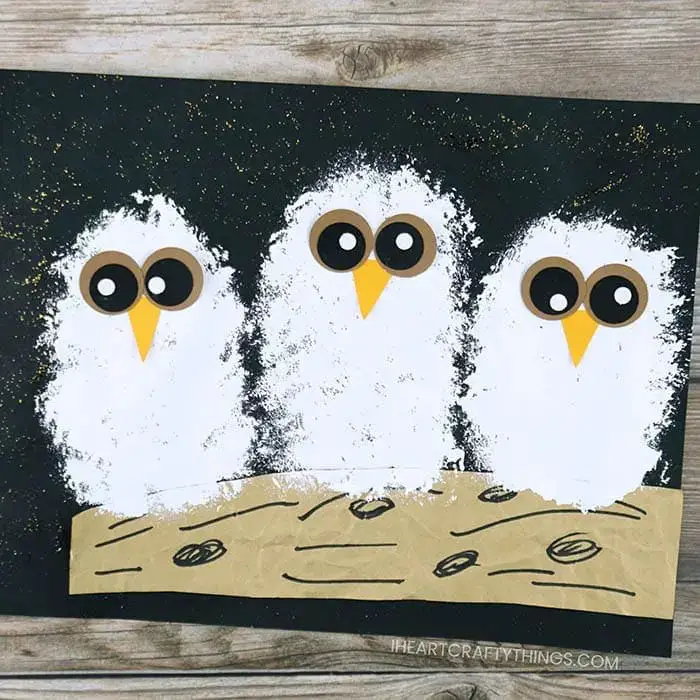 Source: https://iheartcraftythings.com/owl-babies-craft.htmlCards are a great kid craft as they are practical and useful as well as fun ““ so if you’ve got a special someone’s birthday coming up, these are the perfect thing to make with your preschooler.
Materials
For this craft, you will need:
- White acrylic paint
- Small paper plate
- Black card
- Brown paper
- Black paper
- White paper
- Orange paper
- A black marker pen
- A sponge
- Scissors
- White feathers (optional)
- Paintbrush
Step 1: Fold Your Card
Fold the black card in half to form the overall card you will be decorating.
Step 2: Create The Branch
Using the brown paper, help your toddler tear or cut a branch shape for the owl to sit on. Your child can then use the pen to add details to the bark, such as knots or ridges in the wood.
Step 3: Make A Night Sky
This is the part of the craft that could get a little messy, so make sure you have some newspaper down and your child is wearing old clothes (as you’ll be using acrylic paint, this is crucial) and an apron. You should work on a wipe-clean surface and clean up any paint splatters straight away.Give your child a paintbrush with a bit of damp paint on it and show them how to flick the brush to create paint spatters on the card. These will be the stars in the background. They can add to this with a painted moon or some puffy clouds if they want to.The white paint on the black card should look very effective, and making the paint just a little bit wet will ensure it flicks nicely and doesn’t end up in big lumps.
Step 4: Make The Owl
Dip the sponge into the white paint and guide your preschooler in creating a lovely, fluffy owl shape on the black card. You may need a few dips to get a good owl shape. It doesn’t matter if this ends up a bit messy ““ that’s part of the fun of crafting with toddlers!If you can guide them into creating a head shape, that’s great, but don’t worry if not; owls are fluffy and there’s no need for it to look perfect.
Step 5: Cut Out Some Eyes
You should cut two little circles from the brown paper, followed by two slightly smaller circles from the black paper. Finally, either cut or use a hole punch to create two white circles in the smallest size.You may need to guide your child for the next part; help them stick the largest brown circle at the bottom, the black circle on top, and then the little white one on top of that to represent a shine in the owl’s eyes.If you want to simplify this step, you can also use googly eyes, which can be stuck to the owl’s face with no need for more cutting.
Step 6: Cut Some Feet And A Beak
Your owl needs to hold onto the branch, so grab your orange paper and then cut two little owl feet out. You don’t need to spend ages on these; just cut two triangles and then nip two smaller triangles out of each of them with the scissors to form toes.Help your preschooler glue these onto the branch at the bottom of the owl’s body.Next, cut another triangle for the beak and let them stick this under the owl’s eyes.
Step 7: Add Feathers (Optional Step)
If you have some little white feathers in your craft box, your preschooler is bound to love adding some fluff to their owl. You can either use whole feathers or just trim off some of the fluff for them to use.Add a bit of glue to the owl’s body and help your preschooler glue the feathers in place to make the owl fluffy both in terms of texture and aesthetics. You now have a beautiful little owl card to present to any lucky recipient!
Conclusion
Both these crafts are a great way to get your child sticking and creating. They are pretty simple and shouldn’t need too much help from mum or dad, but will still offer you a fun way to spend some time together and make things.Kids love creating cards, in particular, so the owl card is a wonderful one to do if you have a relative who appreciates your little one’s creative talents!

Comments
0 comments