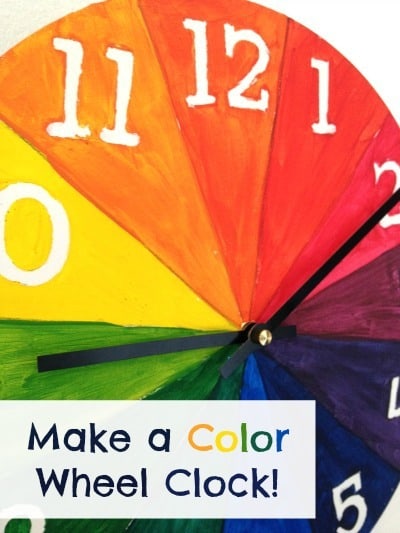
I’ve been wanting to do a color wheel for kids project.
I’ve also been wanting to do a clock project for a long time. In fact, we have a few different sets of clock hands and an old Ikea clock floating around the house, but I didn’t get truly motivated until I found a blank wooden clock face at Michael’s. This one on Amazon is similar to the one we used.
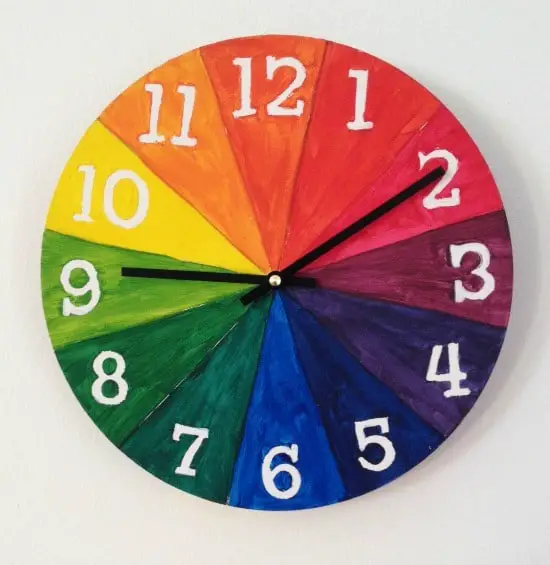
So do you know what is a perfect art project to incorporate into a clock? A color wheel! 12 numbers; 12 colors. Perfect.
Materials
- Wooden clock face
- 3/4″ Clock hands and mechanism kit
- Acrylic paint – we used Liquitex Basics
- Compass or ruler
- Pencil
- Paint brushes
- Number stickers (We got ours at Michael’s. They’re approximately 1 1/2″ high) Here are some similar stickers– maybe a little smaller than the ones I used.
Directions
Prepare your clock face for painting by priming it with gesso. Use two coats, letting them dry completely in between coats.
For this clock, we decided to not be perfectionists. I really wanted this to be a project that’s accessible for kids as young as elementary age to familiarize them with the color wheel.
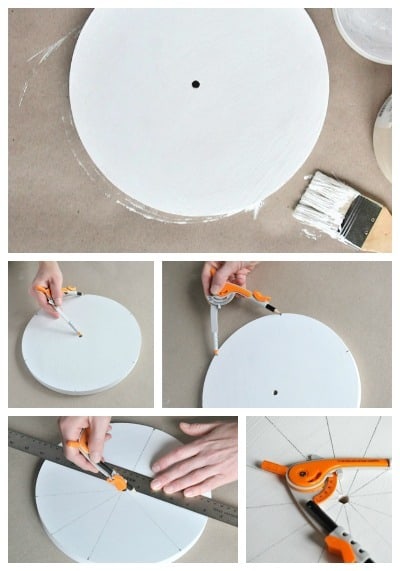
With that said, here’s how we measured the color wheel segments on the clock face:
- Our clock is 10″ in diameter. Show your kids how to find the radius of a circle by measuring from the center to the edge of the circle.
- Mark a dot on the edge of the clock, and mark dots all around the clock edge at the measurement of the radius.
- Mark dots at halfway in between the first dots.
- Use a straight edge and draw the pencil lines across the face of the clock. Draw lightly if you want to erase these later, or you can keep them in. You should have 12 wedges drawn!
Painting the Color Wheel
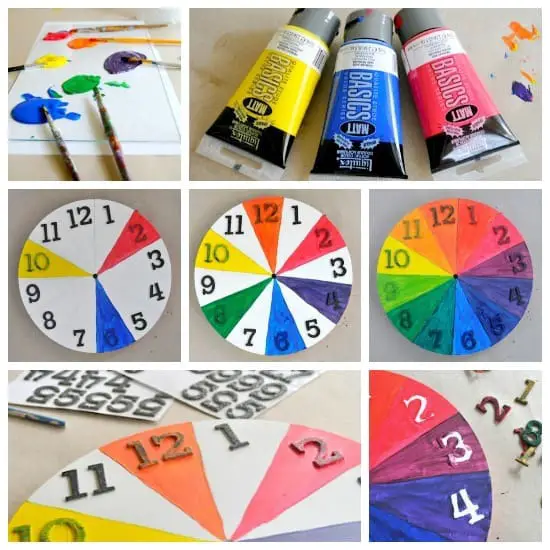
- Stick your number stickers on your clock, and make sure they’re pressed down thoroughly.
- Break out your paints and squeeze a dollop of each of the 3 primary colors onto your palette.
- Paint the primary colors so there are 3 empty wedges in between each primary color.
- Mix the red and blue together in equal amounts to get purple. Paint that in the segment halfway between the blue and red on your clock face. Do the same with the blue and yellow and yellow and red.
- Now you have the primary colors and the secondary colors painted in.
Want to know what goes in the 6 remaining pie pieces? Tertiary colors! Hooray! They are made by mixing together the 2 colors on either side of them.
- Remove the stickers after the paint has mostly dried. If paint seeped under the stickers, you can use gesso and a small brush to touch up the letters.
- Add the clock mechanism/hands onto the clock and slap a battery in the back before you hang and admire your clock. If you don’t order the clock kit from my Amazon link, make sure you buy a 3/4″ clock mechanism, or it won’t fit through the hole. (Ask me how I know…)
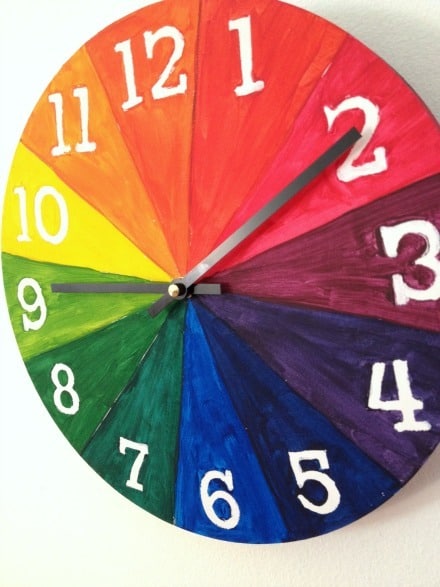
That’s it. It’s not overwhelming. It makes lots of sense once you see it in action. You can go way far into color theory if you desire, but this is a good introduction for your kids. If they’re still having fun color mixing, have them paint 2 complementary colors next to each other on a piece of paper and notice what they look like. Cool!
Color Wheel Vocabulary Time
primary colors – red, blue, and yellow. No colors can be mixed to make these 3 colors
secondary colors – colors made by mixing 2 primary colors together
complementary colors – colors opposite each other on the color wheel
tertiary colors – mixture of primary and secondary color
Color wheel items you might love:
Comments
0 comments
Math meets art! LOVE it!!
I love when math and art go on a date!
wow wow wow!!! Love this so much, the clock is beautiful and the instructions are so clear and helpful! Thank you so much, will definitely be trying this one day 🙂 x
Awsome idea!! I will try this with my class~
Thanks for sharing ^^
a very nice idea for my kid – which is in the process to learn the clock.
I will try to do it with him and see the results.
thanks