Scarecrows are a great arts and crafts idea. There are so many ways to make scarecrow decorations for your home or classroom during the Fall. Making arts and crafts is the perfect way to spend time with your kids. Plus, you can create adorable decorations and store them away as keepsakes. This article provides a list of scarecrow arts and crafts ideas that are perfect for making as the season changes.
Scarecrow Crafts for Kids
Be it the lovable, goofy scarecrow from the Wizard of Oz, or the nefarious adversary of Batman, one thing is for certain: scarecrows have been notable figures across all sorts of children’s media. So, it’s no wonder why your little one or students have been clamoring to make some scary cute scarecrow art.Historically, scarecrows have been used by farmers to, well, scare any crows off their fields, but in recent years, they have become more of decor in the fall season, especially during Halloween.Today we will be sharing some fun, easy to make DIY scarecrows that will not only have kids smiling from ear to ear but will also encourage them to participate in decorating the house with their creations.These are the 4 scarecrow crafts for kids that we will be making today:
- Paper bag scarecrow
- Toilet paper roll scarecrow
- Paper bowl scarecrow
- Popsicle stick scarecrow
So, grab your art supplies (and your kids!), and let’s get crafting.
Paper Bag Scarecrow
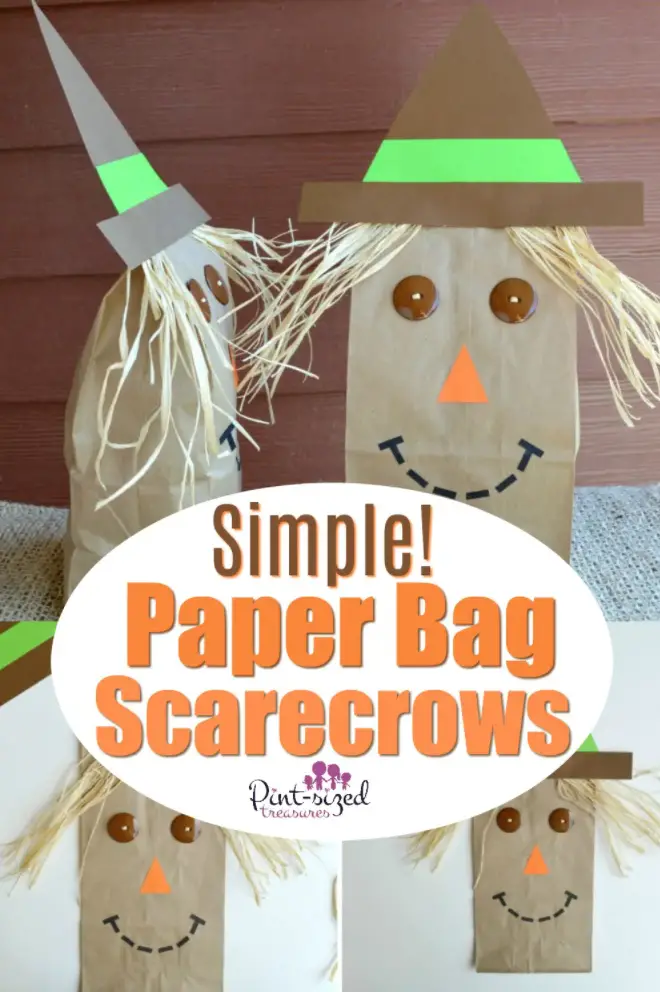 Source:https://pintsizedtreasures.com/paper-bag-scarecrows/Let’s start things off simple by using supplies you definitely have lying around in your home. For this DIY, you’ll be needing:
- A simple brown paper bag
- Sharpies
- Colored craft felt paper
- Scissors
- Scrap Paper
- Yarn
- Glue
The construction of a paper bag scarecrow is fairly straightforward:
- Using your scissors, cut out a triangular hat from the craft felt paper. Feel free to decorate it however you please. Ensure the base of your hat is wider than the paper bag.
- Next, cut off long strands of yarn, about 12 inches in length. Fold them in half and glue them at the top of the paper bag for the hair. Cover the folded part with the hat.
- Cut out two circles and small strips from the black craft felt paper for the eyes and mouth, and a small triangle from the orange craft felt paper for the nose. Glue the eyes and nose on directly, and arrange the black strips in a smiley to emulate stitches for the mouth.
- Alternatively, you can simply draw the eyes, nose, and mouth using Sharpies.
- Finally, stuff your paper bag with crumpled scrap paper, and glue the top shut.
And there you have it! A simple paper bag scarecrow kids will love to make. You can easily hang it up anywhere around the house as well.
Toilet Paper Roll Scarecrows
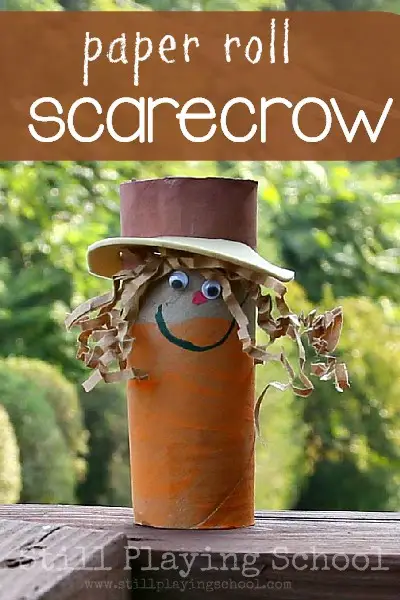 Source:https://www.stillplayingschool.com/2013/09/toilet-paper-roll-scarecrow.html Here’s another super quick and easy scarecrow craft, for which you’ll be needing:
- Toilet paper rolls (one per scarecrow)
- Colored craft felt paper
- Yarn / Crinkle paper
- Sharpies
- Scissors
- Glue
- Paint and paintbrushes
To make a toilet paper scarecrow:
- Cut a ring of brown craft felt paper for the hat brim. Its inner diameter should be equal to that of your toilet paper roll while the outer one can be 1-2cm larger than the inner one.
- Next, grab your paint and paintbrushes and start painting the paper roll. You can paint in whatever colors you’d like. You can use a brown color for the hat, peach for the skin, and blue for the overalls.
- Use your Sharpies to draw on the eyes, nose, and mouth.
- For the hair, glue on some crinkle paper or yarn strands just where the painted hat ends. Slide the hat brim over the glued part.
And just like that, you have a fun toilet paper roll scarecrow! This DIY is a great way to reuse all those toilet paper rolls instead of just throwing them away.
Paper Bowl Scarecrow
 Source:https://iheartcraftythings.com/paper-bowl-scarecrow-craft.htmlIf you’re interested in giving a 3D effect to your scarecrow crafts, then look no further! We’ve got just the thing you are looking for in this paper bowl scarecrow, for which you’ll be needing:
- A paper bowl
- Paint and paintbrushes
- Scissors
- Colored craft felt paper
- Glue
- Yarn / Crepe Paper
- Sharpies
Here’s how to create this paper bowl scarecrow:
- Begin by painting the bottom of your paper bowl a tan, peach, or yellow color. This is the face of your scarecrow.
- Draw a scarecrow hat, nose, and eyes on the craft felt. Cut them out, and glue them onto your scarecrow face.
- Alternatively, you can directly draw the eyes and nose on the scarecrow face instead of making them out of craft felt. You can even use black buttons for the eyes.
- For the hair, cut up 12-inch-long strands of the yarn, and glue them to the top of the scarecrow face. You can use crepe paper instead of yarn for the hair as well.
- To finish the paper bowl scarecrow, add in additional details such as shading on the hat. You can use leftover crepe paper too to decorate the scarecrow even more.
And that is how you make a funky paper bowl scarecrow! Kids will love the 3D effect the paper bowl provides. Do note that you can always use a normal plate instead of a paper bowl for this craft.
Popsicle Stick Scarecrow
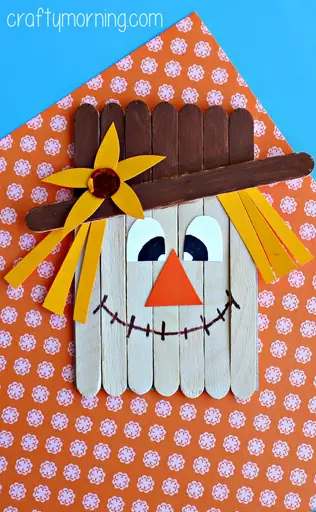 Source:https://www.craftymorning.com/popsicle-stick-scarecrow-craft-kids/We’re now at the last scarecrow craft on our list, for which you’ll be needing:
- Lots of popsicle sticks, at least 8
- Glue
- Colored craft felt paper
- Scissors
- Sharpies
- A piece of cardboard
- Crepe paper
- Paint
As for the assembly of this scarecrow:
- Glue 7 popsicle sticks to the cardboard in a vertical row, and the last one diagonally to make the hat.
- Before the popsicles dry, glue on some crepe paper below the diagonal stick for the hair.
- Once all the glue has dried, paint the hat and face of the scarecrow.
- Finally, draw the eyes and nose on craft felt, and glue it all on. Use a sharpie for the smile.
There! Now you have an adorable popsicle stick scarecrow, which will look amazing on any shelf or countertop.
Paper Bowl Scarecrow Craft
 Source: By Caroline @ iHeartCraftyThings, “Paper Bowl Scarecrow Craft -Super Cute Fall Craft for Kids!” (https://iheartcraftythings.com/paper-bowl-scarecrow-craft.html)This charming craft is perfect for the fall season. This craft can be made in your home or the classroom. Darling little scarecrows can be hung up on the fridge or wall to help welcome the fall season.What You’ll Need
- Scarecrow craft pattern, which you can get here: https://i-heart-crafty-things.myshopify.com/products/paper-bowl-scarecrow-craft-super-cute-fall-craft-for-kids
- 20 oz paper bowl (You can it from Target)
- Paintbrush
- Tan paint
- Strips of yellow construction paper, about 12 inches long. Use several pieces as this will be your scarecrow’s hair
- Black buttons
- Yellow tissue paper
- Construction paper or cardstock – orange, pink, or brown work best
- Scissors
- Stapler
- Black marker
- Brown marker
- Tacky glue
DirectionsWith the tan paint, paint the bottom of your paper bowl. Set it aside to dry completely. From the link, print out the scarecrow craft pattern. Use it to cut out a brown hat, and orange nose. Then print the scarecrow’s cheeks.Take several of your yellow strips of construction paper and glue them to the top of the paper bowl to make hair.Staple the scarecrow’s hat to the top lip of your paper plate.Glue the black eyes onto your scarecrow and then glue the nose and cheeks.Layer three pieces of yellow tissue paper together and scrunch them up. This will make the yellow flower that you now glue onto your scarecrow’s hat.Now use your black marker and draw a mouth with stitches on your scarecrow’s face. You can also take the brown marker and add scratch marks to her hat.And you’re done! You’ve helped your preschooler make an adorable little scarecrow face.
Paper Bag Scarecrow Craft
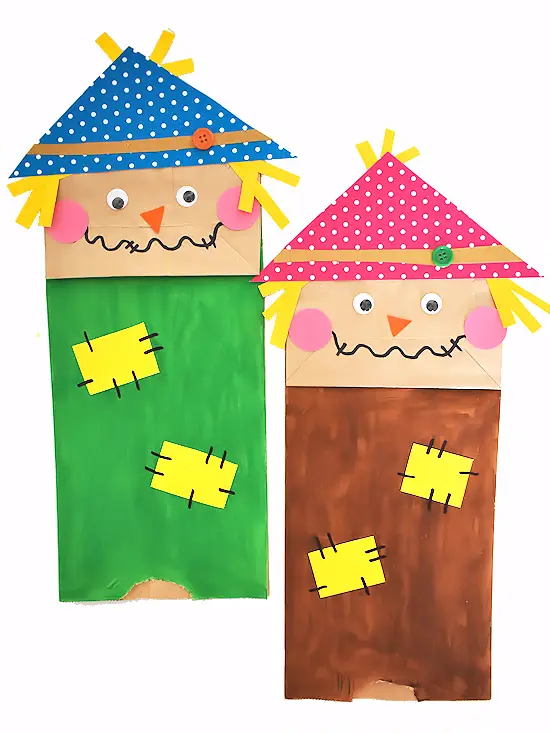
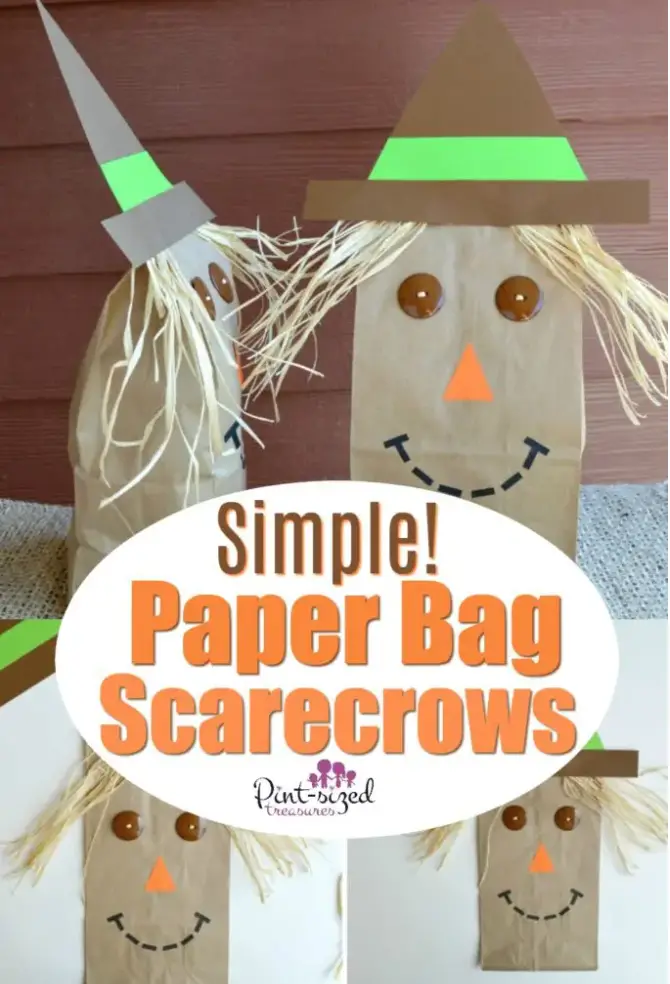 Source: By Alli Katseanes @ Print-Sized Treasures, “Paper Bag Scarecrows That Are Simple and Fun!” (https://pintsizedtreasures.com/paper-bag-scarecrows/)These paper bag scarecrows are super fun to make. They are simple, and kids of all ages can do them. It’s best to use raffia or hay if you can get your hands on any. But yellow construction paper works in a pinch.What You’ll Need
- Buttons
- Card stock in black, orange, green, and brown
- Glue stick
- Scissors
- Raffia, or strips of yellow construction paper
- Brown paper bag
- Scrap paper
DirectionsThread a thin piece of raffia twice through a button and tie it. Trim the excess and do the same with the other button.Take the brown card stock and cut out the shape of a hat, paying attention that the base is a bit wider than the brown paper bag.Using the orange card stock, cut a small orange triangle. Using the black card stock, cut out several thin black lines, about 1/2 inch long.Now cup a strip of the green card stock roughly one inch wide and glue it onto the hat. Remove any excess.Glue on your scarecrow’s eyes, using the buttons. Now glue on his nose using the triangle.Glue the black strips to make a smile.Cut several strips of the raffia at about 14 inches. Fold them in half and glue them to the top of the bag. Now glue the hat over the top of the bag, covering your scarecrow’s raffia hair.Take your crumpled scrap paper and stuff it into the paperback and glue the top closed.Your scarecrow paper bag is now finished and ready to display!
Candy Corn Scarecrow
 Source: By Housing a Forest, “Candy Corn Scarecrow” (http://www.housingaforest.com/candy-corn-scarecrow/)Nothing says fall like candy corn. The white, orange and yellow corns are so good! And packing them into a cute candy corn scarecrow is a ton of fun for you and the kids. What You’ll Need
- Plastic cup
- 1 empty glass bottle. A juice bottle works well
- Buttons
- Yellow sharpie
- Brown and orange paper scraps
- Candy corn. The best part!
DirectionsTake your yellow sharpie and color your plastic cup. You can also just use a yellow plastic cup if it’s easier. Trim your cup to the size you want your scarecrow to be. Now cut slits in the plastic so it looks like straw. Now curl the edges.You can now add a paper band to the hat as a finishing touch.You can also spruce your scarecrow up with flowers if your scarecrow is a girl.Glue on her button eyes and a paper mouth to the jar to form her face. Now fill your glass jar with candy corn. After securing the cover of your jar back on put the yellow plastic hat on. Your little scarecrow is now good to go. It will be fun to see how long your preschoolers can go before they tear into it and eat all the candy corn!
Scarecrow Potato Craft
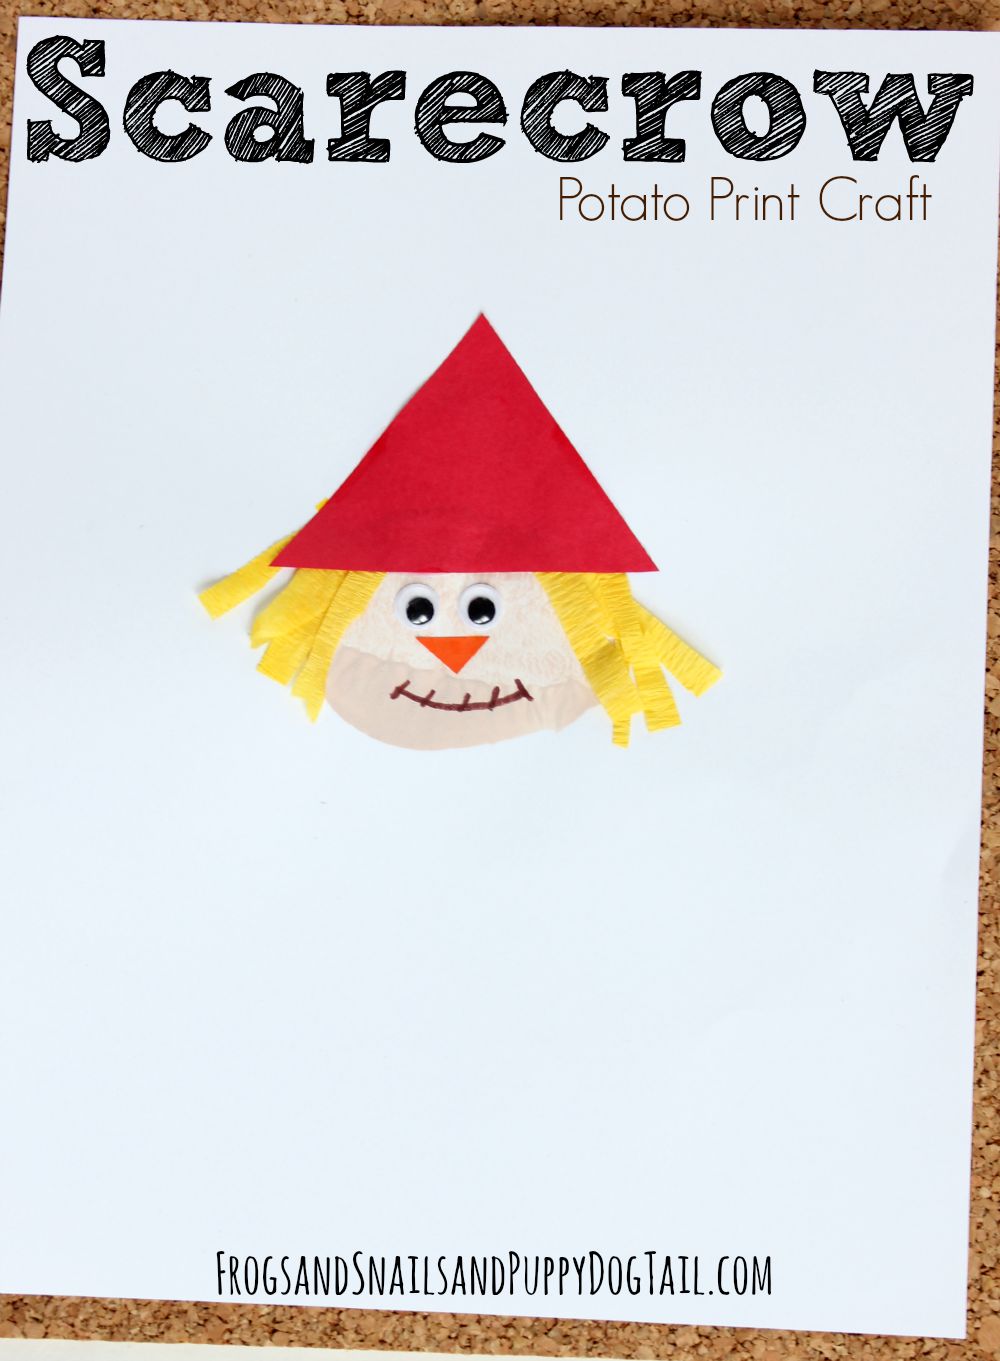 Source: By Jamie @ Frogs, Snails and Puppy Dog Tails, “Scarecrow Potato Print Craft” (http://frogsandsnailsandpuppydogtail.com/scarecrow-potato-print-craft/)Those spuds hanging around in your kitchen are good for more than eating. They work great for crafts, especially making prints! Potato print scarecrows are a darling little craft you can do with your preschoolers.What You’ll Need
- 1 potato. Russet works best, but any kind will do. Just avoid the little tiny ones
- White and brown paint
- Yellow streamers or yellow strips of paper
- Googly eyes
- Cardstock in red, orange, white, and green
- Sharpie
DirectionsHave your child mix the brown and white paint to get the color beige they want. Cut the potato in half and have your child dip the inside part in the paint, and make prints on a piece of white card stock.Set the paper aside and let your prints dry.Now glue on the googly eyes.Using the colored card stock, cut triangles for hats and tiny triangles for noses.Cut the streamers into strips, or use your yellow strips of paper.
Glue on your scarecrow’s hair, and then give her a hat.
Use the brown sharpie and give her a cute little mouth and use one of the tiny triangles for a nose.We now have an adorable little scarecrow made from a potato!
Scarecrow Corner Bookmark
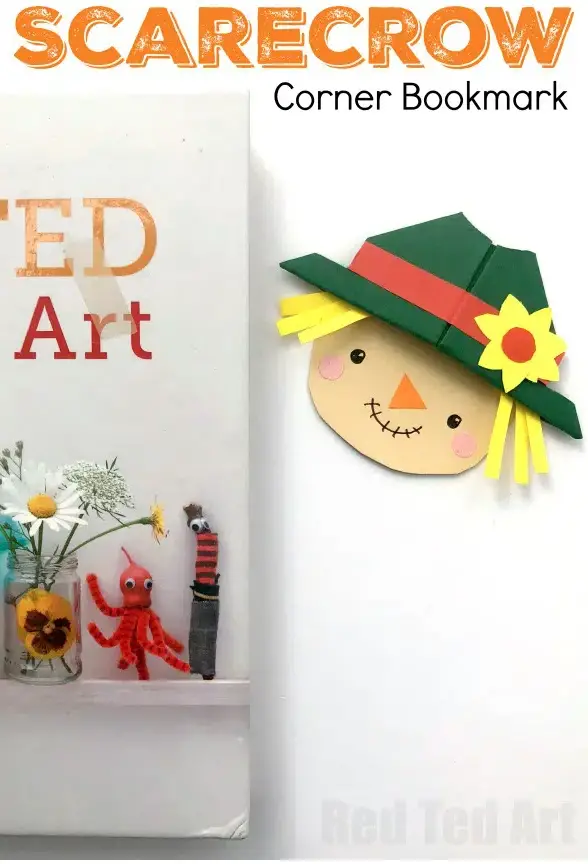 Source:https://www.redtedart.com/scarecrow-corner-bookmark-design/ To make a scarecrow corner bookmark, you will need a square piece of paper (to form the hat), colored scrap paper you can cut into shapes, a pen or markers, scissors, and a glue stick.The first step involves a little origami. Begin with the square piece of paper you want to use for the scarecrow’s hat. Fold your square into a triangle by folding one corner over.Rotate your triangle so that the long side is at the bottom, closest to you. Fold the lower right corner up to the top of the triangle. Repeat for the lower-left corner. It should look like a square again. Fold them back open so it is back to a triangle with the long side at the bottom. Flip down the top sheet of the triangle so that the top corner touches the long side. Make a crease.Fold the flaps you created (the lower left and lower right corner) and tuck them into the opening you created by folding down the top corner. This should make your bookmark square again. Once you have your hat made, cut out pieces of colored paper to create a band across the hat and other decorations such as a paper flower for the hat. Cut a circle out of some colored paper to make the scarecrow’s face. Glue this underneath the hat you made.Use the pen or markers to draw a face on the scarecrow. You can then cut small yellow or brown pieces of paper to glue to your bookmark as the scarecrow’s hair.
Toilet Paper Roll Scarecrow
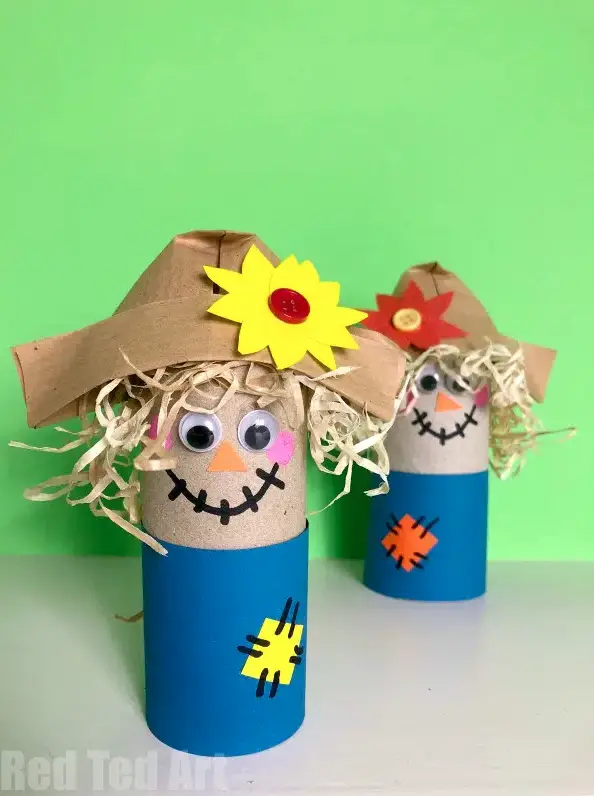 Source:https://www.redtedart.com/toilet-paper-roll-scarecrow/ For this craft, you will need a toilet paper roll, brown paper, markers, fake straw or raffia (you can also use yellow paper strips), googly eyes, scissors, and a glue stick.Make a scarecrow hat out of the brown paper. You can fold a classic paper hat origami-style (similar to a paper boat). Draw a scarecrow face on your toilet paper roll with markers. You can glue on the googly eyes and cut out shapes from colored scrap paper to make the face as well.Next, cut out a shirt for your scarecrow. To do this, cut a strip out of colored paper and wrap it around the toilet paper roll. Use a glue stick to glue it to the toilet paper roll. You can decorate the shirt with markers and scrap paper. After that, put glue around the rim of your toilet paper roll and add the straw or raffia as hair. Next, put glue on your scarecrow’s hat and put that on the toilet paper roll over the hair.
Paper Bowl Scarecrow
 Source:https://iheartcraftythings.com/paper-bowl-scarecrow-craft.html To make a paper bowl scarecrow, you will need paper bowls (A paper plate will also work.), tan-colored paint, paintbrushes, raffia (or yellow strips of paper), black buttons for eyes, colored cardstock or construction paper, markers, scissors, a stapler, and glue.Paint the bottom of a paper bowl tan. Allow it to dry completely before adding paper and buttons.Cut a hat shape out of the brown paper. You can use orange paper to cut out a nose and pink paper to cut out circles for cheeks. Cut raffia into 12-inch strips. Glue the raffia to the top of the paper bowl. Use a stapler to attach the hat to the top of the paper bowl. Glue two black buttons for the eyes. For the nose and cheeks, cut out of construction paper. You can also use markers to draw the scarecrow’s face. Draw a mouth on your scarecrow to finish making your scarecrow. You can also add markings to your scarecrow’s hat and other decorations such as a flower.
Scarecrow Halloween Candy Bags
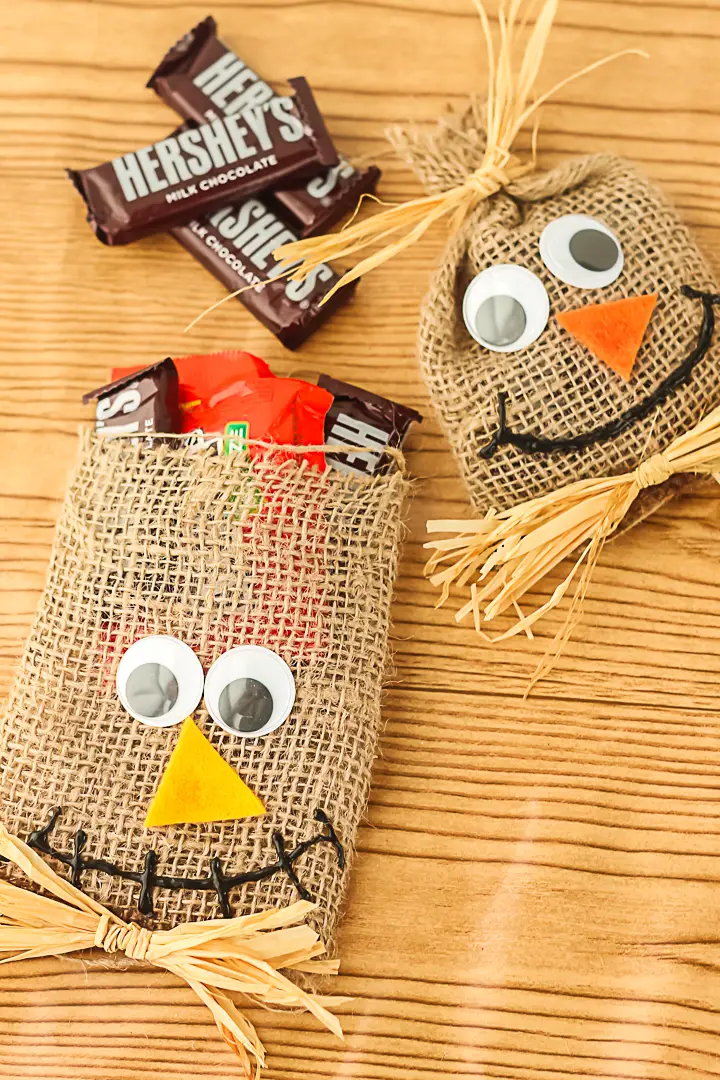 Source:https://www.thecountrychiccottage.net/scarecrow-halloween-treat-bags/ To make scarecrow Halloween candy treat bags, you will need burlap fabric, fabric glue, felt, scissors, raffia, googly eyes, and black paint.Cut the burlap fabric into rectangular pieces about 5 x 8 inches. You can make them bigger or smaller depending on what you want. Use fabric glue to secure the edges of the bag. Glue the long edges together and one of the short edges, leaving the other short edge open to be the top of the bag. Cut shapes out of felt to make the scarecrow’s nose and cheeks. Glue the pieces of felt and the googly eyes to the burlap bag using fabric glue. Using black paint (puffy paint or dimensional paint), draw a mouth for your scarecrow. Allow the paint to dry for a few hours or overnight before you use the bag.Glue the raffia onto your bag. You can glue it on to look like hair or tie it into a bow at the bottom of the bag. Fill the bags with candy and Halloween treats. As the season changes and we welcome Autumn, spending time with family can be a great feeling. A great way to spend time with your loved ones is by creating arts and crafts. You don’t have to spend a lot of money to make arts and crafts. Get creative with stuff you have around the house!Arts and crafts allow you and your children to get creative. Making decorations for your house or keepsakes to look back on is important. Also, arts and crafts help kids learn creativity as well as fine motor skills such as using scissors and crafting small objects. Scarecrows are an adorable way to decorate your home for Autumn. Some other scarecrow crafts include scarecrow puppets, candy corn scarecrows, popsicle stick scarecrows, scarecrow cupcake liners, terra cotta pot scarecrows, scarecrow stamps, handprint scarecrows, and scarecrow mason jars.
Scarecrow Crafts for Preschoolers
Fall is here, and scarecrows are the ultimate symbol for Autumn pumpkin patches. They are cute and adored by all, even if they don’t have a brain.Whether you are teaching your preschooler from home, teaching a class virtually, or teaching in the classroom, arts and crafts are an essential part of learning. Making scarecrow crafts can be a great way to teach creativity to your preschoolers. These easy-to-make, cute scarecrow crafts make great decorations in the classroom or as gifts to parents.This article provides a list of different easy-to-make and super adorable scarecrow crafts you can make with your preschooler.
Craft Stick and Cork Scarecrows
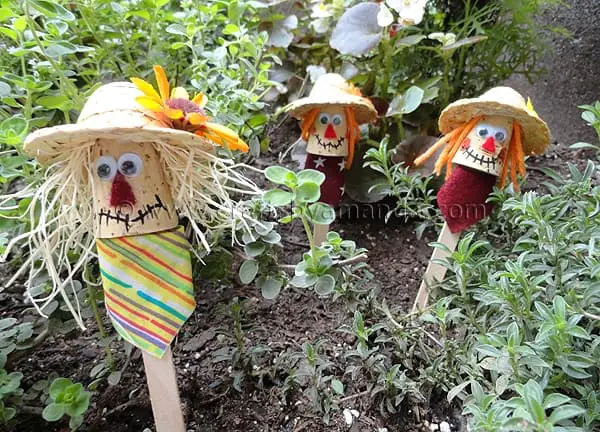 Source:https://craftsbyamanda.com/craft-stick-scarecrows/ For this craft, you will need craft sticks, corks, glue, small pieces of fabric, a marker, pieces of yarn, and a mini straw hat. Cut a slit in a cork. (A grownup should do this step.) Glue the craft stick inside the slit.Use a small piece of fabric (about 2 inches) to create a scarf for your scarecrow. Fold it into a triangle and glue the points of the triangle together. Then put the scarf around the craft stick and glue it in the back.Use a marker to draw a smile and eyes, or you can use googly eyes. You can draw the face any way you want. Glue pieces of yarn to the cork head as hair.Glue the rim of a tiny straw hat to your scarecrow.
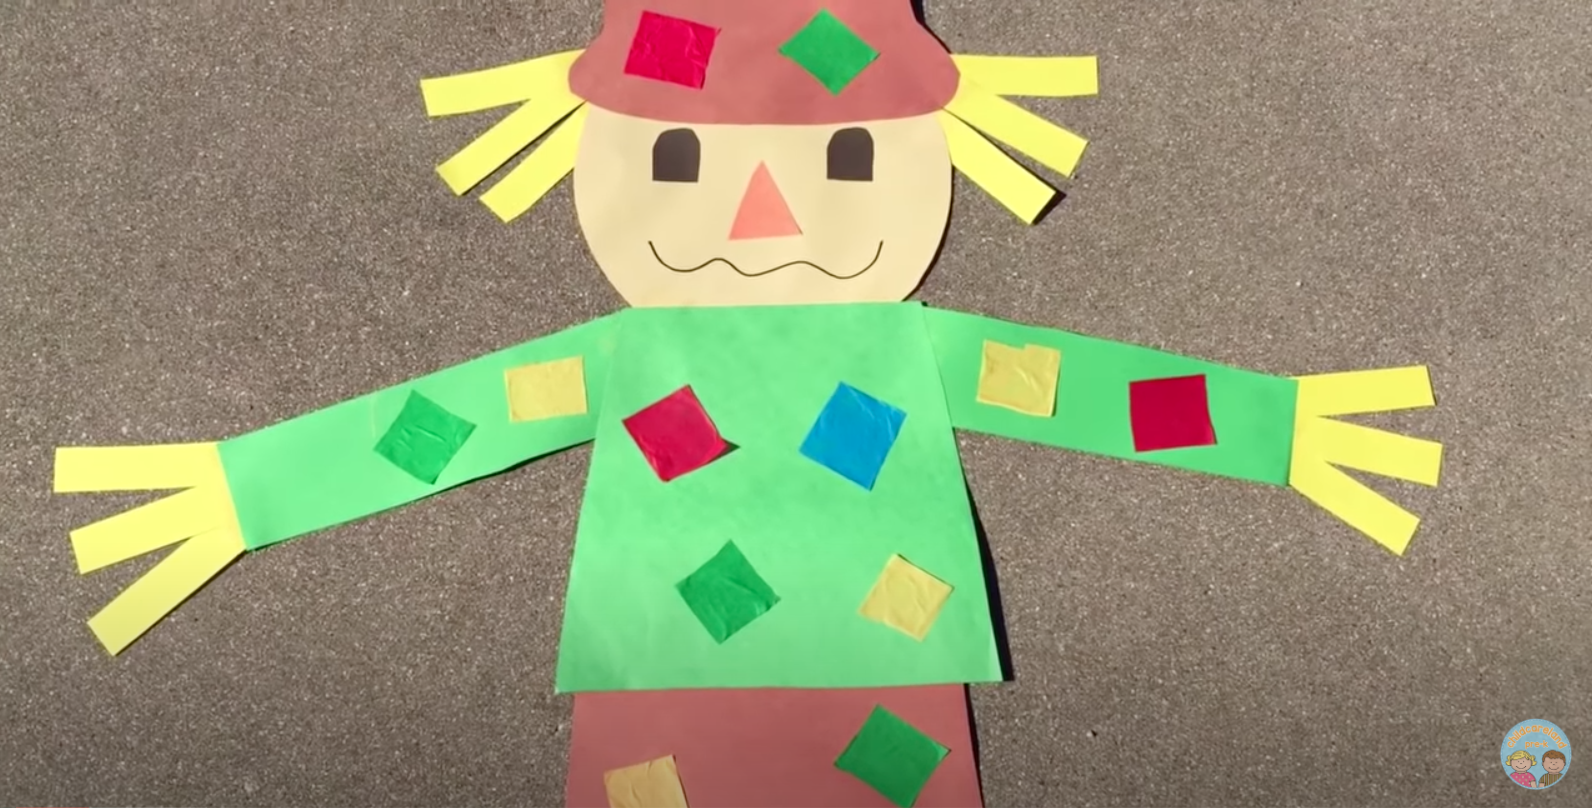
Craft Stick Scarecrows
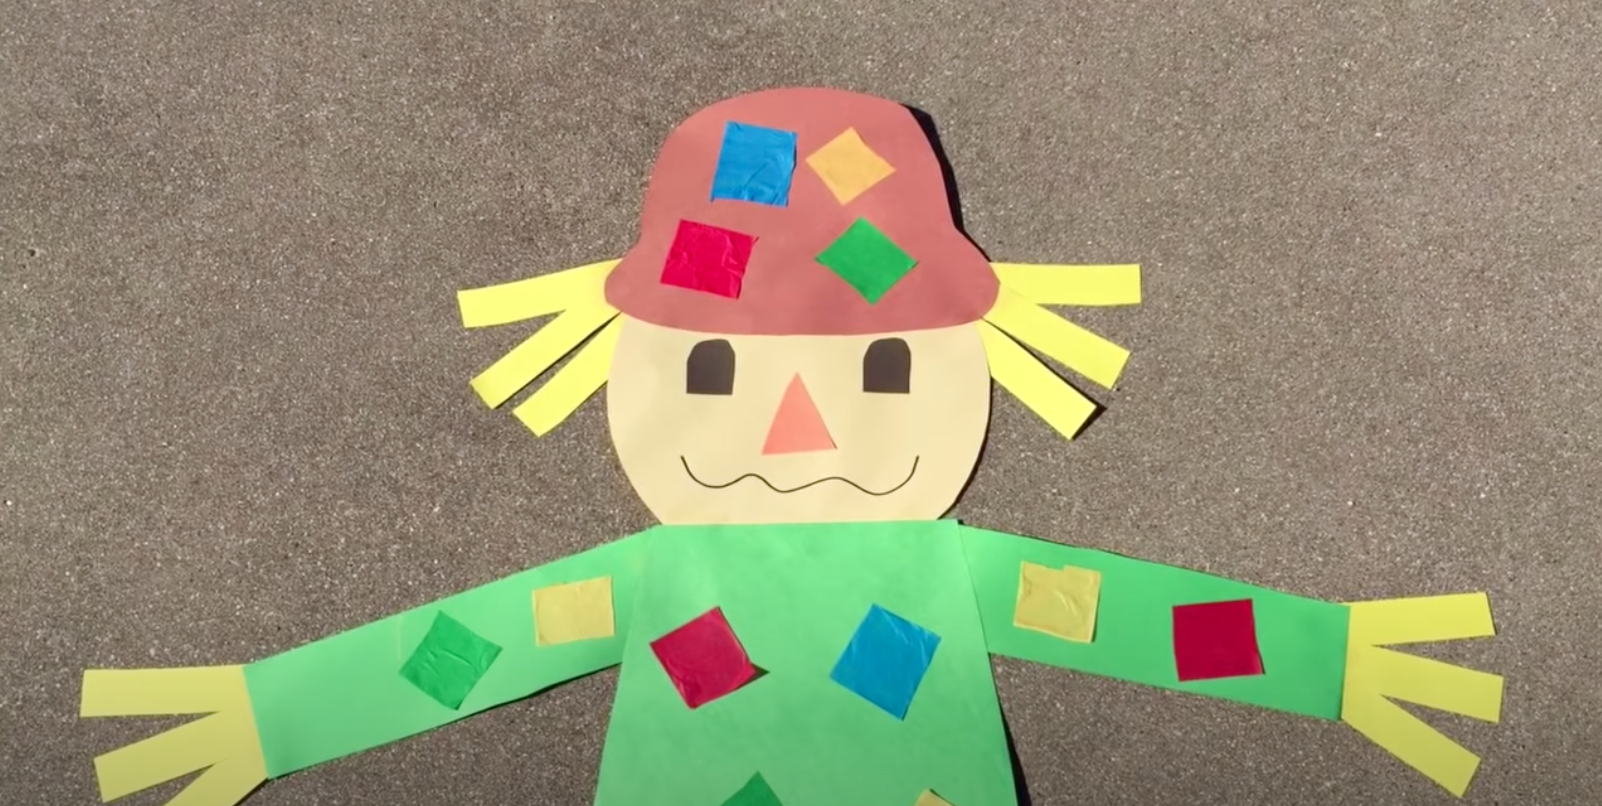
 Source:https://acultivatednest.com/scarecrow-popsicle-stick-craft-for-kids/ To make this craft, you will need craft sticks, googly eyes, felt, glue, cardstock, and markers.Cut out a scarecrow hat, hair, and a nose from different colors of felt. This is a chance to let your preschooler choose the colors they want.Cut a square out of cardstock and glue the craft sticks onto them tight and sturdy. A grownup should do this part to ensure the scarecrow stays together.Glue on the felt pieces. First glue the hair, then the hat.Glue on the googly eyes and nose.Draw a mouth with a marker.
Paper Bag Scarecrow
 Source:https://www.ourkidthings.com/paper-bag-scarecrow-craft/ For this craft, you need a brown paper bag, cardstock, scissors, a glue stick, buttons, paper, markers, and raffia.Cut a hat out of cardstock. The hat should be wider than the paper bag. Lay a brown paper bag flat on a table and use buttons and markers to make a scarecrow’s face. You can also cut a nose and mouth out of cardstock and glue that to the paper bag. Glue on googly eyes and the nose, or you can draw them with markers. Cut strips of raffia and fold them in half to make the scarecrow’s hair. Raffia looks like straw, that’s why it is a great crafting choice to use to make scarecrows. Glue the strips of raffia to the top of the bag.Glue the hat made out of cardstock over the hair. Stuff your bag with crumpled paper or plastic bags.Glue the bag closed.
Candy Corn Scarecrow
 Source: http://www.housingaforest.com/candy-corn-scarecrow/ To make a candy corn scarecrow, you will need an empty glass bottle, a yellow plastic cup (or a clear plastic cup colored yellow with a marker), buttons, candy corn, and brown and orange scrap paper.Cut your cup so that it will fit over your glass bottle as a hat for your scarecrow.Cut slits in the cup so that it looks like straw. A plastic cup will curl the ends better than a paper cup. Add a paper band made out of cardstock to your scarecrow’s hat. Glue buttons on the glass for eyes and a stitched paper mouth.Fill your glass bottle with candy corn.
Scarecrow Bird Feeder
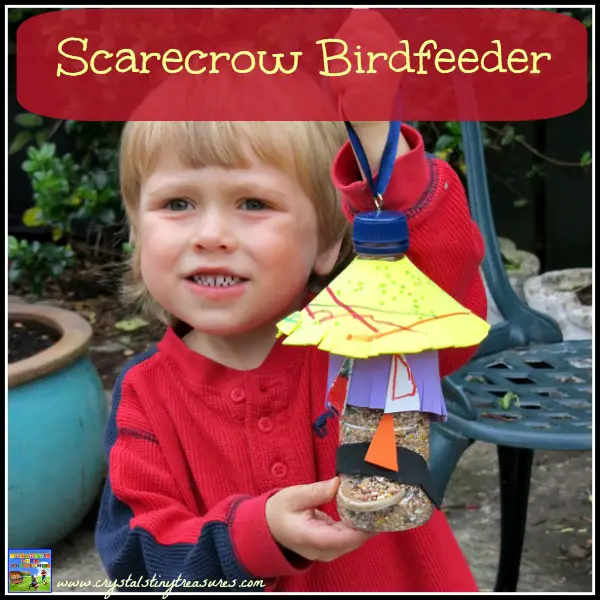 Source:https://www.castleviewacademy.com/scarecrow-birdfeeder/ To make a scarecrow bird feeder, you will need an empty water bottle, a wooden spoon (an old one would be best), permanent markers, foam or felt, glue, ribbon or twine, rubber bands, a screw eye, and birdseed.Take the label off of your water bottle (and rinse it out if it held any other liquid).Cut a horizontal rectangle out of the front of the bottle that is wide enough for the wooden spoon to fit through. (The rectangle should be high enough on the bottle and wide enough to let the birdseed flow out of the hole and onto the wooden spoon.Cut an X on the other side of the bottle where the spoon handle will go through. Test to make sure your bottle will remain balanced with the spoon in it.Make a scarecrow hat from foam or felt. The piece you cut should be round to fit around the neck of the bottle. The size of your hat depends on the size of your bottle.Cut fringe around the hat and use the markers to draw a design on it. Glue the hat to the bottle. (You may need rubber bands to hold it together while it dries.)Use the felt or foam to cut out the eyes, nose, and mouth of your scarecrow. You can also draw on the felt or foam pieces.Glue the eyes, nose, and mouth to the bottle.Make a hole in the lid and stick the screw eye through. Tie ribbon or twine to the screw to hang up your bird feeder.Place the wooden spoon in the bird feeder so that it sticks out a little bit.Add birdseed and replace the cap.Hang up your bird feeder.Arts and crafts are a great way to bond with your kids. It also teaches creativity and motor skills such as using scissors. The creations they make can become decorations or keepsakes.Scarecrows are an adorable symbol of Autumn, and they make great Fall decorations. Creating scarecrow crafts is a great way to welcome Fall into your home or classroom. There are many different ways to make them. Scarecrow crafts are easy to make and super adorable.Some other cute fall decorations include Halloween monsters, leaf ghosts, paper plate pumpkins, paper bag monster puppets, and Thanksgiving place settings.
Comments
0 comments