
If your child is into Spiderman, there are absolutely loads of ideas for things you can make with them, and they’ll love incorporating their favorite superhero into an art session with you. Don’t spend money on cheap, tacky Spiderman gear in the shops; you can make your own at home.Let’s explore some of the best Spiderman crafts out there.
Spiderman Lunch Bag
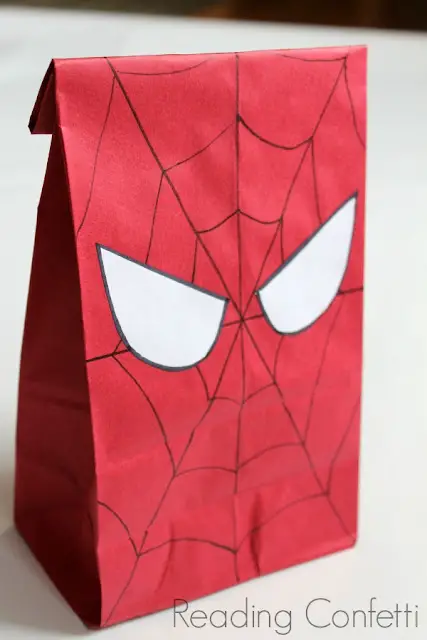 Source: http://www.readingconfetti.com/2013/10/diy-spiderman-party.htmlIf your child is a big fan of Spiderman, this paper lunch bag is perfect for them to grab on their way out of the door ““ and they can either help you make it, or you can keep it as a surprise for them on a special day. They’ll love it, and so will all their school friends!These are absolutely ideal party bags if you’re doing a Spiderman-themed birthday party.
Materials
To make a Spiderman lunch bag, you’re going to need:
- 1 paper lunch bag
- Red paint
- Paintbrush
- White paper
- Fine black marker
- Ruler
Step 1: Paint The Lunch Bag
You’re going to start off this craft by painting the lunch bag (or letting your child do this if they’re involved). Try to get a smooth coat all over the bag, allowing it to dry before switching sides. If you can buy red paper lunch bags, you can skip this step.You might want to do a whole selection of lunch bags in red or paint them different colors so you can do different superheroes. It’s easier to paint a batch, rather than having to make lots individually.
Step 2: Cut Out The Eyes
Cut two semi-circles out of white paper, and draw a black line around the edges, as neatly as you can. Again, if you’re doing multiple bags at once, cut plenty of templates out. Don’t stick them to the bags yet, however.
Step 3: Draw On The Spiderweb
You may wish to do this in pencil first, especially while you get the hang of the pattern ““ don’t spoil any of your nicely painted bags.Use your ruler to draw a plus symbol, and then draw an “X” through it. This should give you a good foundation to work with. Starting near the middle, you are simply going to join each line to the one next to it with a small curve. Try to keep these curves approximately even and level with each other for a neat web.Work your way outward, spacing the curves approximately the same distance apart from each other, until you reach the outer edges of the bag (or your template, if this is your practice). You’ve now got a great spider web design, and you should be able to copy this onto a lunch bag ““ just make sure the paint is dry!Go over your pencil lines in marker, or switch to just using the marker once you’re confident of your design. You don’t have to do both sides of the bag if this is too time-consuming, but if your child is helping, they might like to do so when they’ve got the hang of the pattern.
Step 4: Add The Eyes
When the pen is dry, glue the eyes to the front, at slight angles to reflect Spiderman’s mask. Finally, draw a little thread hanging down from one of your web links, and ink a small spider at the bottom of it. You now have a cool Spiderman lunch bag your child will love!
Super Spider Cuffs
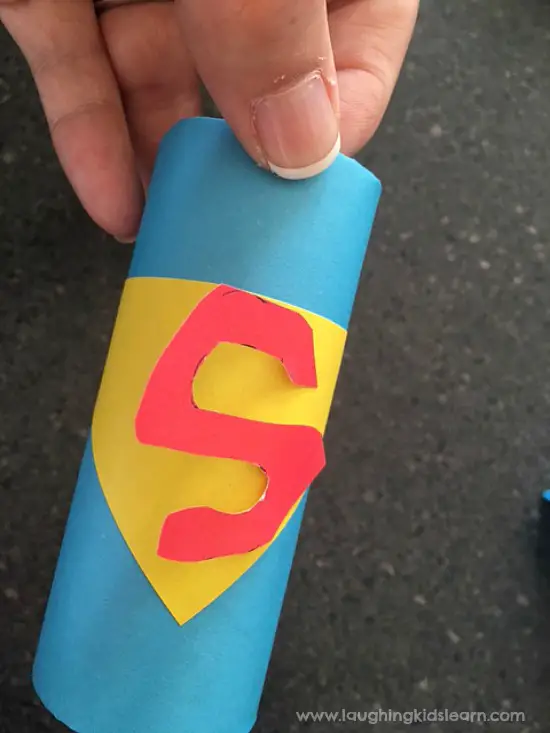 Source: https://laughingkidslearn.com/how-to-make-superhero-cuffs-using-toilet-roll-tubes/If your child wants to be Spiderman, these Spiderman cuffs are an ideal addition to their make-believe fun. They are very easy to make.
Materials
To create Spiderman cuffs, you’ll need:
- 1 empty toilet tube
- Red paint
- Paintbrush
- Pencil
- Fine black marker
- Scissors
- Blue ribbon (optional)
- Glue gun (optional)
Step 1: Paint The Toilet Tube
You’re going to start this craft by cutting the toilet tube into two, and then painting both pieces bright, Spiderman red. Make sure you get a nice even coat, and then set it aside to dry. If you are making this craft for an older child, you may want to use a paper towel tube, as this will be bigger, and toilet tubes might prove too small for the child’s wrists. Again, you can cut the tube in half to make it the right length for their wrists (or trim it down if it’s still too long).
Step 2: Cut The Tubes Open
When the paint has totally dried, cut along both pieces of tube to open out the tubes. Your child will now be able to slip these over their wrists. If they don’t bend them, the tubes should then spring back into place and stay on their wrists.
Step 3: Draw On A Web
If you have a spare toilet tube, you may want to practice drawing on a curved surface before you put the pen on your newly-created wrist cuffs (or use light pencil lines to begin with). Use the above instructions to draw a web, starting with the central plus and “X”, and then filling in between them. You may want to use a measuring tape so that you can get a straight line even on the curve, or just draw the structural supports freehand; it doesn’t need to be perfect for your child to love it.Draw in pencil before you add the marker. Once it’s done, your Spiderman wrist cuffs are complete and ready to be used!
Step 4: Add The Ribbon (Optional)
If you want to add a dash of blue for your Spiderman cuffs, glue a length of ribbon around the edge of the cuffs. You could also paint this line blue if you prefer. This will bring a little more of Spiderman’s iconic colors to the craft.
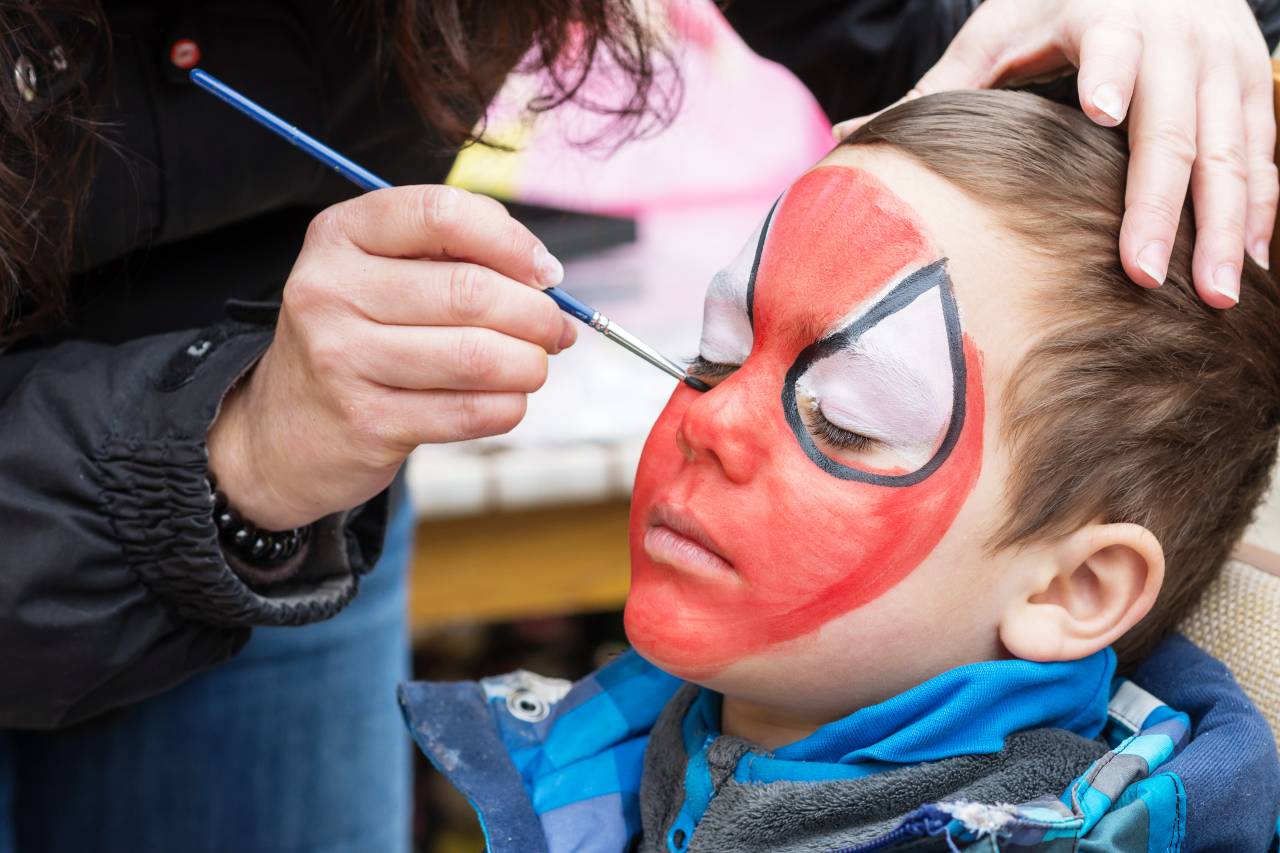
Simple Spiderman Man
Spiderman isn’t the easiest superhero to create a mask for, but you can make something pretty simple that still looks distinctive, and your child will love wearing it along with their Spiderman wrist cuffs.
Materials
To create a Spiderman mask, you will want to gather up:
- Red felt
- Black marker
- Red or black ribbons
- Cloth measuring tape
- Sharp scissors
- Ruler
Step 1: Cut Out The Mask
Use the cloth measuring tape to measure your child’s head and get the width of the mask. It’s only going to cover their face around the eyes, so it doesn’t need to be super accurate ““ just close enough.Draw the mask outline on, and then cut it out with a pair of sharp scissors. Remember to create space for your child’s nose by cutting a narrower shape into the mask in the center, with wider edges for the cheeks.
Step 2: Cut The Eye Holes
Get your child to hold the mask up to their face and then use your black pen to mark where the eyes should go. It doesn’t matter if this isn’t exact.Put the mask on a flat surface and draw Spiderman’s classic semi-circle eyes. Use your ruler to get straight edges at the top. Cut around these using your sharp scissors.
Step 3: Add Details
Use your black marker to edge a thick band around the eyes to add emphasis and color. This should be quite wide so it’s visible. You can also edge the eyes with black ribbon and glue if you prefer, but this is trickier to do neatly.Next, use your ruler to draw three or four diagonal lines between the eyes, coming up from the bridge of the nose and fanning out across the forehead. Draw links between each of these to hint at a spiderweb pattern.You can do the same on the cheeks if you have space, or just do two lines and a few links ““ or leave the cheeks plain.
Step 4: Add The Ribbons
Cut two small holes in the felt near the edges of the mask, but be careful you aren’t so close to the edge that the felt will tear. Next, take your ribbon and knot one piece through either side of the mask.Tie it on your child’s head to check the fit, and trim the ribbon short (but leave yourself plenty of slack so you can easily tie it next time).You can also use a strip of elastic instead of ribbon; it won’t look quite so neat, but it will secure the mask and let the child take it on and off easily without your help.
Step 5: Draw On A Spider (Optional)
Use your marker to draw a little black spider or two on the mask, hanging down on drawn threads. You will only be able to do this if you have a bit of space still, but this is an alternative to putting web patterns on the cheeks and can look very effective.
Conclusion
Spiderman crafts are a lot of fun, and you can easily create things for your child to play with and do. If you’re doing a Spiderman-themed party, making a costume at home ““ or at least costume accessories ““ is a relatively easy process, and you can also wow the kids with their party bags.
Comments
0 comments