Llama crafts are growing in popularity, and they offer a great opportunity for kids to explore textures and shapes in all sorts of different mediums. If your child is keen on llamas, there are some amazing things you can make with them!
Peg Leg Llama
Not quite a pirate version of a llama, this is a really fun craft and can be used to decorate a school folder or hang up another art project in full llama style.
Materials
For this craft, you’ll need to get:
- Cream card
- Cream yarn
- Four wooden pegs
- Black pen
- Scissors
- Glue
- Colored paper (any color)
- Colored pens
- Pencil
- Cream acrylic paint (optional)
- Paintbrush (optional)
Step 1: Cut Out The Llama
Help your child to draw a llama on the cream card. This should be several inches wide; the pegs are going to form the legs of the llama, so it needs to be big enough to fit four pegs comfortably along its stomach.If your child needs help drawing the llama, an oblong makes a good shape for the body, with a long neck and an oval head. Add some sticky-up ears at the top, and the llama should be good to go.Cut around the llama neatly.
Step 2: Decorate The Llama
Show your child how to cut out a rug for the llama’s back. This can be done using colored paper glued on, or they can color it on using their pens if they prefer. They can then draw zig zags or stripes and dots to make it pretty.They should then add the llama’s face by drawing two little round eyes, a nose, and a mouth. If your child likes drawing, they may also want to draw on reigns around the llama’s muzzle. Alternatively, attach a piece of colorful yarn to make real reigns!
Step 3: Glue The Pegs On
It’s time to glue the peg legs. You can either glue two legs at the front of the llama’s body or two behind or glue all four on the front or back. Gluing them all on the back may look the neatest.If your child wants to make the legs match the rest of the llama, they can paint the pegs with cream acrylic paint.When the craft is dry, your child can peg their new llama buddy to anything they like!For a simpler craft, just use two pegs; this will be easier for a young child to peg onto things.
Llama Finger Puppet
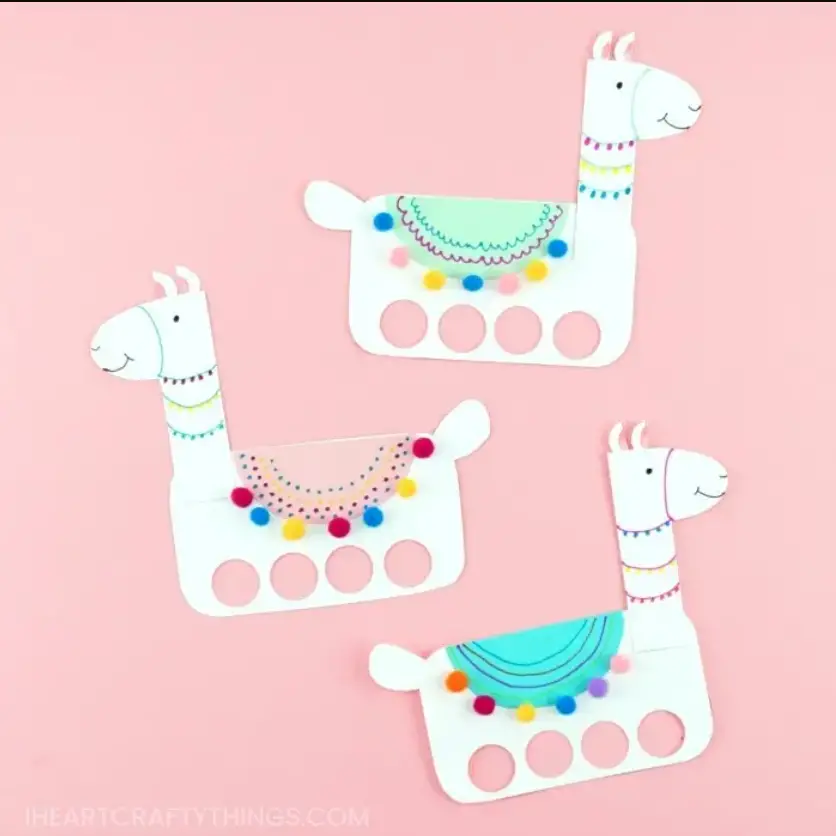 Source: https://iheartcraftythings.com/llama-craft-for-kids.htmlIf your child likes threading their fingers through papercraft to make the legs of the animal, this is a great one to try. It’s simple, needs reasonably few materials, and even a young child will enjoy it.You can make this craft using a paper fastener so the llama’s neck can be moved, or fix neck in place.
Materials
This craft requires:
- Cream card
- Pencil
- Decorative pens
- Scissors
- Paper fastener
- Glue
- Large circular hole punch (optional)
- Beads (optional)
- Yarn (optional)
Step 1: Draw The Llama
Again, you’re going to start by drawing the outline of the llama, though this wants to be bigger than the last one. Your child is going to put their fingers side by side to make the llama’s legs for this craft, so you need to make it at least the width of your child’s hand (plus a bit extra to allow for room between the holes).Draw an oblong for the llama’s body. If you are going to do a fixed neck and head, you can either draw the neck joined to the oblong, or draw it separately and cut it out. If you want a movable neck, draw it separately.
Step 2: Cut It Out
Cut the llama out, and use a large hole punch, or with a scissor carefully cut four circles in the bottom of the llama’s body. Check that these will fit over your child’s fingers and make them a bit bigger if they don’t.Next, grab your paper fastener, and use it to attach the neck to the front of the llama’s body. Fold the back of the fastener round, and show your child how the neck moves. They will love this. You could also make the head move independently, but you may feel that’s a bit much for one craft.Draw the llama’s face on and color the insides of its ears in pink.
Step 3: Decorate The Llama (Optional)
Help your child to draw a large semi-circle on the llama’s back and color it in to make a blanket. They can then use their pens to decorate this. Add the beads or sequins, and little snippets of yarn to edge the blanket with tassels.The llama is now complete! Get your child to slip their fingers in and help their new puppet friend trot up and down the table.
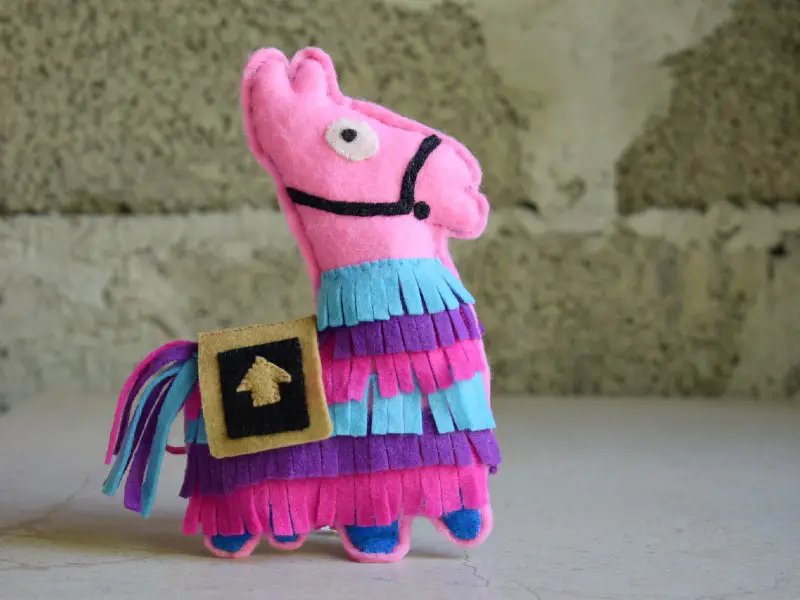
Secret Messenger Llama
 Source: http://mermagblog.com/diy-lama-craft/ This is a more involved craft that an older child will really enjoy working on. It’s a great way to pass little notes with your child, and everyone knows that kids love notes.
Materials
You’re going to need:
- 1 empty toilet tube
- Cream card
- Cream acrylic paint
- Paintbrush
- Scissors
- Pencil
- Yellow card
- Glue gun
- Cream yarn
- Yellow or brown yarn
- Scrap paper
- Cotton wool (optional)
Step 1: Paint The Toilet Tube
First, help your child to paint the toilet tube with cream paint, turning it into a llama’s body. Set this aside to dry.
Step 2: Cut Out The Legs And Head
Take the cream card. Get your child to cut out a long neck with an oval head at the top, and then help them to shape two pointed ears and add a little more definition to the llama’s face.Next, you are going to cut out two wide “U” shapes of the card for the llama’s legs. These are going to be glued to the bottom of the llama’s body.
Step 3: Glue The Llama Together
Cut a small slit into the toilet tube in the middle of the top edge, so you can slot the llama’s neck in. Glue it in place. Next, glue your upside-down “U” shapes to the bottom of the toilet tube to make your llama stand up.Draw details on the llama’s face and ears, add a short length of yarn for the tail, and your basic llama shape is complete.
Step 4: Make The Baskets
Your llama is going to be able to carry secret messages and trinkets, so next, you’re going to help your child cut two circles out of a yellow card, followed by two rectangles. The rectangles are going to form the edges of the basket. It is best not to make the baskets too deep (your child needs to be able to easily lift things in and out), so make sure you don’t cut these rectangles too wide. They should be long enough to wrap around the circles.Let your child draw some wiggly lines for the weave of the baskets, and then glue the rectangles around the circles to create a cylinder with a solid bottom.
Step 5: Attach The Baskets
Next, you’re going to attach one basket to each side of your llama’s body. Glue the baskets firmly into place, and then glue a few strips of your brown or yellow yarn across the llama’s body to form the basket straps. Your message llama is almost complete!Write a little message on a piece of paper, roll it up, and pop it in one of the baskets. Your child can take this out and read it whenever they want to, and write back to you. You may want to stock the llama up with a few pre-cut sheets that can be rolled up and added to the baskets.You can also insert a pen into the tube so that your child always has something to write with; use the lid of the pen to clip it into place. Messenger llama at the ready!
Step 6: Decorate (Optional)
Your child can now finish decorating the llama. They may want to add some little tufts of cotton wool to the llama’s body to make it fluffy, or some strands of yarn. They could also add details to the baskets, or stick some pretty gems or sequins on them.This llama should provide long-term fun in sending secret messages back and forth between you and your child. Stand it on their desk and add a little note any time you want to cheer them up or tell them something special.You can also use it as a means of dropping off tiny prizes or treats, such as sweets or maybe the child’s pocket money. The tooth fairy could also leave her payment safe in the llama’s baskets.
Pom Pom Llama
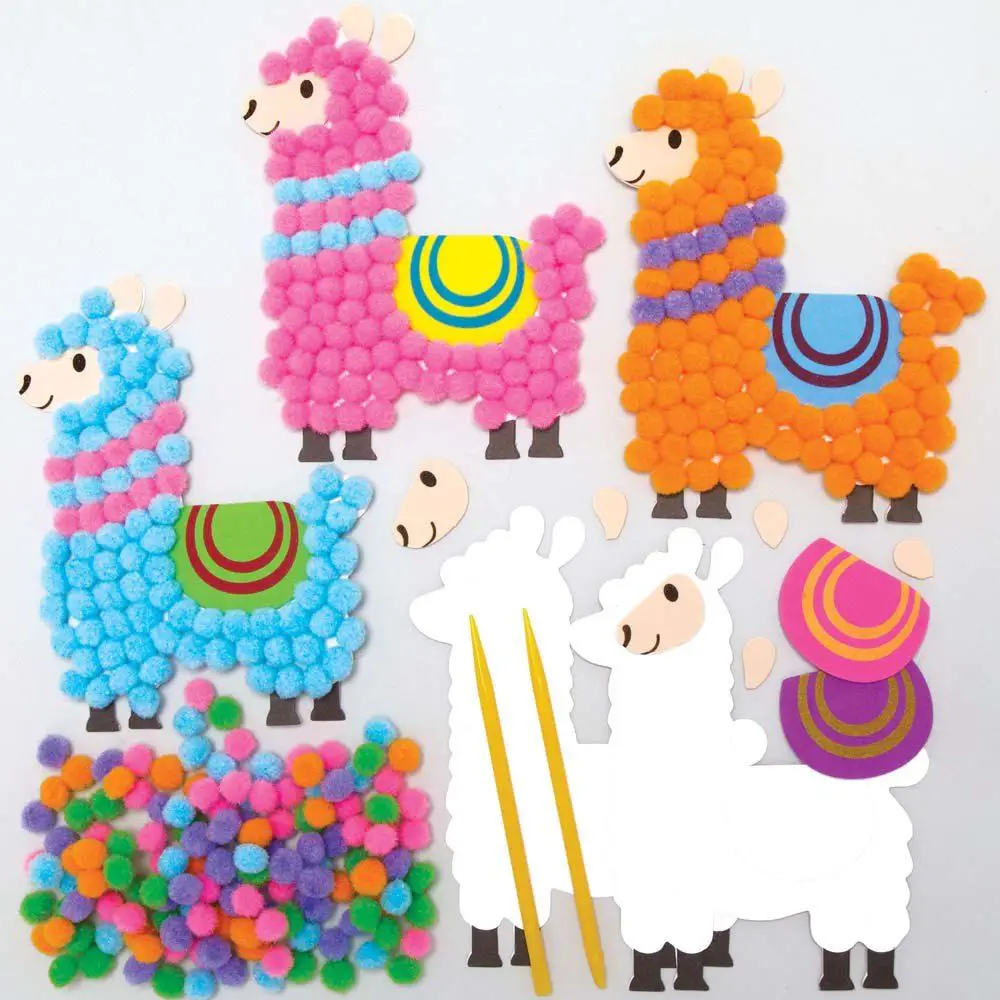 Source: https://www.bakerross.co.uk/llama-pom-pom-art-kitsThis is a great, bright craft to do with a little kid, especially if you have piles of mini pom-poms without any other intended use. If your child enjoys sticking, this is perfect for you.
Materials
Gather up:
- White card
- Black pen
- Pencil
- Colored mini pom poms
- Colored paper
- Skin-tone paper
- Scissors
- White glue
Step 1: Draw A Llama
On your white card, use your pencil to draw a basic llama outline, and then use the black marker to fill in the outline. Alternatively, print a llama template from the internet.To make the craft more complicated, you can draw some lines on the template for your child to follow to represent rings or stripes; they can stick different colors on the lines. Alternatively, leave it plain.
Step 2: Add A Blanket And Face
Cut a semi-circle of colored paper and glue this to the llama’s back to form the blanket. Cut a little rounded llama face and ears out of your skin-tone paper, and draw eyes and a nose on the face. Stick them at the top, and the craft’s ready for your child!
Step 3: Start Gluing On Pom Poms
Your child can use just one color of a pom-pom, or an array of colors. You can either help them (which will likely result in a neat-looking llama), or let them play and experiment. They should aim to glue the pom poms all over the llama, except on the rug, face, and ears. They can decorate the rug with pens if they want to.
Step 4: Finishing Off
When your child is done, check the craft over and make sure the pom poms are sticking firmly. You can shift them around a little if there are any big gaps and then set them aside to dry. When it’s done, your child will have a beautifully fuzzy and vibrant pom pom llama to enjoy!
Mini Wool Llama
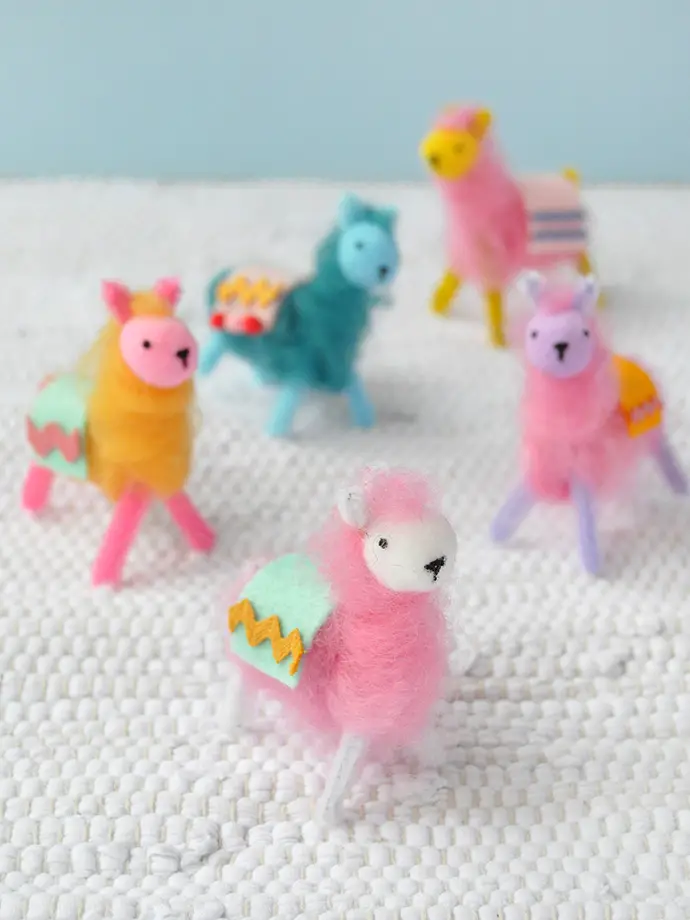 Source: https://www.handmadecharlotte.com/pipe-cleaner-wool-llamas/One of the best things about llamas is how woolly they are, and this craft takes full advantage of that to make a really soft and fluffy little fellow. You could attach these to a bag clip or a bookmark, and they would make very lovely handmade gifts or party favors. Most adults would enjoy these, as well as children!
Materials
To make a wool llama, you’re going to need:
- Soft wool
- Pipe cleaners
- Mini pom poms
- Felt
- Card
- Glue
- Scissors
- Black paint
- A pin
The colors will depend on what sort of llama you want to make; choose ones that complement each other nicely, such as teal and blue, green and yellow, pink and white, etc. You can also make rainbow llamas.
Step 1: Make The Frame
You are going to start by taking one of your pipe cleaners and bending the very tip to create two ears. Bend it tightly back down on itself and run it down into the neck. Create a right-angle to form the body.Next, bend the pipe cleaner down and back up to form the first leg. Make a small tail that sticks up, and then bend it back down to form the second leg. You can either cut off the excess pipe cleaner or bend it back up to wrap around the body.Take a second pipe cleaner in the same color and bend it to shape two legs, and then twist this around the front of the body. Cut off the excess pipe cleaner, and you now have a perfect little llama frame.You can make some small adjustments so that your llama is stepping forward or leaning to one side, or just move on to the next step.
Step 2: Add A Head
Glue one of the mini pom-poms at the top of the neck, in front of the ears, to make the llama’s head. Make sure it has stuck firmly; you don’t want it to fall off later!
Step 3: Wrap The Body
Now, you’re going to take your wool and fluff it up in your fingers, teasing out the strands until you have a lovely fluffy, woolly texture. You can use a brush or comb to further tease out the fibers if necessary.You are then going to wrap this around the llama’s body, starting at the tail. Put a spot of glue on the pipe cleaner and wind the wool round and round, creating a chubby tummy and nice fluffy body.Don’t pull the wool tight; keep wrapping it loosely and adding small dabs of glue to hold it in place wherever you need it. You can always add a little bit more wool later if you feel a patch is looking a bit bare, so don’t worry too much about this.Wrap right around until you reach the top of the llama’s neck, and then pull the end of your wool up between the llama’s ears to form a mane and glue it there.
Step 4: Add A Blanket
To create the blanket for the back of the llama’s back, you’re going to use your felt, plus some little zigzags cut out of cardboard. Cut a small rectangle of colored felt, and then cut some zigzags from the colored card.You can also add spots or stripes to your llama’s blanket, or even tassels if you’re feeling particularly creative and dedicated. Once you’re happy with it, glue it to the llama’s back, being careful not to compress the wool too much.
Step 5: Add The Face
Dip the head of your pin into the black paint and use this to add two round eyes and a black nose. Turn the pin around, dip the point in the paint, and draw a tiny little mouth leading down from the nose. This might be very fiddly for kids; you can either help them or use a fineliner instead.
Step 6: Finish Fluffing
Add any last bits of fluff to your llama, and make adjustments to the legs and tail if necessary, squashing the wool back a bit to make sure the tail is visible.You can theme your llamas for different celebrations by adding tiny decorations on strings around their necks; they would look ultra cute with a miniature pumpkin or Christmas tree, though this may again be quite tricky for a child to manage.You can create a whole flock of colorful llamas and include them in pretty much any decorative scene you create; they look amazing!
Toilet Tube Llama
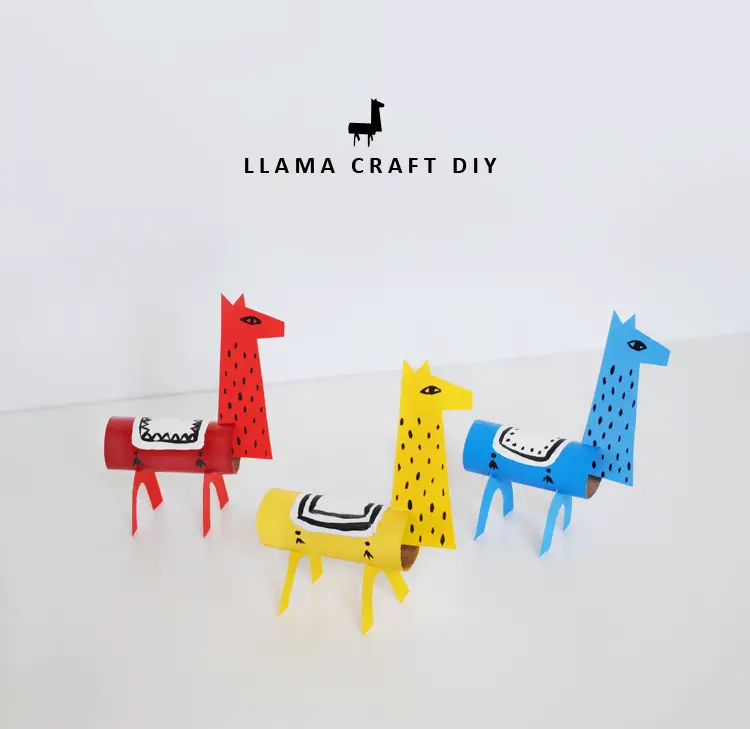 Source: http://mermagblog.com/diy-lama-craft/If you’re looking for a slightly easier craft for kids to do, you could try a toilet tube llama; these are great fun for kids to make and decorate, and they can choose any colors they want to make it exciting or paint themselves a rainbow llama!
Materials
For a toilet tube llama, you’ll want to get:
- 1 toilet tube
- Stiff card
- Black paint
- White paint
- Paint in another color of your child’s choice (this will be the llama’s main color, but they can pick multiple colors if they like)
- Colored yarn (two different colors is preferable)
- Glue gun
- Scissors
- Pencil
- Eraser
Step 1: Draw the Neck And Legs
Take your card and draw a tall, slightly tapered rectangle on it. Erase some of the narrow end, and then draw two spikes for ears and a square-ish snout for the llama’s face. You can keep this quite simple, or put a bit more time into it.Next, for the legs, you are going to draw an arc, followed by an inner arc. Repeat this, and then cut them out so that you have “U” shapes. These are going to be the llama’s legs.
Step 2: Paint The Components
Help your child to paint the card and the cardboard tube on all sides (including the inside if possible). They can either do one color or get creative and give the llama stripes, spots, swirls, etc. You can also do multiple llamas to create a whole flock of different hues.Set the parts aside until they are completely dry.
Step 3: Glue The Neck And Legs On
Cut a small slit in the front of the toilet roll tube, and slip the neck into it, so that the llama is looking forward. Glue it in place using the glue gun.Next, turn the toilet roll tube over and glue the legs to the underside of the llama’s body, spaced out so that it will stand up.
Step 4: Decorate
It’s time to start decorating! Your child can either use pens or black and white paint.Start by helping them to paint a small, rounded rectangle on the llama’s back for the rug. Let the paint dry, and then add stripes, borders, or other decorations to this rug (it may be easier to use a black pen if they want to get fine details).Draw on the llama’s eyes, and outline the inner part of their ears. Your child can also add some “fur” by drawing (or painting) texture on the llama. Consider giving the llama hooves as well.
Step 5: Add The Reins
Take one of your skeins of yarn and glue one end to one side of the llama’s muzzle. Loop it around the llama’s back, and then cut it to the right length and glue the other end to the other side of the llama’s muzzle. The reigns are done!Next, pick up your colored yarn again. Make a small knot in the yarn near the end of the thread, and then cut it off just above the knot, so you get a knot with a little tassel of frayed yarn underneath.Repeat this four times, and then help your child glue one to each corner of the llama’s rug. You can also create a whole edging of tassels if you like.
Step 6: Add A Mane And Tail
Take your other yarn color and cut off a length. Start fluffing up the fibers to create a short, fluffy tail, and glue this to the end of the llama’s body. Do the same for the llama’s mane, gluing it down the back of the neck and between the ears.Your llama’s now complete and ready to run!
Paper Plate Llamas
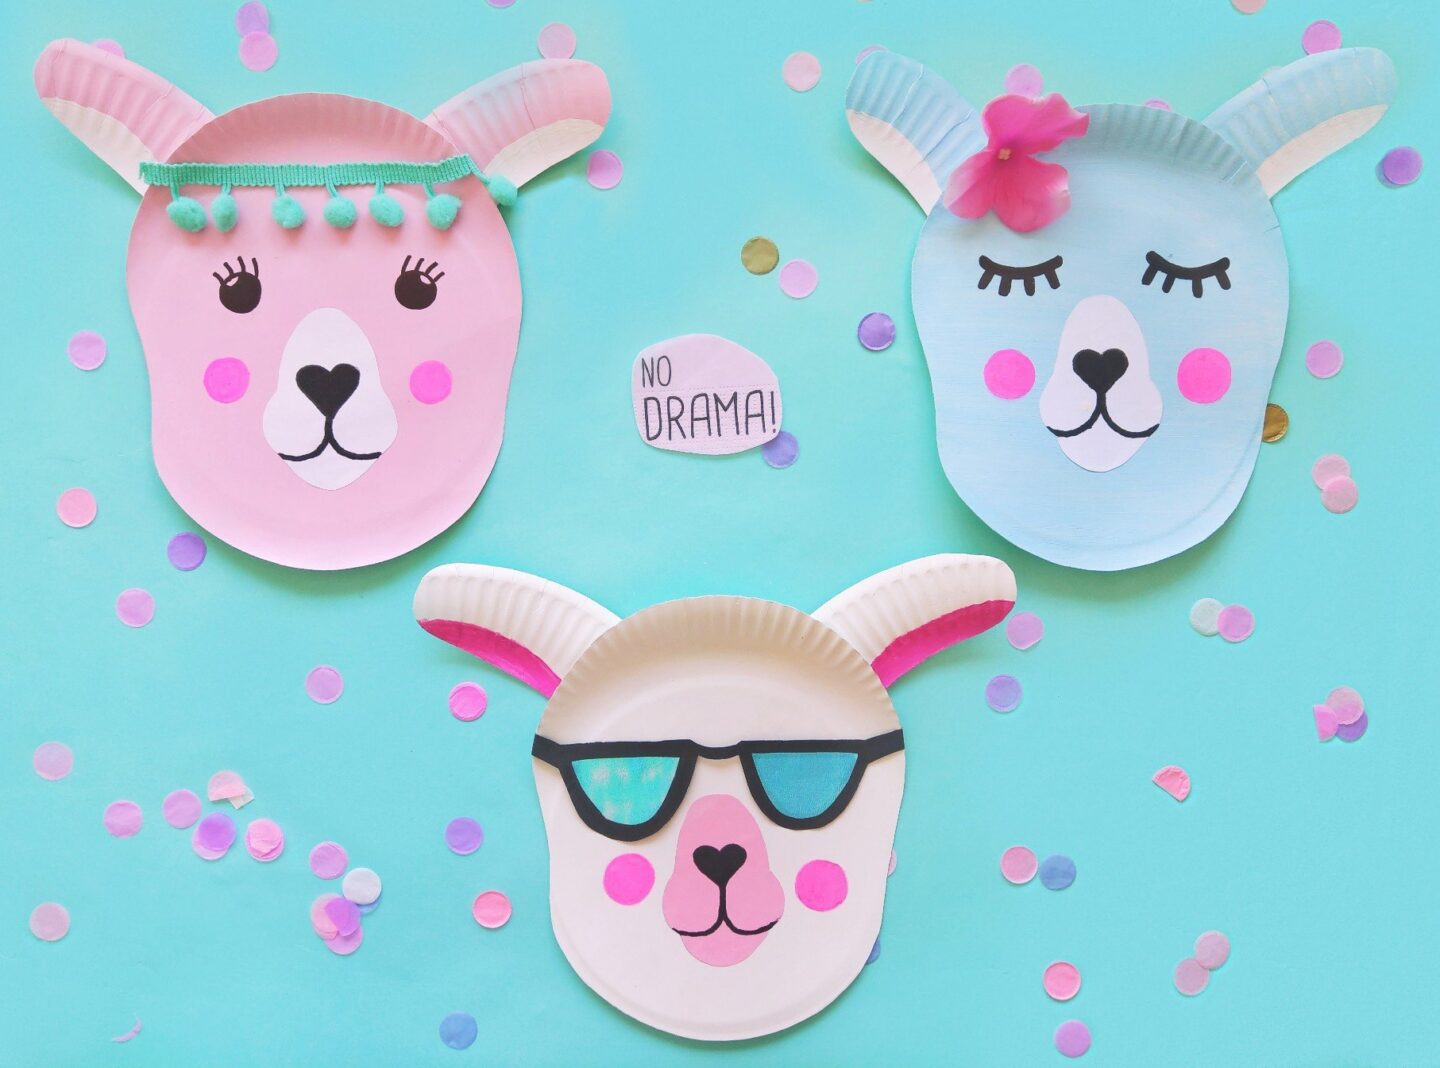 Source: https://kleinliebchen.de/lama-aus-papptellern-basteln-diy-dekoidee-fuer-kinder/If your little one loves using paper plates for crafts, you can make a fantastic llama (or three). These can be hung on the wall or used to decorate a dresser, bringing a bit of llama fun and craft to the child’s bedroom.
Materials
You’re going to need:
- 1 paper plate
- Acrylic paint in two colors
- Paintbrush
- Scissors
- Black pen
- Glue
- Decorations
Step 1: Draw the Head
First, help your child paint the paper plate in the darker of your paint colors. Make sure they are wearing old clothes as acrylic paints don’t wash out. Help them to get a nice even coat all over the plate, and set it aside to dry.Next, draw an oval on your paper plate, a little wider at the top than the bottom. Curve the lines in slightly at the center on either side. This curve will serve to define the llama’s muzzle from its forehead.
Step 2: Cut The Plate Out
Next, cut carefully around this curve you have drawn, saving the scraps to make the ears in the next step. You now have a llama face. If you’re happy with it, proceed, or trim the edges a little more.
Step 3: Make The Ears
Take two curved edges of the paper plate, with the crimps in place. Trim them into smooth ovals and then paint a smaller white (or another pale color) curve on the inside of each to make the llama’s ears.Stick the ears to the back of the paper plate so that they curve above the llama’s head. You can stick them further down to make short ears, or higher up to make longer ones.
Step 4: Paint A Muzzle
In the center of the paper plate, use your pencil to sketch a muzzle for the llama. This should be an egg-shaped oval, with a slightly wider base where the mouth will go. You can then help your child paint this using the paler color.When the muzzle has dried, help your child use the black pen to draw in a heart-shaped nose and two curves for the mouth. You can make the llama smile so it looks happy.Above the muzzle, draw two round eyes, and add a dot of white or your pale color to give them shine. You can also add cute little eyelashes or leave the eyes as they are. Alternatively, you could draw the llama asleep with its eyes closed.
Step 5: Decorate The Llama
Now it’s time to jazz the llama up a bit. You can help your child paint little blush spots on its cheeks, or give it a shaggy mane between the ears using some fluffed-up yarn or cotton wool. Alternatively, stick little stars around the top of its head like a crown.You could also use a pencil to create a shaggy fur effect on the plate, or stick some tufts of wool around the edges and above the eyes.
Felt Llama
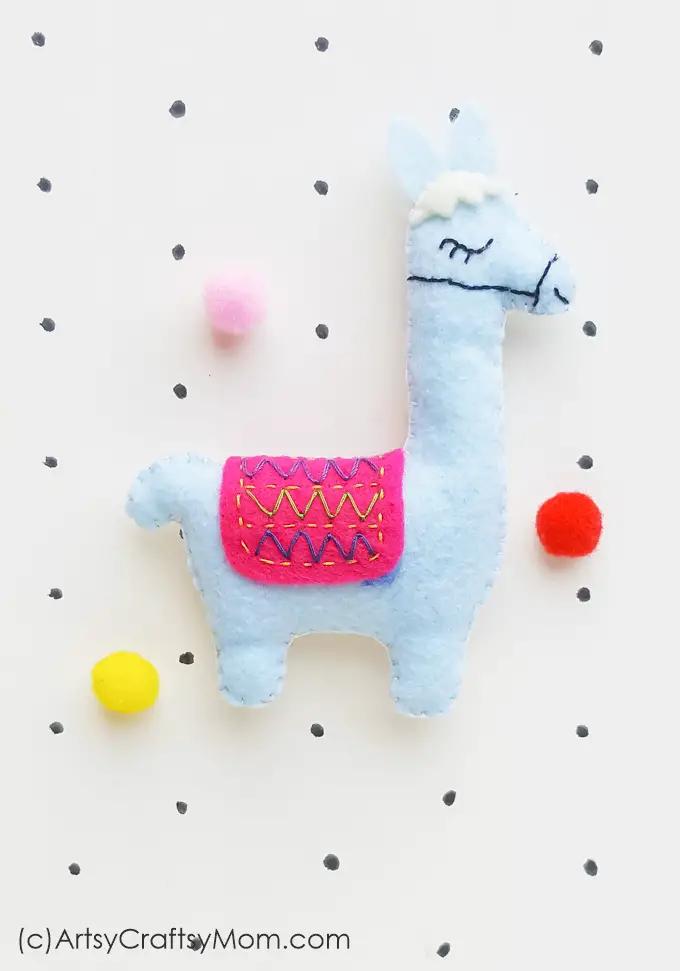 Source: https://artsycraftsymom.com/felt-llama-craft-for-kids/Creating a felt llama is a very easy craft if your child is capable of sewing, and this is a great project for them to do some practice, too. It’s more suited to older children, as young ones may not be safe enough (or patient enough) with the needle.
Materials
For this craft, you will require:
- Felt in your child’s color of choice
- Felt in another complementary color
- Pen
- Cotton thread in a complementary color
- Scissors
- 1 needle
- Pins
- Stuffing
- Scrap paper
- Pencil
- Black marker
- Beads (optional)
Step 1: Draw A Llama
Start out by helping your child to draw a template of a llama on a sheet of paper. You can keep this fairly simple; it’s just going to be used for the outline of your llama craft. Two legs rather than four will make the project quicker, but won’t look quite as good.Remember that any project which has seams and stuffing will come out a bit smaller and thinner than the corresponding template. You can compensate for this by adding a little more width to the llama’s legs and neck. Don’t draw the llama’s ears; these can be added later.
Step 2: Pin And Cut
Pin the paper template to your felt and cut around it using some sharp scissors. If your felt has a “right way,” make sure you reverse the template for the second llama shape so you have two “right ways” that will face outward.Once you’ve cut the templates out, you’re going to help your child pin the two “right” sides together so that the wrong sides are facing out.To keep this craft simple, it can help to choose a fabric that is the same on both sides. Most felt will be, but if you’re using patterned cotton or something similar, you will need to pay attention to this. It’s also a good opportunity for your child to think about these things if they’re moving toward more advanced sewing.
Step 3: Sew Around The Seams
Next, your child is going to sew around the llama’s seams, keeping the stitches small so that the stuffing won’t show through when you fill the llama. They can choose any stitch type they prefer, but running stitch or blanket stitch may be best.Start around the llama’s back, just before the neck. Remind your child to over-sew at points so that if a bit of thread snaps and comes undone, their whole llama won’t unravel.Your child should stop sewing when there are a few centimeters of fabric left, not sewn. If you have started at the llama’s neck, this should line up with the llama’s back. While this doesn’t matter hugely, it will make it easier to fill the legs, and will also make it easier to hide the stitches done on the outside of the fabric; they will be covered up by the llama’s rug.
Step 4: Stuff The Llama
Help your child turn the llama the right way in, and then fill it with stuffing. It’s best not to use too much; while you want a cuddly llama, over-stuffing puts the stitches under strain, and can also make the craft lumpy.If you’re having trouble getting the stuffing into the llama’s legs, use a pencil to wriggle it around and poke it down. This can be a bit fiddly, but you’ll get there.
Step 5: Finish Sewing And Decorate
Sew the llama closed, and now it’s time to decorate! First, help your child to cut two felt ears, either from the same fabric or contrasting color. These can be stitched or glued to the top of the llama’s head.Cut a rectangle or circle out of contrasting fabric for the llama’s rug. This can be sewn onto the llama’s back, and your child can also decorate it with beads or different colored threads/yarns. They might like to add some tassels, too.Finally, either stitch a little bead to either side of the llama’s face for its eyes or draw little eyes and a smiling mouth using a marker pen. The llama is complete, and your child should be very proud!Tip: you can easily make this into a lavender llama by including some dried lavender blossoms inside when you are stuffing it. This will make the llama smell lovely and can help to make it a soothing toy to take to bed. Before letting young children handle the llama, check all beads have been sewn on very tightly, and preferably glued for good measure.
Pom Pom Llama
Note: I think I made this one up.Another great 3D craft for a child, a pom-pom llama can be all sorts of colors and will be wonderfully soft. If your child likes to create crafts that feel good, this will be perfect for them.
Materials
This pom-pom llama needs:
- Colorful mini pom-poms
- 1 larger pom-pom
- Pipe cleaners
- Some scrap white paper
- Colored pens or crayons
- Yarn
- Black marker
- Glue gun
- 2 small beads (optional)
Step 1: Stick The Body Together
Your large pom-pom is going to make the llama’s body. You could also glue two large pom poms together to create a bigger llama; using a glue gun will make this quick, and your child can help with choosing the colors.Next, glue two or three mini pom-poms together to make the llama’s neck, and add another pom-pom a little further forward to create the llama’s head. If you have three sizes of the pom-pom, make the head a slightly larger one than the neckpieces; don’t worry if you only have two, though.
Step 2: Add Legs
Get your child to choose what color pipe cleaner they would like to use for the llama’s legs, and then cut four short lengths off it, and glue these to the llama’s body. Your llama should now stand up nicely. You can bend one of the pipe cleaners up as though the llama is taking a step.
Step 3: Decorate The Rug
Cut a rectangle or circle out of scrap paper, and get your child to decorate it using colored pens or colored crayons. This can then be glued to the llama’s back to keep your pom-pom llama nice and snug.
Step 4: Add Ears And A Tail
Two more small snippets of pipe cleaner will make lovely ears for your llama, or you can cut these from scrap paper and glue them in place.To make a yarn tail, tie a knot at the end of your yarn, and then tie another knot a little way off the other end. Fluff up the loose end, and get your child to help you stick the first knot to the llama. You can also use a little piece of cotton wool or a snippet of pom-pom if you prefer.
Step 5: Add Eyes
Last, of all, your cute llama needs some eyes. Get your child to help you choose two small colored beads for these, or they can be drawn on using a pen that will stand out against the pom-pom. If you’re using beads, make sure you glue them firmly so that they don’t come loose.Your mini pom-pom llama is now finished, and should look very cute! You can make a whole herd of pom-pom llamas in all different sizes and colors, and let your child give them away to friends.
Cotton Wool Llama
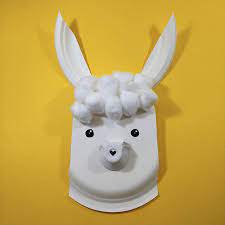 Note: I think I made this one up too, possibly with inspiration from https://www.google.co.uk/imgres?imgurl=https%3A%2F%2Fwww.5minutefun.com%2Fwp-content%2Fuploads%2F2019%2F04%2FLlama-face.jpg&imgrefurl=https%3A%2F%2Fwww.5minutefun.com%2F5-llama-crafts%2F&tbnid=ry2CIY5OS47pzM&vet=12ahUKEwiT3L3Q2qDxAhUi7-AKHcCCCZwQMygUegUIARDfAQ..i&docid=kNnHoyFcI8BU5M&w=500&h=500&q=paper%20plate%20llama&ved=2ahUKEwiT3L3Q2qDxAhUi7-AKHcCCCZwQMygUegUIARDfAQIf you want a simple craft to do with a little child, a cotton wool llama can be good fun. It does involve glue, but not too many other materials, and it should be fairly simple to create.
Materials
You’re going to need:
- 1 paper plate
- White card
- White glue
- Black marker pen
- Cotton wool
- Pink cotton wool (optional)
- Sparkly ribbon (optional)
Step 1: Draw A Llama Face
Take your paper plate and draw a llama’s face on it. Draw some eyes and two nostrils for the llama’s nose, and then add a smiling mouth underneath. Some of this may get covered up with cotton wool, but it shouldn’t matter too much; you can always redraw the lines on top.
Step 2: Add The Ears
You’re going to cut two long, curvy ears out of the card, and stick these to the top of the paper plate. Set it aside until the glue has dried. Your llama plate is now ready for the little decorator to come along and make it fluffy.
Step 3: Glue The Llama’s Wool On
Pour out a small amount of white glue, and help your child to dip the cotton wool into the glue and add it to the paper plate a little bit at a time. If you are working with a young child, you may want to just spread a thin layer of glue on the plate instead; this will prevent them from covering up the features too much.If your child is keen and you have some pink cotton wool, you can do the llama’s nose in pink wool instead. You could also do this on the insides of the llama’s ears. This can be a good challenge for a slightly older child; they will need to do a line of white wool, followed by a line of pink.If you don’t have pink wool, it doesn’t matter; your child can still have plenty of fun with white.
Step 4: Tidy Up The Details
When your child has finished adding cotton wool, put the plate somewhere to dry for a while, and then use your marker pen to touch up any details that got lost in the fluffy wool. You might want to re-draw the two dots for the llama’s nostrils, for example.
Step 5: Add A Crown
To make the plate look more interesting, your child may want to add a sparkly crown for the llama to wear. There are lots of ways to do this, such as cutting a crown out of a gold card and sticking it on, but the easiest is probably with a bit of sparkly ribbon.You can cut this to size, and then help your child to glue it over the top of the llama’s head, in front of its ears. If your child wants to add further gems or sequins, they can make it even prettier.
Conclusion
Llama crafts are amazing fun for a child of any age, and you can make the most of their fluffiness, long necks, and patterned blankets to get your child crafting in all kinds of different ways.
Comments
0 comments