Crafting is fun for everyone, and who doesn’t love chickens? This page has suggestions for chicken crafts to make with young children as well as project ideas for older kids. Each project has step-by-step instructions under the description, as well as a link to pictures or a tutorial.
Crafts for Young Children
These crafts are super easy and cute! You only need a few simple supplies, and none of the crafts will leave a big mess. Your kids will have so much fun making them and will be practicing their fine motor skills in the process.
Paper Plate Chicks
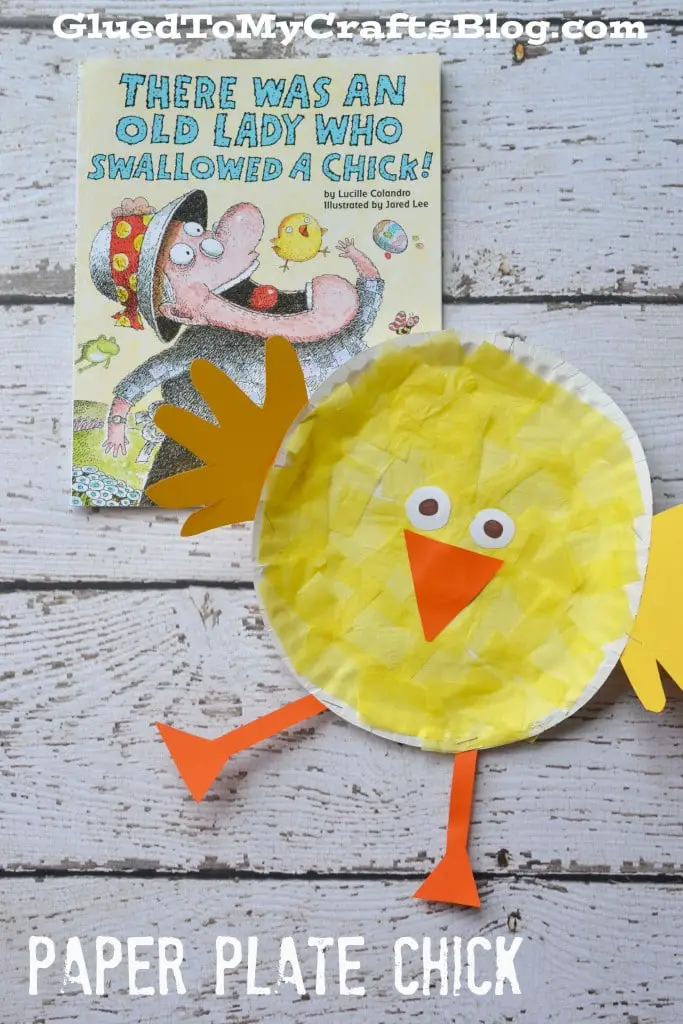 Source: By Stacey Gibbon @ Glued to My Crafts, “Paper Plate Easter Chick ““ Spring Kid Craft Idea” (https://www.gluedtomycraftsblog.com/2015/03/paper-plate-chick-kid-craft.html)This is a classic and simple craft for kids. You can tweak this idea to fit your preferences or to work with supplies you have on hand. For example, you can use a cardboard circle if you don’t have a paper plate. You can also paint the plate instead of covering it with tissue paper.You will need:
- Yellow tissue paper
- Paper plate
- 1 pair of scissors (kitchen shears)
- 1 pair of dull, kid-friendly scissors
- School glue stick
- Orange, yellow, and white construction paper or cardstock
- Black marker
- Stapler
Instructions:
- Have the kids cut out small squares of tissue paper or let them tear it into small pieces.
- Let the kids glue the tissue paper to the paper plate.
- Get the orange and white paper. Cut out (or help the kids cut out) small white circles for the eyes, small triangles for the nose, and small strips for legs.
- Let the kids glue on the face and legs. Let them make black dots on the eyes.
- Let the kids trace their handprints on the yellow paper.
- Cut out the handprints and staple them to the side of the plate for the wings.
Potato Stamp Chicks
 Source: By Kate @ The Craft Train, “Easter Potato Stamp Art” (https://www.thecrafttrain.com/easter-potato-stamp-art/)This is a cute craft if your kids enjoy painting. You can make many of these very quickly, so this is perfect for making Easter cards. An adult will have to cut the potato, but the kids can do the rest!You will need:
- 1 small potato
- Sharp knife
- Cardstock paper or watercolor paper
- Yellow acrylic paint
- Sponge or paintbrush
- Orange and black markers OR googly eyes, orange construction paper, scissors
Instructions:
- Cut the potato in half.
- Take one of the halves and cut it in half. You should now have ½ potato, and two ¾ cuts of the potato.
- For paint: if using a sponge, cut it in half and put it in a small piece of Tupperware or another small plastic container. Then squeeze glue over the sponge and rub it in. If using a paintbrush, pour paint into a small container for dipping the brush.
- Paint the largest potato half and press it onto the paper (this is the body).
- Paint the smaller potato pieces and press on either side of the body (these are the wings). You can point the wings up or down. Set aside to dry.
- Once dry, use markers to draw the face and legs. If you are using construction paper, help your child cut out small black circles for the eyes, a small orange triangle for the nose, and small strips for the legs, then glue.
Crafts for Older Kids and Adults
These projects require a steadier hand than some of the other projects, so they are great for older kids and adults. If you are a beginning crafter, have no fear, these are easy ones. They would make cute gifts or decorations, or could just serve as fun projects on a rainy day.
Felt Chicken Ornaments
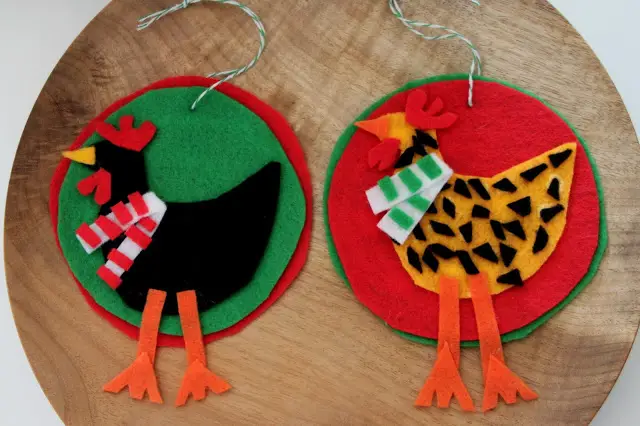 Source: By Tilly’s Nest, “DIY Felt Chicken Christmas Ornaments” (https://www.tillysnest.com/2013/11/diy-felt-chicken-christmas-ornaments-html/)This is a super easy project that only requires a few basic supplies. If you are not interested in making a Christmas ornament, the felt chicken would also be a fun accent to sew or glue on a hand towel, tote bag, or apron. You will need:
- Felt in different colors
- Scissors
- Felt glue
- Twine (if you want to hang it)
- Large sewing needle (to add the twine)
Basic Instructions:
- Choose different colors of felt and cut out the chicken parts: head and body, legs, beak, comb, and wattle.
- Cut out any fun chicken accents or accessories (add a scarf for a Christmas decoration, make polka-dots for your chicken, etc.)
- Cut out one small circle that is big enough to fit the head and body of the chicken (the legs will dangle off), and one slightly larger circle in a different color.
- Glue the smaller circle on top of the larger circle. The larger circle should look like a frame for the smaller one.
- Glue your chicken parts on the center circle, allowing the legs to dangle down.
- Thread the twine through the top of your circle if you want to use it as an ornament.
Stuffed Hen
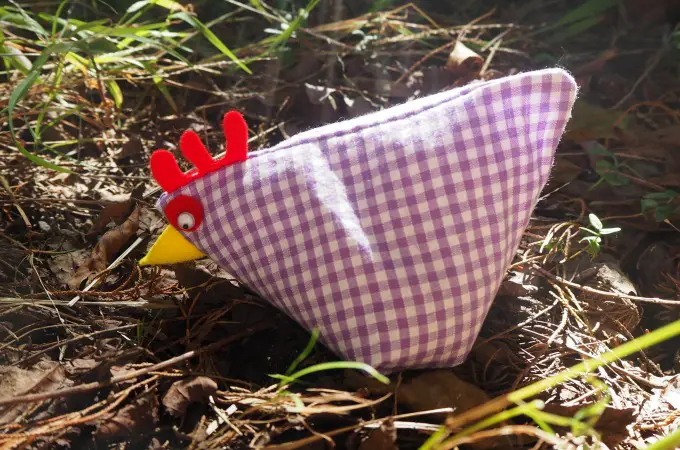 Source: By Sew a Softie, “Sew a Hen: A Free Stuffed Toy Pattern” (https://www.sewasoftie.com/2016/03/sew-hen-easter-kids.html)This cute little hen makes a great gift for a child, can be used as casual home decor, or you could make a few and play bean bag toss! The project requires some simple hand sewing, but even non-sewers can do it! You will need:
- Gingham fabric
- Red and yellow felt
- Scissors
- Sewing needle
- Thread to match your fabric
- Pins
- Cotton stuffing (a handful of cotton balls will work)
- 1 cup of dry rice
- Googly eyes
Basic instructions:
- Cut two squares of fabric measuring 6 ½ x 6 ½.
- Cut out a beak from the yellow felt, and a comb and eyes from the red felt.
- Pin the comb in the top right of one of the squares of fabric, facing down. There should be a thumb-sized space between the right edge of the comb and the top right corner of your fabric.
- Pin the beak on the top-right edge of the fabric facing inward. Leave a thumb-sized space between the beak and the top right corner. The beak will slightly overlap with the comb.
- Put the other fabric square on top and sew the edges together, leaving one 2-inch gap.
- After sewing, use the gap to the fabric and turn it right side out. Now the comb and beak should be visible.
- Stuff your cotton filling through the gap so that it fills about ¼ of the hen, then add the rice.
- Sew the gap together.
- Turn the hen upside down and bring the opposite corners together.
- Make a triangular shape at the base of the hen, then sew a line about 1 ¾” down from the top of a triangle. This will fold under the hen so she can sit upright.
- Glue on the small red circles for eyes, then glue one googly-eye in the middle of each one.
These crafts are great for spring and Easter projects, simple gift ideas, or to help your child learn about farm animals. You can have fun with them and make them your own by switching up colors or adding silly features.
Comments
0 comments