If you’re celebrating St. Patrick’s Day, or you’re just wanting to do some rainbow-related crafts with your little one, there are lots of pot of gold craft ideas out there for you to try. We’ve picked some of the top projects for you to recreate with your child.
Pot Of Gold Coins
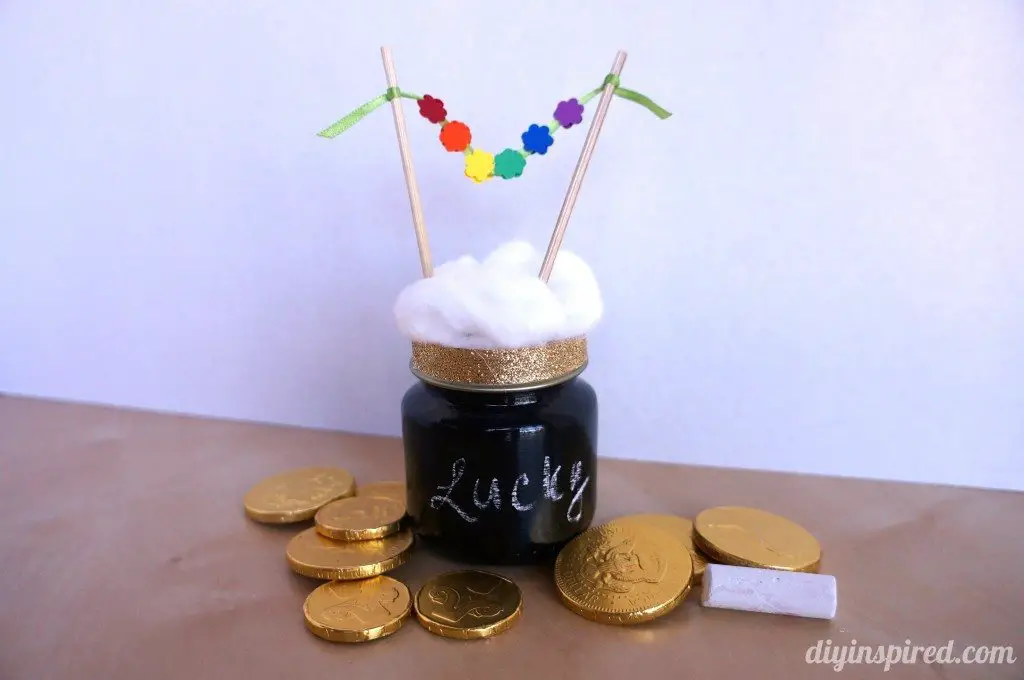 Note: I invented this craft based on one I did for my goddaughter a few years ago. It has some similarities to: https://diyinspired.com/st-patricks-day-craft-pot-of-gold/ but didn’t actually use this idea.If you want to make an actual 3D pot of gold, it’s easy to do! You can fill this with chocolate coins as a special treat for your little one, or use gold card circles to create the money inside it.
Materials
You are going to need:
- 1 rounded glass jar
- Black tissue paper
- Yellow tissue paper
- Paintbrush
- Glue
- Scissors
- Gold card (or chocolate coins)
- Black card
- Hot glue gun
- Pipe cleaners in each color of the rainbow
- Some newspaper
Step 1: Cover The Jar
The first thing you want to do is help your child turn the jar into a suitable pot of gold. The easiest way to do this is to cover it in torn-up tissue paper. Help your child to rip some pieces of tissue paper up, and then start gluing these to the jar.Keep layering up the tissue until you have covered the whole jar, and then set it in a warm place to dry. If you have added lots of layers, it may be best to come back to this craft in a while when it has had time to dry.
Step 2: Make The Rainbow
Help your child to glue the pipe cleaners into a rainbow, being careful not to let them burn their fingers on the glue gun. Pipe cleaners make a great 3D rainbow, but you can also create one out of colored cards if you don’t have pipe cleaners to hand.When your pipe cleaner rainbow is ready, put a slight curve into it; it is going to represent half of the rainbow, so you don’t need the full arc. Alternatively, glue another pipe cleaner to each of the ones you already have to make a longer rainbow, and then you can create the full arc.
Step 3: Make The Gold Coins
If you aren’t using chocolate coins, you will want to help your child cut lots of circles made out of gold cards. You can use a large-hole hole punch if you prefer; this will be much quicker. You don’t need to make enough coins to fill the whole jar; we’re going to put newspaper in, so the coins just need to cover the top layer.
Step 4: Add The Newspaper
Help your child to tear off some strips of newspaper and crumple these into balls. When your jar has dried, fill the bottom of the jar with these balls, creating a layer of paper. Next, you are going to lightly crumple and then glue in a layer of yellow or gold tissue paper; this will hide the newspaper and make a good background for your gold coins to sit on.When you’ve got a layer you are pleased with, get your child to help you fill in the rest of the pot using either gold coins or gold cardboard coins. Your pot of gold is nearly complete!
Step 5: Add The Rainbow
Glue the end of your pipe cleaner rainbow into the edge of the pot, so that the pipe cleaners look like they are plunging into the golden coins. Next, cut a small cloud or two out of the white card, and get your child to help you glue these near the top of the rainbow.
Step 6: Give The Pot Feet (Optional)
Cut some little semi-circles out of the black cards, and glue these around the base of the glass jar to finish off the pot and give it legs to stand on. You don’t need to do this, but it may make the pot look more finished.You could also cut some little clovers out of green paper and glue them around the edge of the pot.Sit back, enjoy your craft, and be prepared to start instantly replenishing those chocolate coins if you’ve used them!
Paper Pot Of Gold
 Source: https://www.ourkidthings.com/paper-pot-of-gold-craft/If the above craft is a little more complicated than you were hoping to do, you can also make a paper pot of gold with your child very easily.
Materials
For your paper pot of gold, you should get:
- 1 sheet of pale blue card
- Green pen
- Some black paper
- Some glittery gold card
- Paper in the colors of the rainbow (or rainbow pens)
- White paper
- Scissors
- Glue
- Pencil
Step 1: Cut Out The Pot
Sketch a rounded pot with a rim onto your black paper, and then help your child cut around this so they can glue it onto their blue background. They should glue it near the bottom, and they can then use the green pen to add grass or clovers underneath the pot.
Step 2: Cut Out The Coins
Cut some coins out of the glittery gold card. You can just cut semi-circles because they are only going to be peeking out of the top of the pot; you should also only need a few. Make them slightly different sizes so that they look like a pile of gold. You could also cut one whole coin to put on the floor next to the pot.
Step 3: Make The Rainbow
If you’re using colored paper, draw a wide arc on the color you are going to use at the bottom. Help your child to cut around this; this will be the base for all the other colors. Use it to draw a template on the next color, but make the arc slightly narrower.Do this for each successive color, until you are only drawing a small strip on the final color. You can then help your child to cut them all out, and carefully glue each successive layer to the one beneath it.If this is too complicated, you can also help your child to just create a strip for each color, but you may want a template to draw around so that the strips end up approximately the same width, with the same angle.You can also get your child to color the rainbow onto some white paper and cut this out, or use another medium, such as a rainbow ribbon or pipe cleaners as we did in the last craft. A curve of rainbow marbled paper would also work.
Step 4: Add The Clouds
Help your child to cut some puffy clouds out of white paper, and glue these around the scene. They may also want to draw or cut out a sun to stick in the background.The craft is now finished!
Felt Pot Of Gold
Note: I believe I also made this one up.If you want to do a very simple craft in felt, a pot of gold is another fun one that you can help your child create ““ and this could then be sewn onto a bag or outfit for decoration.
Materials
For this craft, you’ll need:
- Black felt
- Gold felt (yellow will also work if you can’t get gold)
- Strips of colored felt for a rainbow (optional)
- Piece of card
- Glue gun
Step 1: Cut Out The Pot
Draw a pot onto your cardboard. Cut around this, and use it as a template to draw on your black felt with. You are then going to glue the black felt to the cardboard; this will give your finished pot rigidity.If you want to sew the felt pot to a garment instead, omit the card from the instructions, and leave it floppy.
Step 2: Cut Out The Gold
You can either cut some circles from your gold felt, or simply cut a wiggly line that isn’t quite as wide as your pot’s rim. Help your child to glue this just behind the rim of the pot, creating the impression of a mound of gold coins.If you choose to cut individual coins, your child can pile them up and overlap them a bit so that they are all on top of each other, and then you can glue them into place.
Step 3: Add The Rainbow (Optional)
Help your child to cut some strips of the different colored felts, and then cut a wide strip of card to glue the felt to. This will allow the rainbow to stand up independently. If you are going to sew the felt pot to something, use a strip of thin fabric to glue the rainbow to instead.Glue the rainbow into the side of the pot.You now have a finished felt pot of gold, which you can either sew or glue to a bag or item of clothing, or keep just as a lucky felt pot of gold!
Conclusion
Pots of gold are great fun for kids to create, and involve lovely glittery gold materials, which most children love to use in their crafts. They are also nice and simple. They don’t require you to cut or shape anything very complicated. You can add little clovers to your crafts to represent Ireland and rainbows to make them bright, or keep them simple with just black and gold.
Comments
0 comments