Bird crafts are always fun, and if you’re looking for some great pigeon crafts, there are some amazing options out there to choose from, whatever age your child is. Some of these can be adapted to cover a particularly popular children’s book character; others can just be your average street pigeon.
Hadprint Pigeon
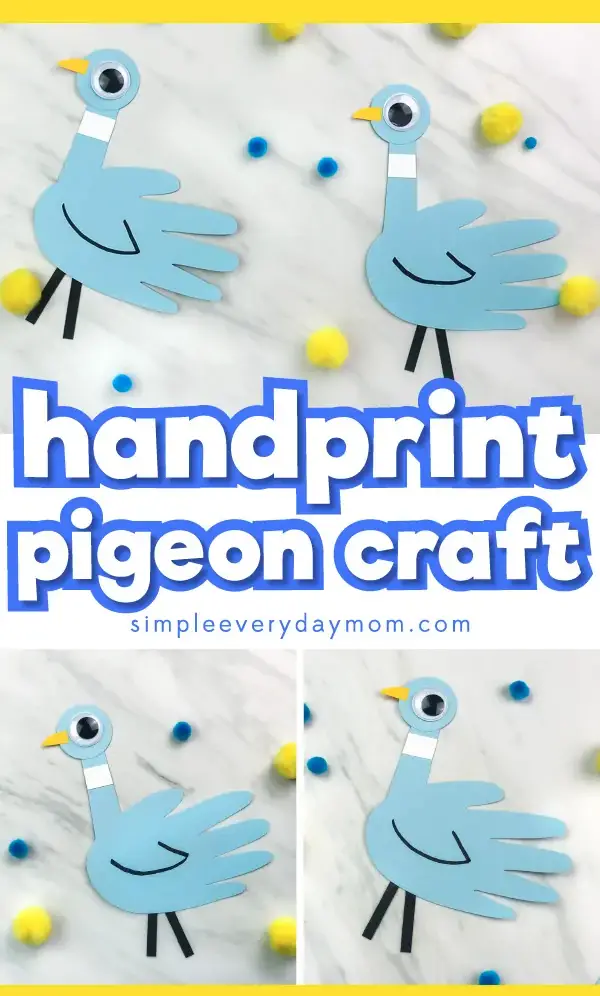
 Source: https://www.simpleeverydaymom.com/handprint-pigeon-craft/Kids love turning their handprints into things, and you can do so very easily for this pigeon craft ““ and if you don’t want to get paint everywhere, simply use a colored card and draw around the hand instead. This minimizes the mess and makes cleaning up very quick.We’re going to do the card version, but you can easily adapt this to include a painted handprint if you’d like to!
Materials
Your handprint pigeon will need:
- Gray card
- Black card
- Yellow card
- Glue stick
- Scissors
- Black pen
- 1 Googly eye
- Pencil
Step 1: Draw Around Your Child’s Hand
Get your child to put their hand on the paper, with their fingers naturally spread enough for you to draw between each one. Use a sharp pencil and go around their hand carefully. Their hand is going to be the body of the pigeon, with the splayed fingers serving as feathers.Next, from the palm of the hand, draw a neck curving up from the body. You can make this a long neck if you want to do a certain popular kid’s character (you may want to use a blue card for your pigeon if so), or keep it short if you’re aiming for a realistic pigeon.Once you’re happy with the shape, use the black pen to go around the edge and make it neat. Erase any pencil slips or overlapping lines.
Step 2: Cut Out The Pigeon
Now that you have your basic pigeon shape, grab the scissors and cut carefully around the shape you have created.
Step 3: Add A Head And Legs
Cut a circle out of your gray card, and then glue this neatly to the top of the pigeon’s neck. Cut two legs out of the black card (just thin rectangles will do) and glue these to the underside of the pigeon’s body.
Step 4: Finish Off
Get your child to draw a little wing on the side of the pigeon’s body; this can be very simple, or they can draw feathers if they want to.Finally, cut a beak out of the yellow card and help them glue this and the googly eye to the pigeon’s head.You’ve now got a lovely pigeon craft. Add your child’s name and the date to the back, and it’s complete!
Pigeon Hat
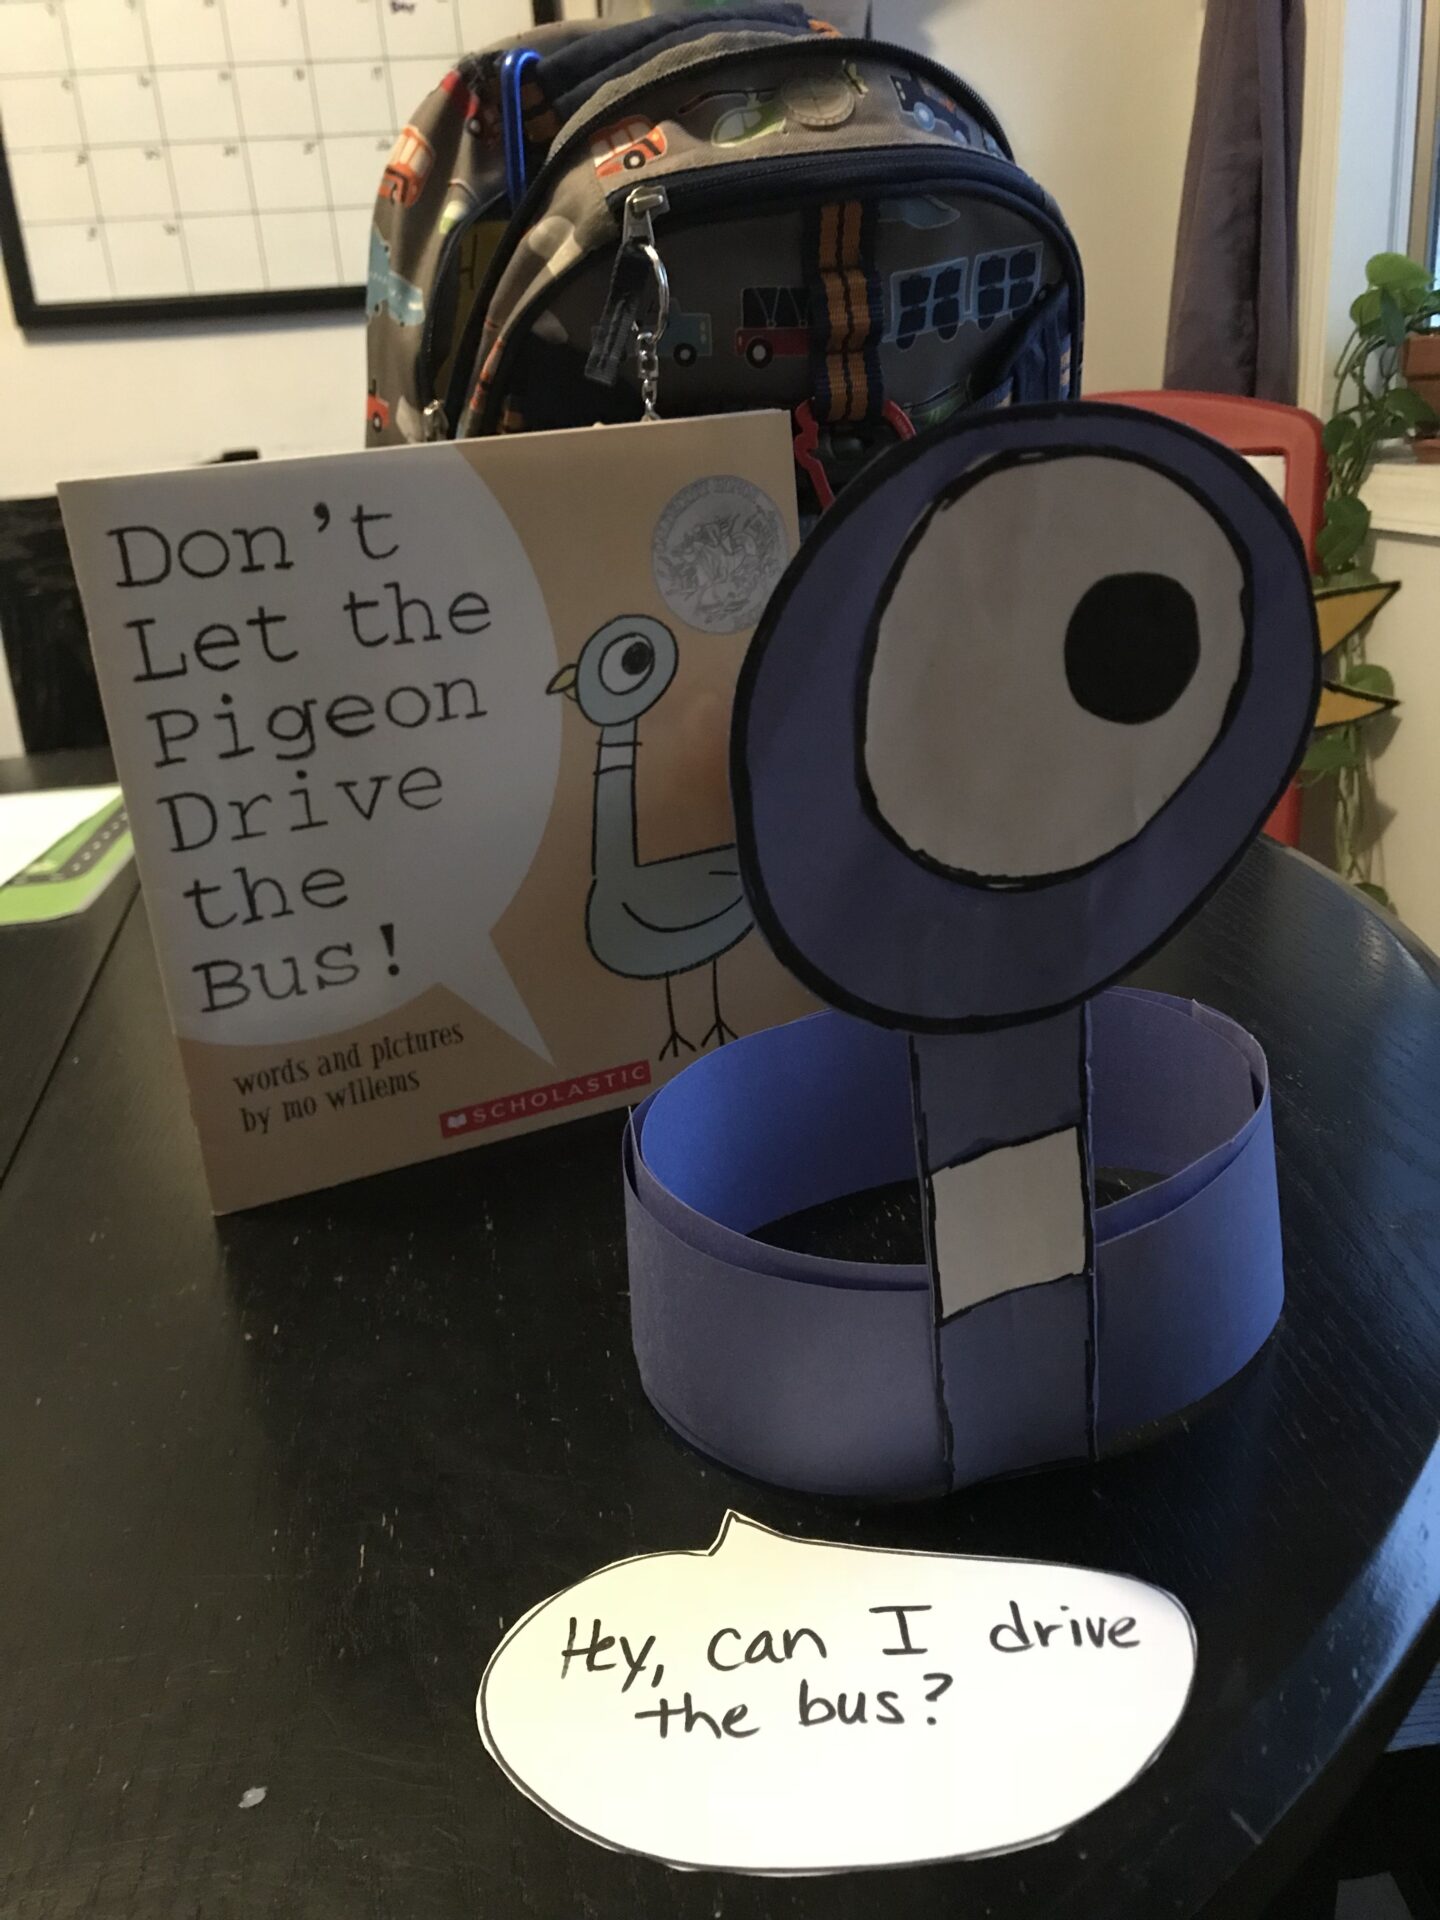
 Source: https://i.pinimg.com/originals/db/5f/ef/db5feffb11872034dc0f8c3718fa8aa0.jpgIf your child is a big fan of the pigeon book, you can do this in blue card; if you’d rather just make a normal pigeon hat, choose some gray card instead. These hats are great for themed parties and can be made very easily.
Materials
To make a pigeon hat, you will need to source:
- Blue or gray card
- White paper
- Black paper
- Yellow card
- Black pen
- Stapler or a glue gun
- Craft feathers (optional)
Step 1: Make The Headband
You are going to start by measuring some of the blue or gray cards to fit around your child’s head. You want a wide band, cut so that it will stay up but isn’t too tight to be comfortable.Use the glue gun or the stapler to fasten this in place, and then make sure it fits your child.
Step 2: Cut Out The Head
On the same color card, draw around a plate or something else circular to get a nice, large circle. You are then going to help your child glue this to the front of the headband you made, hiding the headband’s seam behind it.
Step 3: Add The Eye And Beak
Cut out a large white circle for the eye, and a smaller black circle for the pupil. Get your child to glue these to the bird’s face. Next, draw a triangle on the yellow card to serve as the beak, and use the black pen to draw a line down the middle.This should be glued to the side of the bird’s head, and you’ve now got a great pigeon headband, perfect for any pigeon party!
Step 4: Decorate With Feathers (Optional)
Your child might want to decorate the band a bit by adding some feathers around the edges. Choose ones that complement the chosen colors and help your child stick them on securely so they won’t fall off.
Pigeon With Moving Wings
If your child is fascinated by moving crafts, this is a great one to try with them. It’s pretty simple and involves minimal mess, but will give you an opportunity to show them how paper fasteners can be used to make crafts more interesting.
Materials
You will need:
- Stiff white card
- Coloring pencils
- Paper fasteners
- Scissors
Step 1: Draw A Pigeon
You might want to use a picture of a pigeon from the internet as a guide; you are looking to draw the pigeon in profile, with its head at one side of the craft and its tail at the other. You don’t need to spend ages getting the shape perfect. Simply sketch a curving body, with a pointed tail at one end, and then a rounded chest, neck, and head at the other. Add some legs at the bottom.
Step 2: Let Your Child Color It
Get out some coloring pencils and help your child to color in the pigeon. Pull up some pictures of pigeons to help them get the colors in the right places, and talk to them about why pigeons are colored in certain ways.
Step 3: Draw Two Wings
Next, on a separate piece of card, draw two wings. These should be a little smaller than the pigeon’s body, and again, you can draw very simple wings, or spend a bit more time detailing the feathers and shape.Help your child to color these in, too.
Step 4: Cut The Pigeon Out
Cut around the pigeon and the wings, and then use a paper fastener to attach the first wing to the bird’s back. The wing should be placed in front of the pigeon’s body. Fold the ends of the paper fastener over and check that the wing moves properly before adding the second wing.The second wing should be positioned behind the bird’s body.Your pigeon is now complete! Your child can add further details if they want to, and you could consider hanging this up somewhere, but you’ve now got a pigeon with moving wings.
Cupcake Case And Popsicle Stick Pigeon
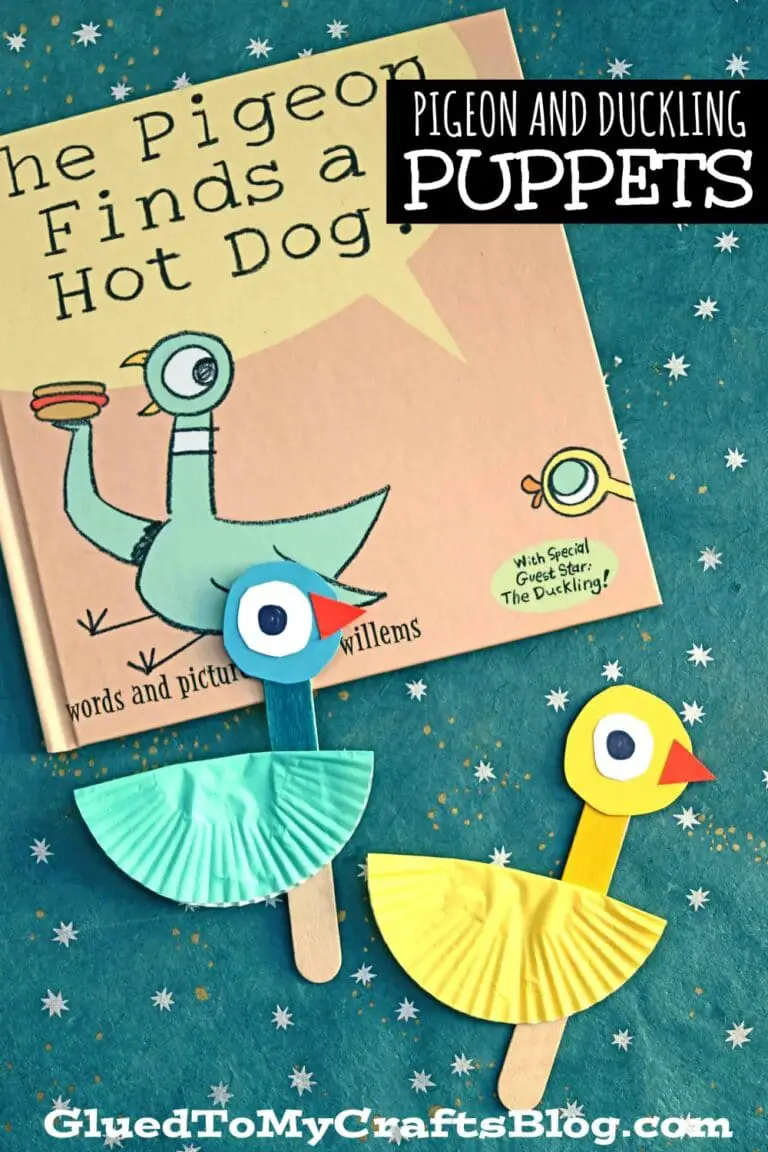
 Source: https://www.gluedtomycraftsblog.com/2016/05/cupcake-liner-pigeon-duckling-kid-craft.htmlThat sounds instantly delicious, and these are a great craft to do at a party or to use up leftover party supplies. It doesn’t matter too much what color your cupcake cases are; your child will have fun with this craft, even if their pigeon isn’t quite “pigeon-colored.”
Materials
You will need:
- Cupcake case
- A Popsicle stick
- Paint (the same color as your cupcake case)
- Card (the same color as your cupcake case)
- Glue gun
- White glue
- Scissors
- Yellow card
- White paper
- Black pen
Step 1: Paint The Popsicle Stick
Start by getting your child to paint the Popsicle stick the same color as the cupcake case. They should just paint the upper half of the stick; the lower half can be left plain, or painted yellow or black.
Step 2: Glue The Cupcake Case On
Help your child fold the cupcake case in half so that you get a frilled edge at the bottom, and a flat edge at the top. This is the pigeon’s body. Glue this to the Popsicle stick, with a little overlap at the front to create a fluffy chest for the pigeon. The plain bit of the stick should be below the frilled feathers.
Step 3: Make The Head
Cut a circle from your card, and let your child position this at the top of the Popsicle stick. Add a dot of glue so they can stick it in place.Next, cut a circle of white paper for the eye, and stick this in place so they can draw the pupil in with the marker pen.Cut a triangle of yellow cards and add this as the beak. Draw a thin line along the length of it to divide up the two halves of the beak.
Step 4: Draw On The Feet
Finish this craft up by drawing a line down the plain part of the Popsicle stick, and then drawing some little splayed lines to make bird feet. These can be very simple; they will just make the craft look finished.Now, your child has a Popsicle stick pigeon. Choose a whole range of different cupcake cases and you can end up with a flock of rainbow birds of every kind.
Conclusion
Pigeon crafts can be great fun for any age, whether you want something simple, with minimal mess, or a more involved craft where they can get covered in paint. Have fun thinking about how to represent a pigeon’s wings, and talk to them about the history of pigeons and why they are significant to people. There’s a lot for us to learn about these extraordinary birds!
Comments
0 comments


