Minnie Mouse is a very beloved children’s character, and if your child wants to create some Minnie Mouse crafts, there are some great choices to select from. You can make things to decorate your child’s room or just have fun creating together ““ it’s up to you!
Minnie Mouse Bookends
Are you looking to decorate your child’s bookcase with a character they adore? You can make a pair of Minnie Mouse bookends easily, and your child can help!
Materials
For Minnie Mouse bookends, you will need:
- 1 pair of bookends (preferably plain wood or metal ones)
- Glue gun
- Stiff red or pink card
- Stiff black card
- White paint
- Black paint
- Paintbrush
- Scissors
- 1 cork
- Pencil
- Masking tape
- Googly eyes (optional)
Step 1: Draw Your Template
You may want to use a plate or something else circular to draw around to create the shape for Minnie Mouse’s head. Draw around onto your pink card, and then cut this out. This will be the main piece you are working on.You will want two of these ““ one for each bookend. However, if your child’s shelf is set up so that only one bookend will really be visible, you might choose to just do one.
Step 2: Divide The Card
Put your large pink circle on a flat surface. Tear off a strip of masking tape and paste this along the circle so that its top edge is on the halfway point. You are then going to help your child paint the upper half of the circle black. Set the circle aside to dry. You want to paint the other side when it has dried.
Step 3: Cut Out The Ears
Next, Minnie Mouse needs some ears. Use a saucer or side plate to draw around to make two smaller circles. You are going to cut these out and set them aside for now.
Step 4: Add White Spots
When your black paint has dried, put the main circle back in front of you, and dish out some white paint. You are going to help your child use the cork as a stamp to create white circles all over the lower half of the circle ““ the pink half. These will be the spots on Minnie’s dress. You can also cut out white paper circles and stick these on if you prefer, but it will take more time.Let the paint dry on one side, and then do the other side.
Step 5: Cut Out A Bow
While your paint is drying, sketch a little bow on another piece of pink card, and then cut this out. Get your child to add some more dots of white paint to this. They can just paint these with a brush as they should be small enough not to matter if the circles aren’t very neat.Do both sides of the bow and set it aside to dry.
Step 6: Glue The Ears On
Glue the ears to the circle, in the black section. You can use a glue gun or white glue to fix them in place. Glue the bow between them.
Step 7: Finish Off
If you want to add googly eyes to one side of this craft (the side that faces away from the books), you can now do so. The bow should also be stuck on this side.Finally, use the glue gun to stick the bookend to your Minnie Mouse cut out, and you’ve got a gorgeous Minnie to guard your child’s bookshelf.If you want to vary this craft a bit, you could add a real polka dot ribbon to the top, or include some glitter or sequins to make it sparkly. Once you’ve got a basic shape with Minnie’s distinctive colors anything will work!
Minnie Mouse Pencil Holder
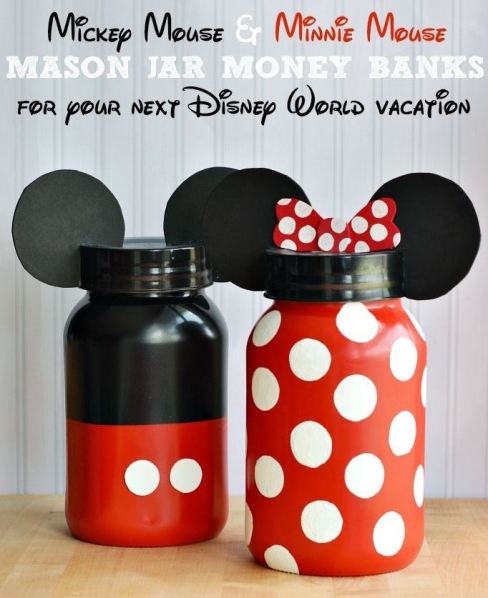 Source: https://kimberleymarriott.wordpress.com/2015/04/14/hello-world/If your child needs a simple desk tidy, it’s easy to make this Minnie Mouse themed, and that may even encourage them to put coloring pens away when they’ve finished with them ““ you can at least hope!
Materials
For a Minnie Mouse pencil holder, you’re going to need:
- 1 plastic cup
- 1 metal weight (optional)
- Red paper
- White paint
- Paintbrush
- Scissors
- Black card
- Glue gun
Step 1: Glue The Weight To The Cup
You don’t have to include weight in this craft if you can’t source one, but having something to make the cup heavy will prevent it from toppling over too easily. You can also use a heavier cup or a glass jar, but these are in danger of shattering if your child drops it, so may not be very child-friendly.If you can’t find a weight, see if you can drop something heavy into the bottom of the cup that they won’t need to remove ““ this will help it to stay upright. Alternatively, blu-tack the cup to the desk when the craft is finished.
Step 2: Paint On Circles
Spread out your red paper and get your child to help you paint some white circles on it. You can use a cork or another circular object to stamp these on or paint them free-hand. If you have a red plastic cup, you may find that it’s easier to just paint white circles straight onto the cup, rather than covering it in the paper. If so, make sure you use paint that will stick to the cup ““ test a bit before you start.
Step 3: Add The Ears
Cut out some circles of stiff black cards, and line these up with the top of the cup. You want to stick them mostly to the sides so that they won’t keep getting knocked as your child takes pencils out and puts them back.Angle the ears so that only a little bit of them overlaps with the cup’s opening, and then glue them to the edges of the cup using the glue gun. You can cut slots in them or fold a flap over if it helps to get a better join.
Step 4: Add The Bow
Minnie’s bow is an iconic part of her look, so next, cut a small bow out of the red card, and get your child to add some little paint spots to it. Draw some folds and pleats and the knot in the center, and then glue this to the front of the cup. Again, try to glue it low down so that it won’t keep getting jostled as the pen pot is used.
Minnie Mouse Sponge Painting
Source: https://www.youtube.com/watch?v=k6mP87nmPZcIf you’d rather do a 2D craft with your child, there are lots of options too. You can use a paper plate to get a good shape for Minnie, plus two circles of black cards for ears.
Materials
To create a Minnie sponge painting, you’ll need:
- 1 paper plate
- Black card
- White card
- Scissors
- Glue
- Pencil
- Red paint
- Black paint
- White paint
- Sponge
- Paintbrush
Step 1: Make Minnie’s Face
If you don’t have a paper plate, simply draw a large circle around some white card. On the black card, draw two smaller circles for ears, and then glue these to the back of the large circle (or paper plate). Finally, cut out a bow from the white card, and glue it between the ears.
Step 2: Painting
First, dish out some red paint for the lower half of the circle. You may want to draw a line across or put some masking tape to make it easier for your child to find the middle.Help them sponge some red paint all over the bottom half of the circle. They can also use the paintbrush to fill in the edges if they like.
Step 3: Continue Painting
While the red paint is drying, wash the sponge out thoroughly and then turn the craft around so you’re working on it upside down. Remove the masking tape and help your child use the sponge to paint the top half of the circle black.Next, move onto the ears. See if your child can manage to go around the bow without touching it; this is good practice for them.When they have finished, wash the sponge again and then help them to sponge the bow in red, trying to stay within the lines.
Step 4: Paint The Spots
When the lower half of the painting is dry, your child can use the sponge to add white spots to Minnie, going all over the lower half of the plate. They may want to use the paintbrush to add the bow’s spots (when the paint is dry).The craft is now done! Wash up the paints, set the painting somewhere to dry, and then admire it with your child.
Conclusion
Minnie crafts can be great fun, and you can take advantage of her iconic shape and color scheme to avoid having to draw or make anything complicated. Whether you want to create 3D art or just have a quiet afternoon doing some painting with your child, Minnie Mouse crafts are a fantastic way to do it!

Comments
0 comments