What kid doesn’t like to completely plaster their body with awesome tattoos? They’re fun, expressive, and disappear in a few days. Unless you’re letting your kids get the real thing…
Did you know about this tattoo paper? It’s such a good idea- you can turn your kids’ drawings into their very own body art. I knew this would be a hit here, but I wasn’t sure what the quality would be- it’s fantastic. Fen and I both thought it out-performed the pre-made tattoos.
Here’s exactly what I did to get a full sheet of tats. The pack comes with only 2 sheets, so you’ll want to make sure you maximize the space! (BUT, don’t feel like you have to use the same technique I did- go ahead and scan a piece of paper your kid had doodled on and print that out if you want to go low-stress.)
Materials:
- Silhouette Tattoo Paper
- Markers
- Paper
- Scanner/printer
Have your kids draw little thingies. I wanted to include some of Beckett’s robots he’s been drawing, but he has been in a ‘scribble everything out right after I draw it’ phase.
Scan the thingies in to your computer, and crop and save each one in basically a square crop. I cleaned up the backgrounds to ours by just erasing whatever extra marks were in the crop.
I used PicMonkey for this, which if you haven’t played with yet, you NEED to. It’s my favorite and I’m on it daily. In fact, there’s always a tab on my computer open to PicMonkey.
*************
Click on Create a Collage and upload your images. Use the Square Deal setting and click on the option with the most squares.
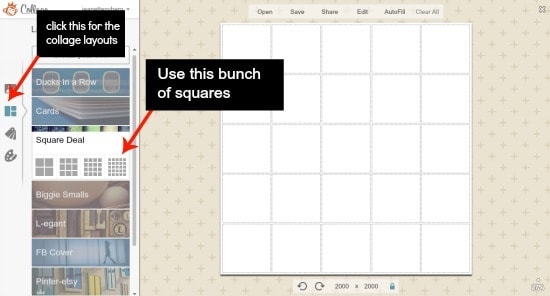
Drag your images into the squares, keeping a 4-across, 6-down ratio. To do this, delete a column of squares by clicking the x in each box. Drag an image from the left below each square at the bottom to add in the extra row down there.
I boosted the color saturation for each of the images to make them ultra-cool.

Don’t forget to flip the image in your computer before you print it, so it shows up the right way when it’s applied. Print it on the glossy side of the paper on the photo setting.
Let the ink dry and apply the sticky blue sheet to the front of the print, as directed. I used the back of a wooden spoon to burnish the sticky sheet onto the print.
*** You do NOT need to follow all of the directions on the paper package. There is no need to use special software or buy fancy cutting things as they direct***
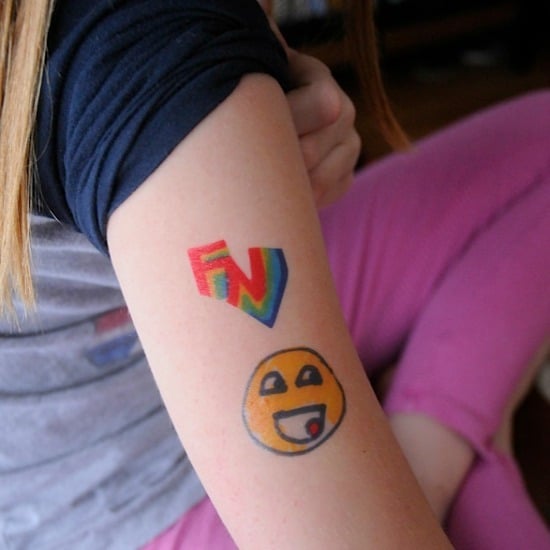
Cut each tattoo out and apply it with a damp towel like you have done a thousand times before. These only take about 10-15 seconds to transfer onto the skin.
Comments
0 comments
This is genius! Love the artwork too!
Ha! thanks, Danielle. I’ve had this paper sitting around forever and we only just got around to making these. So fun.
These are awesome! What a great way for kids to “wear” their drawings. I love it!!
Thanks- and I can now report that they come off pretty easily in a couple of days. We were really impressed with the quality!
Good to hear they hold up a few days – but do come off easily – I can’t wait to give them a try someday. My daughter loves temporary tattoos!
Of course, now that we did this project, we keep thinking of millions of things we want to make tattoos of!
So very tempted! Didn’t know about tattoo paper before reading your post!
I love discovering these new weird materials!
I ALWAYS forget to flip stuff like this! This would be a fun birthday party activity I think.
I think I need to check out pic monkey too!
Definitely check out PicMonkey. I think even though you are a graphics superstar, you would enjoy PicMonkey.
This is so cool. I need to do this with my younger son. He loves to cover himself with tattoos. My oldest, however, has always run screaming. The first and only time I put one on him, he cried at the top of his lungs until I removed it.
Sweet tattoos! These are good for adults who are squeamish about getting the real thing too, right?
Yes, yes, exactly. Especially that full-back tattoo I know you’ve been debating.