Polar bears are amazing animals, and extremely popular with kids. They look so cute and cuddly, and your child has ever had the good fortune to see them at a zoo or sanctuary, or even just in a film, they might be very keen on finding some polar bear craft projects.So, what are the top polar bear preschool crafts?
Toilet Tube Polar Bear
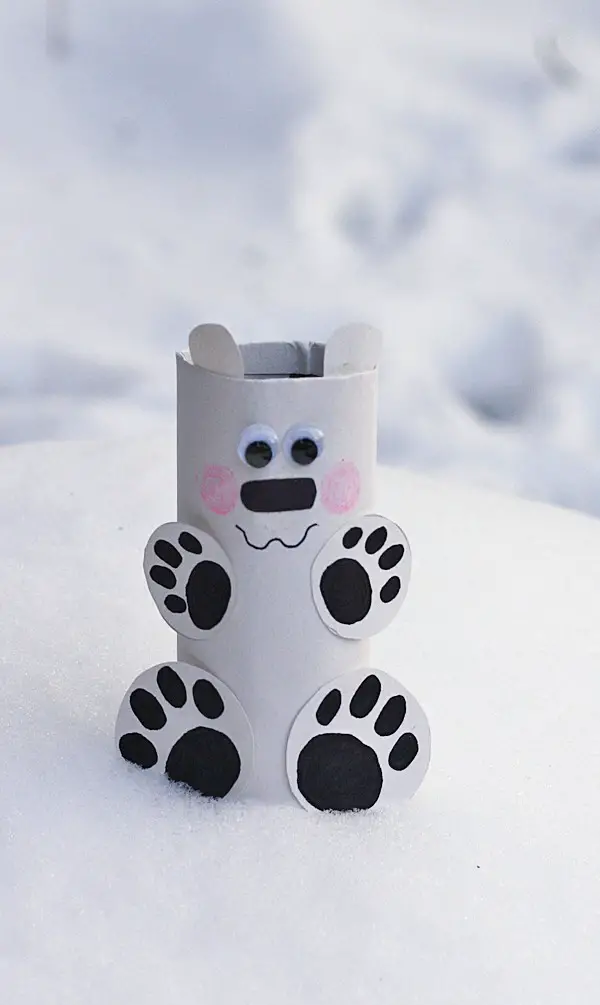 Source: https://craftsbyamanda.com/cardboard-tube-polar-bear/Toilet tubes offer endless crafting opportunities, and you can make a lovely little polar bear mascot for your child using one. This would look so nice standing on a desk or bedside table.
Materials
A toilet tube polar bear will require:
- An empty toilet tube
- White paint
- A paintbrush
- Glue
- Googly eyes
- Four mini white pom poms
- White card
- A black marker
- Scissors
Step 1: Paint Your Tube
First, help your preschooler paint the toilet tube white all over. They don’t need to paint the inside, but they can if they would like to.
Step 2: Cut Out The Ears
While the toilet tube is drying, cut out two little circles from your white card and help your toddler draw an inner circle on them to make the polar bear’s ears. Once the paint is dry, stick these ears to the inside of the tube.
Step 3: Add The Face
Help your child glue the googly eyes to the tube, a little way below the ears you have just added. Next, take your marker pen and draw a heart-shaped nose and a smiling mouth beneath. You can either add a curved mouth or do a mouth like a cat’s mouth.
Step 4: Add The Paws
Glue the mini pom-poms to your bear next. You should glue two near the top of its body, and two near the bottom. When they have stuck, use the marker pen to draw some paw prints on them: a big circle near the bottom, and four little ovals above to represent the toes.If you don’t have pom-poms, you can also make these feet out of white cards. Your preschooler’s polar bear is now finished! They may want to give him a name and find an ice floe of cotton wool for him to stand on.
Cotton Wool Polar Bear Face
If your child enjoys having fun with cotton wool, this is the perfect craft for them. It would also make a gorgeous decoration for the Christmas tree when the right time of year rolls around.
Materials
To make a cotton wool polar bear, you will need:
- Stiff white card
- A mini black pom pom
- A black pipe cleaner
- Some scrap black card
- Cotton wool
- Scissors
- Glue
- A pencil
Step 1: Cut Out Your Circles
First, you are going to cut out a circle of stiff white cards. This is going to be the polar bear’s face, so don’t make it too small. You may find that it helps to draw around something like a bowl or small plate to get the circle neat. Next, cut out two smaller circles; these are going to be the ears. Glue them to the back of the plate.
Step 2: Cover In Cotton Wool
Help your child to dip little balls of cotton wool into the glue and apply them to the big circle and the ears. They should aim to cover the whole surface. You can tease the cotton wool out a bit to make it go further if you don’t have quite enough, or fill in any gaps with white tissue paper instead.
Step 3: Cut Out The Eyes
Grab your black card and cut out two small black eyes, and let your preschooler stick these to the tissue. Next, cut out a heart-shaped nose and help them to stick this in the middle.
Step 4: Add The Mouth
Cut your pipe cleaner in half and then bend one half in half again, and twist it together up to the ends. Curve the ends around to form a smile, and then help your child glue this into place on the polar bear’s face. Trim the ends if they are too long.You can also use a black card if you don’t have a pipe cleaner.If you want to hang this polar bear on the Christmas tree, add a loop of yarn or cord at the top to turn it into an ornament.
Polar Bear Handprint
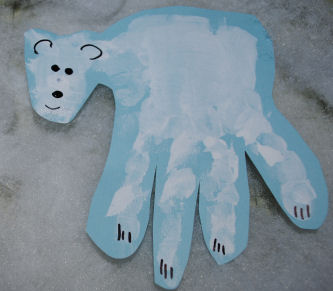 Source: http://www.lovetosew.com/polarbearhandprint.htmHandprint art is a wonderful thing to do when your child is small; it’s fun and easy for them, it doesn’t take much time, and they’ll love it. Polar bear handprints are very straightforward, and they also make a great party activity.
Materials
You’re going to need:
- Black card
- White paint
- A paintbrush
- A black pen
- Tiny googly eyes
- Cotton wool (optional)
- Scissors
Step 1: Make The Print
Get your sheet of black card ready and pour out a little bit of white paint. Help your child to dip their hand carefully into the paint, and use the paintbrush to get paint on their palm if they need a bit of assistance.Next, help them print their hand on the paper. It’s best to make several prints; you can always make a few more polar bears, and this will make sure you get at least a few good ones. When they’ve finished, wash their hands straight away so you don’t end up with white paint everywhere.
Step 2: Cut The Bear Out
Once the paint has dried, cut a loose outline around the print, leaving a border of black to help it stand out. Alternatively, cut a big square around the print, and add some little stars with flecks of white paint to make a bigger scene.
Step 3: Draw On The Details
Your child’s thumbprint is going to be the polar bear’s head, while the four fingers are its legs.Take your black pen and draw on two little ears, a nose, a smile, and lines to mark the paws. Get your child to stick the googly eyes on its face, and add a little dab of extra white paint for the tail.
Step 4: Cotton Wool Fur (Optional)
Next, you can help your preschooler fluff up the polar bear with a bit of cotton wool if they would like to. Try not to obscure the handprint, but just add a few little puffs of the cotton wool to make your polar bear fluffy and cuddly.
Step 5: Paint Some Snow (Optional)
If you’ve cut a bigger square or oval around your polar bear, rather than cutting closely around the handprint, get your toddler to paint a little strip of white under the polar bear’s feet so they have something to stand on, and then the polar bear is finished! These would make lovely Christmas cards, or you could add a string to the top and use them as decorations for the Christmas tree.For the last detail, add your child’s name and the date to the back of the handprint so you’ll know how old they were when they created it.
Conclusion
Polar bear crafts are perfect for winter, but you can have fun with them all year round. Your art sessions don’t need to be complicated or involve great masterpieces; just get out the glue and paint and have some fun together.
Comments
0 comments