
Mistletoe is a big part of Christmas, and it has an iconic and very beautiful aesthetic that can be great fun to transfer to your crafts with your children. You don’t have to bring real mistletoe into the house to enjoy the romance and elegance that this plant lends to Christmas ““ you can make your own!Below are our top mistletoe craft ideas to do around Christmastime.
Felt Mistletoe
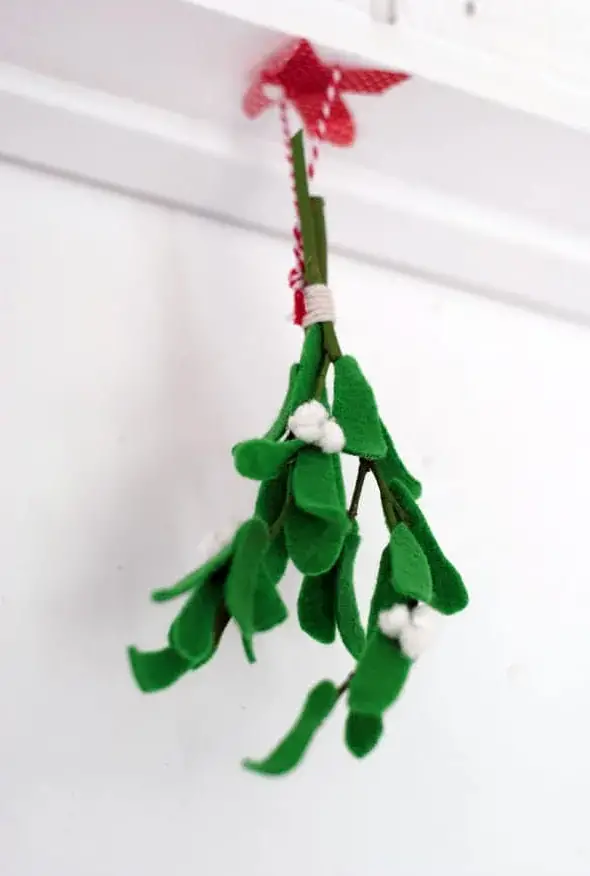 Source: https://diycandy.com/how-to-make-felt-mistletoe/How about creating a mistletoe decoration that you can hang up year after year after year, and enjoy some fond memories of creating it with your little one every time you do? These bunches of felt mistletoe are super durable and will last forever, and they are also a fun project to do with your child.
Materials
You are going to need:
- Green felt
- Green acrylic paint
- Paintbrush
- Mini white pom poms
- Sharp scissors
- Green cotton thread
- Hot glue gun
- Some twigs
- 1 elastic band
- 1 pretty ribbon (optional)
Step 1: Paint The Twigs
Help your child to give the twigs a good coat of acrylic paint, and then set them aside to dry on some newspaper.
Step 2: Cut Out Felt Leaves
Mistletoe leaves are long ovals, thinner at one end than the other, and slightly curved. If your child is old enough to handle scissors, get them to help you cut out some leaves in different lengths and thicknesses so that you get a good bunch of natural-looking leaves.You can use both a dark and light green felt if you like for this part or just one color.
Step 3: Glue The Leaves To The Twigs
If the twigs are dry, it’s time to start shaping your mistletoe. Heat your glue gun up, and put a dot of glue on one of the nodules of your first twig. Glue a leaf to it, with the broader end hanging down.Repeat this process until your twig is covered in dangling leaves, bunching and curling in all different directions.When you’re happy with your mistletoe leaves, you can glue on the white pom poms. These should be bunched up into groups of three, to reflect real mistletoe. Get your child to help you decide where to position them, and don’t add too many ““ just a few will be perfect.If you don’t have any white pom poms, you can either use cotton wool (break the balls down into smaller, round tufts), or some shiny white beads. Beads will be the most durable option, so if you have something suitable, they would make a lovely addition, and would nicely catch the light as well.You are going to make several bunches of mistletoe with this method, using all the twigs you collected, so that your mistletoe looks bushy and pretty ““ just one bunch may have a slightly anemic effect. Collect them all together and use the elastic band to hold the twigs in a bunch.
Step 4: Add A Decorative Ribbon (Optional)
You can now tie a pretty ribbon around the stems of the mistletoe to hide the elastic band and unify all the bunches into one craft. The ribbon will also add a splash of color, but you don’t have to use one if you would prefer to leave the mistletoe plain; just choose a green elastic band so it won’t show up.
Step 5: Hang The Mistletoe Up
The point of mistletoe is to hang it in doorways, so you now need to create a loop to suspend your mistletoe from. Tie some green cotton around the mistletoe (at the bottom of your twig, since mistletoe hangs upside down).Keep the thread short so that your mistletoe will hang close to the ceiling and not seem to float in mid-air. Tie a little loop on it, and then lift your child so that they can hang it up and admire the craft they have created with you.
Mistletoe Footprint Bag
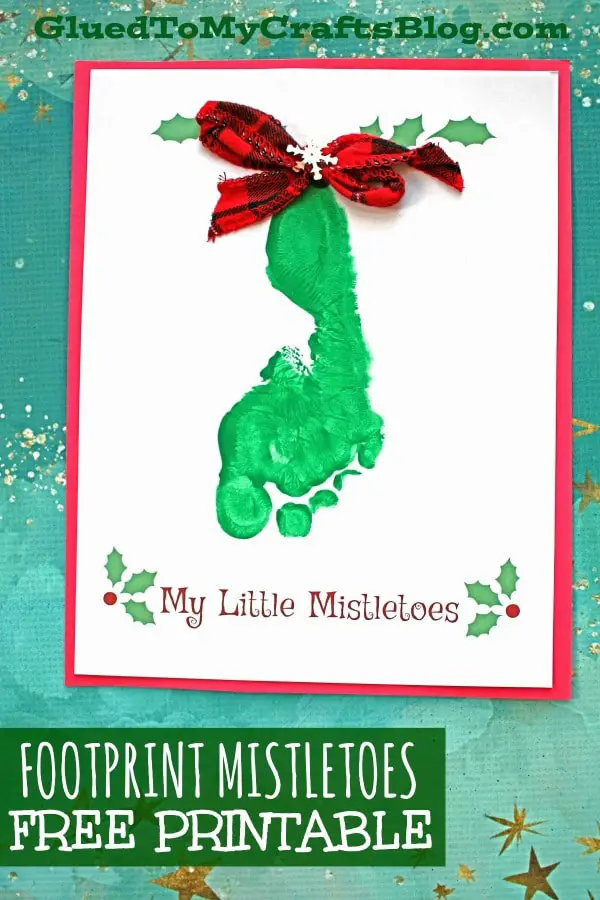 Source: https://www.gluedtomycraftsblog.com/2017/11/little-mistletoes-footprint-keepsake-printable.htmlIf your child wants to create a Christmas-y gift for a special someone, a mistletoe footprint bag is a lovely idea and can be a beautiful memory of your child’s tiny feet. It’s also a simple craft for even small children to engage with.
Materials
You’re going to need:
- 1 plain white bag
- Green fabric paint
- White fabric paint
- Paintbrush
- 1 red ribbon (optional)
- Fabric pen
Step 1: Print The Bag
First of all, decide if you are going to make a single footprint mistletoe, or print both of your child’s feet. Prepare your space with newspaper and make sure you are working on an easy-to-clean surface so your child won’t ruin a nice carpet by wandering around with painty feet. Get a bowl of water ready to wash them.When you’re all set, sit your child on a chair and help them to dip their feet in the paint. Use a paintbrush to spread the paint out evenly.Do a couple of test prints on some newspaper to see the effect before you print onto the bag. Once you’re ready, check the paint is even on your child’s feet, and then help them to step onto the bag carefully, getting their feet in the center. Remember that their toes are the bottom of the mistletoe, and don’t get it the wrong way up!Lift them off so they don’t smudge the paint, and wash their feet promptly.
Step 2: Add The Berries
When the paint on the bag is dry, use your paintbrush and the white fabric paint to add some mistletoe berries in little bunches of three on the bag. Again, you may want to practice on paper or newspaper first.Follow any directions that the fabric paint suggests for sealing and setting the paint.
Step 3: Write Your Message
Once the paint has dried, use a fabric pen to write your child’s name and age on the bag, along with any message you wish to add (e.g. “Merry Christmas”).
Step 4: Add The Ribbon (Optional)
Tie a bow in a red ribbon, and then sew or glue it to the bag, just above the heel of your child’s foot. This will add a splash of Christmas-y color, but you don’t have to include it if you would rather leave the bag plain.You now have a gorgeous memento of your child’s tiny feet, immortalized in a beautiful and practical craft. You could make a whole load of these for Christmas gifts, or keep the craft yourself as a special memory.You can also print footprint mistletoes on anything else, including just plain paper (use acrylic paints rather than fabric paints if you’re using paper/card). You can make Christmas cards, or frame the footprints as a record of your child.
Painted Mistletoe
Note: I believe I came up with the idea for Painted Mistletoe, based on one of the pictures on this page: https://thepinterestedparent.com/2016/11/holly-and-mistletoe-arts-and-crafts/If your child enjoys painting, they might want to paint a mistletoe picture. If so, print out a picture from the internet so they have something to copy, as the shape can be a bit tricky to grasp.
Materials
For this craft, you’ll need:
- 1 sheet of good-quality paper
- Green paint
- Paintbrush
- 1 red ribbon
- Cotton wool
- White glue
Step 1: Paint The Mistletoe
Help your child to paint some mistletoe onto the paper. You can sketch an outline in pencil for them to follow if necessary, or just let them experiment with the shape. They can always start again if they aren’t happy with their first attempt. Show them how to paint long lines, with a slightly flatter curve at the bottom. It may take them a few tries, but they will get there in the end.When they are happy with the picture, set it aside to let the paint dry before moving onto the next step.
Step 2: Add The Berries
Next, take a ball of cotton wool, and tug some tufts off it. Show your child how to roll the cotton wool between their palms to create a smaller ball, which can then be glued to the paint to give your mistletoe craft some extra texture.Group these mini cotton wool balls in threes on the bunch of mistletoe. Your child can then use white glue to stick them down, or you can add some little dots of glue from a glue gun to speed things along a bit if they are getting impatient.If you want to keep this as a painting-only craft, just get them to add some blobs of white paint once the green paint has dried fully.
Step 3: Add The Ribbon
Tie a bow in the red ribbon, and then glue it at the top of the picture, across the mistletoe’s stems if possible. Alternatively, give your child a blob of red paint, and get them to paint a ribbon there instead.Write their name and the date at the bottom of the painting, and this craft is complete!
Conclusion
Mistletoe craft can be great fun and gives your child an opportunity to look at and understand how different plants grow and shape their leaves. Have fun playing with different mediums, and mixing paints with cotton wool or ribbon to create textured crafts that can be used to decorate the house come Christmas.
Comments
0 comments